Nesting slatted benches

Stevenski

Member
Joined
Jun 1, 2024
Messages
37
My son-in-law who is (was) a lawyer has decided to launch a new venture - small gyms.
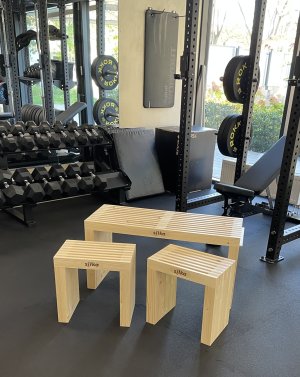
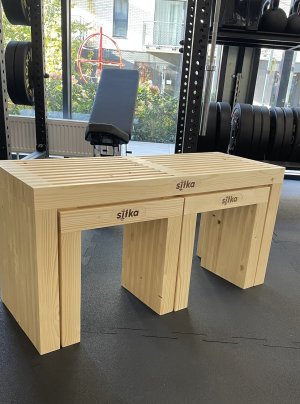
He asked me if I could help by making some stuff to fit it out so I made some nesting benches which I think will be useful and versatile.

Simple construction technique using pine battens dimensioned down to 60x18mm on the table saw

I branded them with his logo by milling out a pocket and inserting a laser cut and etched blank of 2mm ply wood

They are very sturdy despite looking light. The large bench actually weighs almost 18kg! I guess they could also be used for bench presses.... (pun intended ;) )
1.jpg

2.jpg
 
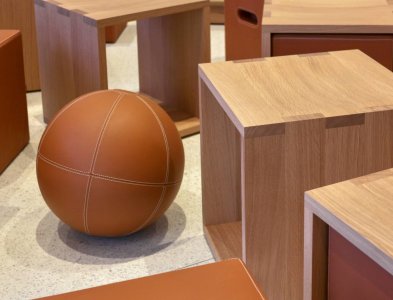
I was quite taken with the Apple Store benches ((cubes, actually), but I might like these pine benches even more. Nice.

With the Apple benches, if every board is exactly the same width, and exactly the same length, then building them Is just glue-up. I’ll have to spend some time with the Sitka bench images to figure out how they were made.

1761093559490.jpg
 
I’ll have to spend some time with the Sitka bench images to figure out how they were made.
I made this video to share with my son-in-law, maybe it will help explain.

It's a very simple (and repetitive) process of layering up 2 types of layers 1) a full inverted "U" shape; 2) full height spacer battens on either side every second layer. On the longer bench I added a spacer square in the middle for added rigidity. Each piece is glued, tacked and screwed to the previous layer (except the final layer which is glue only to keep it clean)

everything is made of 60x18mm stock.
The smaller benches are square and made up from 2 different lengths: 430mm and 370mm
The larger bench is made up from 3 different lengths: 500mm, 440mm and 1000mm
(The difference in sizes obviously being the width of stock used - in my case 60mm)


Thanks for that. How do you apply a finish? Pine will soil quickly without a clear coat. I assumed you would pre-finish the slats, but it does not appear that you did so. And I bet it was a race to assemble.
 
I like it!

I'm curious how you dealt with slippage while gluing. From the vid, it looks like you did it by feel then tacked in place? The seams are hardly visible and the corners look nice and square. Good job.
 
And I bet it was a race to assemble.
Haha! Yes, I can see why you might think that. Especially with the Timelapse giving a Benny Hill vibe to everything (if that reference means anything to you?)

In fact it is a very calm and stress free process. Glue is only in fact applied to the longest vertical battens so you only have max 2 pieces with glue in play at any given time. Plenty of time to get each piece glued, squared, tacked and screwed in place.

Additionally the nature if the construction - layers - means that you can in fact pause anytime you want to and come back to it later. I just chose to do the large bench in one go (it took 60 minutes). With the smaller benches I took breaks for dinner and overnight rest :) I just wrapped the roller in a plastic bag, popped it into the fridge and poured any glue left in the tray back into the pot.

The only "stress" came from a) making sure to keep everything level and square to avoid any drift or cumulative errors. Double checking before screwing and checking with a square took care of that; and b) despite having system in my head for where to place screws on each layer to avoid "double decking", I still managed to get lost a couple of times and find a screw in the lower level with my drill bit duh! I had one drill chucked with the Festool counter sink pilot bit for pre-drilling and another chucked with a T20 bit for the screws. 18G brad nails to tack in place to avoid movement while drilling the pilot holes.

The benches are finished with water based satin acrylic clear after assembly with a roller. It just seemed quicker and easier to do it this way and also avoided putting clear on faces that would never see the light of day anyway :) Before applying the clear finish, the assembled bench got a good sanding with 80 grit mesh on my RO150 to flatten out any unevenness on the sides and then all over with 120 grit on my ETS(?) 150. I think I also ran the bottom of the legs through the table saw to level them out but I'm not sure now :)
 
I'm curious how you dealt with slippage while gluing. From the vid, it looks like you did it by feel then tacked in place? The seams are hardly visible and the corners look nice and square. Good job.
Yes, you are exactly right! I describe the full process in my post above but I absolutely used my finger tips to sense levels and then tacked in place with 18G brads to avoid slippage as you deduced. I then pre-drilled and countersunk 2-3 screws on each leg. I only used clamps on the very last layer because I didn't want any visible screws.

I made frequent use of an adjustable square hung over the edges every couple of levels to make sure I wasn't introducing drift (at one point I saw it beginning to creep but just compensated over the next layer to bring it back into true)

Indeed, there layers came out very tight and there are no gaps. No filler required :) (this time anyway...:p )

Thank you for the interest! I have taken a lot of benefit from the forum and am delighted to try and give something back (y)
 
To avoid slippage when I do glue-ups, I drive 4 small brads in to the surface to be glued with a brad pusher and then clip off all but 1/8” to 1/16” so that the to-be-glued surfaces are not touching. Once I have everything positioned I manually press the pieces together and then clamp. For purists, the brads don’t show and have no structural function. I leave about 1/8” of brad for soft woods like pine, and 1/16” for harder woods like oak or maple.

This is also a good process for attaching edge molding. Manual brad pushers (under $10.00) are faster and easier than pneumatic pin drivers.

For those too young to remember these devices, I am including a video.

The video below demonstrates a brad pusher. It fails to mention a bit and gives what I consider bad advice elsewhere:

1. It fails to mention that the driving anvil (the center post) is magnetized on modern brad pushers. That serves to hold the brad in place while you position it.

2. The idea of clipping the length on air gun brad driver pins strikes me as absurd. Go to the hardware store and buy ready-made brads in the shortest length that will work for you application. They will have a nail point and a head. The nail point will make driving the brad easier. I clip the length with a wire nipper.

 
Last edited:
To hold things square during glue-ups, I use 90 degree corner clamps (usually used for picture framing. I use 8 per carcass, two at each corner (opposite ends). Those in addition to the bar clamps to squeeze everything together.

Since implementing that, I have not had to diagonal clamp a single carcass to square things up. The clamps are about $3.00 to $4.00 each, and you need 8 per carcass. I had a bunch left over from my picture framing days.

Even the cheapest versions seem to be square enough for this purpose.

In theory you only need to clamp one corner, but the clamps make using the bar clamps easier so I clamp all 4 corners. Obviously not ideal for a high production operation.

The video is a bit misleading. You would also need bar clamps to squeeze everything tight.

 
I can't remember the name, but that particular design has one. It might be related to the architect who is credited with it, though can we ever be sure who was the first to do this?
 
I can't remember the name, but that particular design has one. It might be related to the architect who is credited with it, though can we ever be sure who was the first to do this?
George Nelson? If he's the one you're thinking of, it's hilarious he came with the design thinking it would be so uncomfortable it would deter people from staying in his presence long!
 
I can't remember the name, but that particular design has one. It might be related to the architect who is credited with it, though can we ever be sure who was the first to do this?
I think you might be thinking of the so called "Nelson bench"?


A beautiful design classic and definitely a core inspiration for this kind of slotted bench in my opinion also (y)
 
That's the one, though I have seen several variants of the legs.
I was under the impression that the point was to drain water, since it was intended for outdoor use.
 
Back
Top