This is the first table I have ever made, and my first piece of furniture made with Festool products. I have not made any furniture in >20 years, so I had to re-learn quite a few things.
[attachthumb=3]
First thing to learn was milling the boards. I do not have a jointer, so I used a Veritas bevel-up low angle jack plane. I had to take some twist out of about 10 or so boards. Once one face was flat, I could send them through the planar. I tried squaring the sides with a TS75, but I had some difficulty with keeping the boards from slipping on the workbench table. The track saw was not the issue, but the table top, as is was coated with melamine and was very slippery. At the time I did not have the workbench top drilled for holes to clamp the track, material, and table together to avoid the slipping. So, I made a ripping sled for my table saw and ripped the two sides of each board. Looking back, the issue of the slipping could have been resolved easily.
Next on the list to learn was making the table top. I used 6mm dominos to help with alignment and glue-up, although I discovered that my plunges with the Domino were not perfectly steady. I had holes which were 6.2mm, and that introduced some error in the glue-up. Once the glue-up was done, I had the plane the top to get the boards smooth to each other. This is where I learned about tear-out. There were a couple spots were the tear out was bad enough that I did not want to thin down the top anymore to get rid of them. I was already a hair under 3/4". So, I took my 12" x 18" OSB wood floor sander and sanded the table top smooth. Never have I sanded a piece of furniture so quickly")
Next on the list was the joinery for the legs. I intend to use this table with an "L" bench, so I wanted to make sure people would not band up their own legs while sliding in/out of the bench. My first thought was to do a trestle table, but I worried that a traditional trestle design would not support the table top well enough. So, I decided to do something that I can best describe as a timer frame. There would be two main posts, with supports at each end, with one end being the feet of the table and the other end being the supports for the table top. This made extensive use of the Domino.
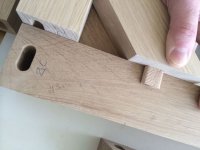
Some unique things were the use of dominos that were ~180mm. Now, we all know a Domino XL can mortise a hole up to 70mm, which would lead to a maximum of 140mm tenon. However, if you start with a through tenon and add two more pieces of wood on each end (both ~65mm), you can end up with a domino which is way longer than 140mm. So, that is what I did for both ends of the posts. There were 8 12mm x ~165mm tenons used for the main joint in the 2 posts. I then added a 45 degree brace for each support. Each brace has two 6mm dominos, one to attach to the support and the other to attach to the post. Some planning must be done to ensure the dominos are oriented in such a way where the 3 pieces (a support, the post, and the brace) can be assembled. In this case, the 12mm through tenon in the post and one of the tenons in the brace (the one that connects the brace to the post) have to be parallel in order to assemble it. So, the first step is to attach only the support and the brace, let that dry, then mortise the hole for the second domino in the brace and post, then mortise the 12mm domino in the support and the post to be parallel. Below is a picture of the brace and support already joined together, and I am now marking where the mortise will go to join the support & brace to the post.
[attachthumb=1]
Here is a picture of the "core" of the table support. On the posts, I have half of the 12mm through tenons installed. The other half will be perpendicular to the installed ones. Since these would intersect, their placement in the posts are at different heights.
[attachthumb=2]
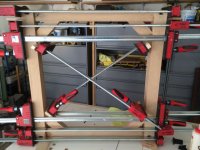
Here is a picture of the glue-up of the core support. The clamps on the diagonal help ensure the braces are fit snugly in the posts and are also adjusted to help square up the whole thing (got both diagonal measurements to be 950.5mm)
[attachthumb=4]
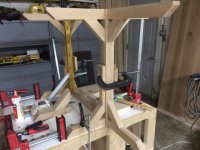
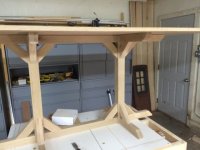
And here is almost all of the table support glued up. This was by far the most difficult part, mainly because I was not prepared for coming up with creative ways to ensure everything was square. Eventually I got it, but it always seems like glue-up is the most stressful part.
[attachthumb=5]
And here is the table before any finish work
[attachthumb=6]
And finally after finishing with two coats of Osmo Polyx oil wax. I have a ton of this left over since I originally bought it for my wood floors, but found out the hard way that it was not compatible with the wood (Ipe). It seems to be fine for white oak.
[attachthumb=7]
[attachthumb=3]
First thing to learn was milling the boards. I do not have a jointer, so I used a Veritas bevel-up low angle jack plane. I had to take some twist out of about 10 or so boards. Once one face was flat, I could send them through the planar. I tried squaring the sides with a TS75, but I had some difficulty with keeping the boards from slipping on the workbench table. The track saw was not the issue, but the table top, as is was coated with melamine and was very slippery. At the time I did not have the workbench top drilled for holes to clamp the track, material, and table together to avoid the slipping. So, I made a ripping sled for my table saw and ripped the two sides of each board. Looking back, the issue of the slipping could have been resolved easily.
Next on the list to learn was making the table top. I used 6mm dominos to help with alignment and glue-up, although I discovered that my plunges with the Domino were not perfectly steady. I had holes which were 6.2mm, and that introduced some error in the glue-up. Once the glue-up was done, I had the plane the top to get the boards smooth to each other. This is where I learned about tear-out. There were a couple spots were the tear out was bad enough that I did not want to thin down the top anymore to get rid of them. I was already a hair under 3/4". So, I took my 12" x 18" OSB wood floor sander and sanded the table top smooth. Never have I sanded a piece of furniture so quickly
Next on the list was the joinery for the legs. I intend to use this table with an "L" bench, so I wanted to make sure people would not band up their own legs while sliding in/out of the bench. My first thought was to do a trestle table, but I worried that a traditional trestle design would not support the table top well enough. So, I decided to do something that I can best describe as a timer frame. There would be two main posts, with supports at each end, with one end being the feet of the table and the other end being the supports for the table top. This made extensive use of the Domino.
Some unique things were the use of dominos that were ~180mm. Now, we all know a Domino XL can mortise a hole up to 70mm, which would lead to a maximum of 140mm tenon. However, if you start with a through tenon and add two more pieces of wood on each end (both ~65mm), you can end up with a domino which is way longer than 140mm. So, that is what I did for both ends of the posts. There were 8 12mm x ~165mm tenons used for the main joint in the 2 posts. I then added a 45 degree brace for each support. Each brace has two 6mm dominos, one to attach to the support and the other to attach to the post. Some planning must be done to ensure the dominos are oriented in such a way where the 3 pieces (a support, the post, and the brace) can be assembled. In this case, the 12mm through tenon in the post and one of the tenons in the brace (the one that connects the brace to the post) have to be parallel in order to assemble it. So, the first step is to attach only the support and the brace, let that dry, then mortise the hole for the second domino in the brace and post, then mortise the 12mm domino in the support and the post to be parallel. Below is a picture of the brace and support already joined together, and I am now marking where the mortise will go to join the support & brace to the post.
[attachthumb=1]
Here is a picture of the "core" of the table support. On the posts, I have half of the 12mm through tenons installed. The other half will be perpendicular to the installed ones. Since these would intersect, their placement in the posts are at different heights.
[attachthumb=2]
Here is a picture of the glue-up of the core support. The clamps on the diagonal help ensure the braces are fit snugly in the posts and are also adjusted to help square up the whole thing (got both diagonal measurements to be 950.5mm)
[attachthumb=4]
And here is almost all of the table support glued up. This was by far the most difficult part, mainly because I was not prepared for coming up with creative ways to ensure everything was square. Eventually I got it, but it always seems like glue-up is the most stressful part.
[attachthumb=5]
And here is the table before any finish work
[attachthumb=6]
And finally after finishing with two coats of Osmo Polyx oil wax. I have a ton of this left over since I originally bought it for my wood floors, but found out the hard way that it was not compatible with the wood (Ipe). It seems to be fine for white oak.
[attachthumb=7]