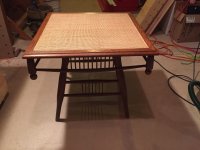
A few months ago, my wife and I saw this old table kicked to the curb in front of a small repurposing shop. It was unique enough that we scooped it up and added it to the long list of projects.
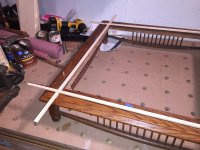
The original top was some type of nasty wicker over a sheet of plywood, so off it came to be replaced with a new top. I planed down some oak cutoffs, joined them (domino 5's), then cut it to fit. Because I also needed to fill in those nasty wicker grooves once I got all the rawhide glue out of them, I had some maple that volunteered itself to be cut into thin strips using the TS 75 (I know, a little overkill, but I'm not one of those dual TS owners). After hand planing (call Ripley's) and sanding (RO 90), I needed to re-stain the oak top to get as close to the original color as possible, of course, using frog tape (because it's green you know…) to cover the maple, alternating the inside, staining, and then the outside.
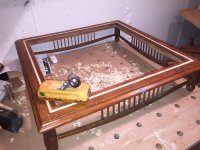
I had some trouble with fastening the top, so I cut wide mortices on the inside, stuck in some domino 5's, drilled a hole through the exposed end and screwed through to the thin oak panel. Evened out the stain for the bottom, applied a coat of varnish, and as Tigger would say: "It's as good as new, if your new isn't too good."
Anyway, it's a very unique piece that someone many years ago spent a lot of time making. I didn't dare mess with the sides, luckily everything else was in great shape for something that was kicked to the curb.
Helped hone a few skills, and I learned after much head scratching why the boards weren't coming together despite all the right settings on the domino. Turns out, the tip of the bit was broken ever-so-slightly, and I didn't notice until after I had all the slots cut. Another lesson: dry fit everything first to make sure the tenons that are supposed to fit actually do, and you're not suffering from a nixed bit that doesn't give you the full plunge depth. Another lesson, it's impossible to get those things apart after they've been glued, and you suddenly find that you're mortices aren't deep enough. Refer to previous step on dry-fitting...
The original top was some type of nasty wicker over a sheet of plywood, so off it came to be replaced with a new top. I planed down some oak cutoffs, joined them (domino 5's), then cut it to fit. Because I also needed to fill in those nasty wicker grooves once I got all the rawhide glue out of them, I had some maple that volunteered itself to be cut into thin strips using the TS 75 (I know, a little overkill, but I'm not one of those dual TS owners). After hand planing (call Ripley's) and sanding (RO 90), I needed to re-stain the oak top to get as close to the original color as possible, of course, using frog tape (because it's green you know…) to cover the maple, alternating the inside, staining, and then the outside.
I had some trouble with fastening the top, so I cut wide mortices on the inside, stuck in some domino 5's, drilled a hole through the exposed end and screwed through to the thin oak panel. Evened out the stain for the bottom, applied a coat of varnish, and as Tigger would say: "It's as good as new, if your new isn't too good."
Anyway, it's a very unique piece that someone many years ago spent a lot of time making. I didn't dare mess with the sides, luckily everything else was in great shape for something that was kicked to the curb.
Helped hone a few skills, and I learned after much head scratching why the boards weren't coming together despite all the right settings on the domino. Turns out, the tip of the bit was broken ever-so-slightly, and I didn't notice until after I had all the slots cut. Another lesson: dry fit everything first to make sure the tenons that are supposed to fit actually do, and you're not suffering from a nixed bit that doesn't give you the full plunge depth. Another lesson, it's impossible to get those things apart after they've been glued, and you suddenly find that you're mortices aren't deep enough. Refer to previous step on dry-fitting...