new MFT/3 question...

Iceclimber

Member
Joined
Oct 25, 2014
Messages
504
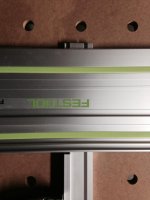
Attached is a picture of the cross rail where it meets the guide rail. My intuition tells me that it is not suppose to poke out the cut side of the guide rail as in the picture.

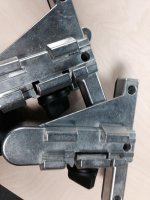
The problem is if i back off so it does not stick out the cut side of the guide rail i cant but it tight against the other side of the guide rail hence i cant get my setup square. Well at least with ease as i thought it was intended to set up.

Maybe I'm missing something. Please chime in someone as i need the table to cut a few pieces for a after business hours instal i have to do tonight ekk!
 

Attachments

  • image.jpg
    image.jpg
    222.1 KB · Views: 647
The part you are referring to can be moved.  I did this 2 years ago, so I forget where the adjustment is without looking at it.  Some people set it a certain distance from the kerf so you can reference.  Do a search on you tube for halfinchshy.  Paul does a video or 2 about setup and review.
 
Yeah it slides back. And forth along the miter gauge however if you but it tight to keep things square if it runs at least a half inch over the cut side of the rail...

Hmmm,

Come all these guys around here this has to be stupidly clear to someone?
 
I watched just about every video i could find.

I don't say that in a ungrateful manner just to clearify.

The problem is the guide rail that locks into the miter gauge extends into the kerf of the saw. If i back it off so it does extend into the kerf the backside of the guiderail then has a 1/2 gap making it very hard to square the table.

I get its probably hard to understand. I a, probably not communicating as effectively as i could.

Does thT help shane? If not please say so as i would loce to resolve this. If i had a metal blade or junk balde on my TS i would just rip it flush. I shouldnt have to do that though with a brand new table and im apprehensive to do so in the event i am hust oberseing something.

On the other hand i ahd a lroblem getting the miter gauge on my new CMS to lock into the miter gauge. After further inspection i found the problem in the picture bellow. Look closely and you will see to the left of the lock knob there is a small cut out of the metal that allows the gauge to tighten lr pinch the rail. On the probelm gauge that piece of metal was not removed in the machining process at the factory. No big deal as it is being taken care of.

The problem with the MfT is a bit more elusive hence me reaching out here.

Tahnks again!

 
Shane Holland said:
Not sure I understand the issue, but see if these videos help.


Attachments

  • image.jpg
    image.jpg
    260.6 KB · Views: 526
Let's try to solve one thing at a time, MFT first.  [smile]

Can we get a photo of the MFT as a whole? I think I may be able to better understand with that.

You should be able to adjust the fence toward or away from the guide rail without any issues. You definitely shouldn't need to cut the fence to make it work.

Also, if you'd prefer to talk to someone by phone, give us a call. We have folks that can help you by phone.

Shane
 
After re-reading this a couple of times, I think I might understand.

Are you saying that you have a gap between the fence (the part that connects to the miter gauge) and the guide rail (that the saw rides on)? If so, you can raise and lower the guide rail. Where the red arrow is in the photo below?

For squaring purposes, you don't need to make a cut. Just set a square between the fence and guide rail.

Shane
 

Attachments

  • mft-fence.jpg
    mft-fence.jpg
    364.2 KB · Views: 536
You are not supposed to butt the fence against the left side of the guide rail.  Butting the fence against the guide rail has nothing to do with squaring anything.  The 1/2" gap is irrelevant.  The gap between the fence and the guide rail should be there.  The fence should not extend past the right side of the guide rail.

Only two things matter -
1. the fence has to be square to the guide rail.
2. the fence and guide rail should be square to the holes in the table.

Watch the videos again. 
 
Thanks guys..

Why you all where trying to help i just backed the rail off so it would not be in the way of the kerf. I threw every square i had at it and it was fine so i started cutting.

Everything came out square. Im happy!

I figured it was oversight on my part. I guess when i start doing angle cuts i will find that half inch space to come in useful as it will allow to to get length even at a angle?

 
look into the parf dogs asap, i find squaring the mft to that miter gauge is the biggest time waist.
 
My Toolnut cart has some dogs in it already.

I have just yet to pull the trigger as i am having a hard time for my budget just exactly what my next round of purchases should be.

Its nuts how quick this shit adds up. I have a couple sets of dogs, the DTS125, two 50 count grits of paper, some clamps, a woodpeckers square and triangle and a non antistatic hose for my Kapex that i can cut short and its big money.

Big enough it has me wondering if i should ky bosh all the little stuff and get something big. I could really use another CT as I'm already  sick of moving the one i have around my shop. On the other hand my contractor table saw is a freaking dust nightmare and a CMS insert for my TS75 would be sweet!!

Decisions decisions.

Thanks for the help with the MFT guys.

So far outa the tools i purchased i am just floored by the Kapex and more than happy with the CMS VL...
 
I'm a bit late to the party on this thread...

Firstly the common terminology is:
guide rail = the part the saw travels along
fence = the part the piece is pushed up against (with that cut out), and attached to the mitre

You now realise that the saw guide rail drops into the same position every time.  [big grin]
  • it does not need the support of the raised cut edge of the fence (some people remove the fence altogether and just rely on dogs).
  • just ensure that it drops into place square to another reference (such as the fence or dog holes) by setting the hinge and front supports in the correct position

Some people like to try and set the fence parallel to the holes across (leftright) the table, and the saw guide rail parallel to the holes running up down the table. This means that you can use any row of holes for dogs and the guide rail will always be parallel.

Finally, if you intend on putting a stick-on measuring tape on the fence, then it is useful to set the default position of the fence far left enough so that the saw can clear it at a 45 degree angle before you stick the tape on.  [wink]
 
Ditto the recommendation on using Qwas dogs for squaring the guide rail and, if used, the fence. I've never used the protractor & fence that came with the MFT. I just line up several dogs, butt the wood against the dogs, adjust the guide rail height, drop the guide rail, and power up the TS55.

I did find a little gadget the eliminates any left right movement in the guide rail. Can't remember its name.
 
The Slop Stop is pricey for a little piece of plastic, but I found it to worth it in the end. It really does make the settling of the guide rail on its support more firm with no side to side movement. I wasn't sorry I bought it.
 
grbmds said:
The Slop Stop is pricey for a little piece of plastic, but I found it to worth it in the end. It really does make the settling of the guide rail on its support more firm with no side to side movement. I wasn't sorry I bought it.

My thoughts exactly.  I was like why in the world am I spending $20 bucks on this, but glad I did.
 
I usually have the fence set so that it just hides underneath the rail.  Be warned, however, when you come to cut a bevel.  The cut line is then well under the rail (depending on the thickness of wood being cut), and it's dead easy to cut the end of the fence - I'm told

Andrew  ;-)
 
By coincidence this thread was just revived, addressing a problem I ran into myself when first trying to set up the MFT:

http://festoolownersgroup.com/festool-how-to/putting-additional-clamp-for-stop-ruler-on-back-of-table/

Basically, the clamping action of the back fence stop can sometimes put the fence out of alignment, regardless of whether you use dogs or a square.  The fence stop has a plastic lip that when tightened -- if it's off by even a slight amount -- can pull the fence back or push it forward.  Just be aware of the issue, as it caused me half an hour of madness before I realized what was going on.
 
Back
Top