New project for myself (drawing added)Updated

Crazyraceguy

Member
Joined
Oct 16, 2015
Messages
4,901
I have lived with a cheap big box store TV stand for an embarrassingly long time. It's especially bad considering how many I have made for other people and businesses. I even made one in a knock-down format for a friend's brother, who lives 1500+ miles away in Texas.
The recent thing of building with reclaimed wood for my own house has spawned this idea too. This one is a bit more ambitious though as far as the amount of time it might take.
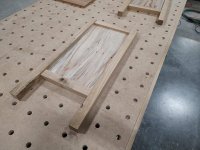
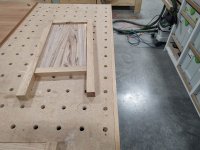
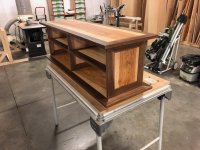
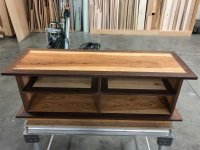
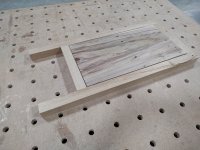
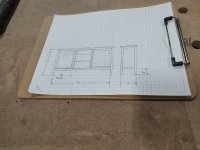
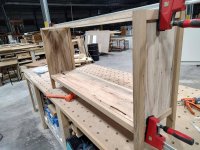
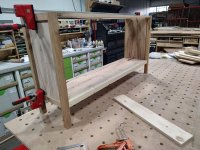
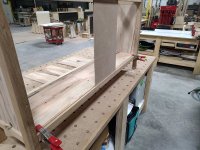
Today should have been a short one, off at noon because I am ahead of schedule. The next thing is not available yet, for a couple of reasons. Instead of going home, I stayed and worked on some parts for a new TV stand. It's just an idea in my head, that I probably should actually sketch out, but the end panels are at least done to the point of dry-fit. It falls into a somewhat matching set kind of thing, since the last 2 pieces I have built for myself are from the same wood, just varying slightly in leg shape/design, and all three will be in the same room.
The panels are fairly thick, so they are flush to the inside of the legs. That way I don't need spacers to meet up with a shelf on the inside. I should have flipped one over to show that. With a 10mm x 50mm Domino at each joint and some snug fitting panels make these hold together very well.
The plan is for a solid top, but I don't know if it's worth the effort to do that for the bottom panel?
 

Attachments

  • TV end panels.jpg
    TV end panels.jpg
    367.3 KB · Views: 165
  • TV end panels 2.jpg
    TV end panels 2.jpg
    402.6 KB · Views: 125
Sounds like the TV stand I finally built for my home. Something about the shoe maker and shoes....

All the material came out of the cull pile.

[attachimg=1]

[attachimg=2]

[attachimg=3]

Tom
 

Attachments

  • IMG_0337 (1).jpg
    IMG_0337 (1).jpg
    305.5 KB · Views: 652
  • IMG_0336 (1).jpg
    IMG_0336 (1).jpg
    331.4 KB · Views: 631
  • IMG_0340 (1).jpg
    IMG_0340 (1).jpg
    322.2 KB · Views: 650
I love those spalted panels, they will look great with finish on them.

I was looking around the house the other day and almost all our furniture is made from leftover parts and materials from jobs over the years.

Oh, well, kind of memory book of some of the jobs we have done.

I look forward to seeing the finished piece.

I
 
Mmmmm Walnut.  [eek] I don't get much of that. Great looking project!
I'm thinking about 3 sections, with sliding doors on the outer openings. The plan, so far, is to have them in the same groove (non by-pass) with the center segment left open when the outers are closed. Possibly a drawer in that center section.

tjbnwi said:
Something about the shoe maker and shoes....

Yes, the mechanic drives a junky old truck. etc.
Seems like the thing you do for a living, you don't do for yourself?

I'm trying to get my brain into retirement mode though and finally looking around for things I can do. None of them is actually a disaster "needing" to be done, which is why they haven't been.
I'm almost to the agreed date, but I have also agreed to stay a while longer to help out with the training of an apprentice. Realistically, I can go at any time, after the 1st of the year, but my home-shop is still in need of work. That has been hard, while still working, especially since most of my tools are there.
 
That looks nice CRG! What's the plan for the top? same wood as the side panels or different?

Before you start to move your stuff home, you might want to evaluate the lighting you have in your home shop. I Upgraded to some LED strips and it has made a world of difference. Coming from that big shop with what looks like great lighting might be a shocker. It is always easier if you haven't gotten the shop filled up with stuff before you start. Don't ask me how I know that one!  [eek]

I used these 8 foot strips from Amazon and they have worked well. (I think [member=44099]Cheese[/member] put some in as well)
https://www.amazon.com/Barrina-8500LM-Daylight-Output-Linkable/dp/B07RKZFD5Z?ref_=ast_sto_dp&th=1

Ron
 
Thanks Ron, that means a lot coming from you.

As far as the top, I'm not sure yet? I think it will probably be the same Oak as the legs. I have more of it and in longer pieces. The top needs to be at least 66" long, which is about a foot more than that spalted stuff. I have 6 or 7 of those left, but they are only 55" or so, and between 5" and 8" wide.
Initially, I was planning on 100% solid wood, but I may compromise a little and use some veneered ply for the back.

My garage has had some{8} of the old-school 8' fluorescent tubes down the middle for year, decades actually. They are hard to get tubes for them anymore, plus being power-hungry compared to modern stuff. I took all of those out over last winter, when I started this project.
My goal at that time was to retire over the summer, but I have been talked into ($) staying a while to train a new guy. I moved the goalpost to Jan 1, at that time, which has now moved again. At this point we're looking at spring? absolutely no later than my birthday, which is exactly 1 year from original.

Those lights look like a pretty good option. I have a couple of 4' LEDs that I bought at the local HD. They are very bright, actually too bright to be unshrouded, but temporary as I remodel. Those 8' ones, running across and spaced out evenly could be just right.
Yes, we do have great lighting at work. The place is full of hi-bay LEDs that are on motion sensors. The whole building is like that, only the front vestibule is not equipped with them.
 
The Barrina leds from Amazon are fantastic. I my shop is 30’ wide and the roof trusses are 4’ apart. I installed three 8’ers on all but one of the truss’s.  It’s like turning on the sun, I have zero shadowing any where. It’s especially nice I the section I use for a garage as I hung one on either side of of the 10’ overhead door and another at the end of where the door stops crosswise.  It makes vehicle detailing easy
 
Another cool project!

A counter note on the Barrina lamps, I bought a 6 pack of the 4 footers and installed 5. They look very nice and installation is super easy because they are almost weightless.

Warranty is 3 years. At 3.1 years three out of the five had died. In my usage about a tenth of the claimed life expectancy as far as light projection goes.
 
Following.. shaker style?
Sliding doors..  [big grin]
Sketch up? Nahh.. you have enough experience to improvise  [wink]
- I’m usually, when it’s all up to me.. tend to find new ways and ideas while working on a project - it’s the involvement that brings new ideas to the table. And sometimes this leads to that I’m adding a lot that wasn’t in the plan at first thought..
 
[member=71478]FestitaMakool[/member] that was just a coincidence of words. I was just referring to drawing something out with a pencil and ruler.
I don't use Sketch-up. I downloaded it years ago, when it was free to everyone, but never got involved enough to know how to deal with it.

I did hit on the idea of making some recesses in the backs of the doors for some wheels, then making the wheels themselves with the Shaper Origin. Seems like it would be easier to roll them than just slide. I have done dozens of display cases with glass doors, using tiny wheels on an aluminum track.
It's way more complex than it needs to be, for doors that will see minimal use.....but that doesn't matter at all. [big grin]

I doubt that Shakers ever built a TV stand. Everyone knows that TVs hang on the wall  [blink]
Seriously, several people have said that to me, when the asked what I was making.
I did remember to take a pic of the back today. I didn't get any further with it than that though.
I think I am going to stick with the water-based Poly on the panels to keep from introducing any color too them. I also got some "Tried & True" oil to test on the rest of it.
 

Attachments

  • TV end inside.jpg
    TV end inside.jpg
    479.4 KB · Views: 59
Crazyraceguy said:
I did hit on the idea of making some recesses in the backs of the doors for some wheels, then making the wheels themselves with the Shaper Origin. Seems like it would be easier to roll them than just slide. I have done dozens of display cases with glass doors, using tiny wheels on an aluminum track.

I think I am going to stick with the water-based Poly on the panels to keep from introducing any color too them. I also got some "Tried & True" oil to test on the rest of it.

Andersen windows original claim to fame was inventing the "sliding window" back in the 50's. It centered around a window with a series of sliding guide pins that were contained within a molded plastic track and the window was guided and controlled in that track by the pins. It was pretty revolutionary at the time...we're talking over 70 years ago.  The normal maintenance was to "wax" the track with paraffin/canning wax/candles at 6 month intervals. It was certainly fun for the new homeowners the first time around but it was quickly relegated to the son or daughter after that brief moment of parental euphoria.

A hint...simple sliding material against sliding material panels are not what you want to maintain 20 years from now. Make your life easier for the future...use the Origin and add the bearings.

I'd also stick to the water based top coats, the solvent based top coats turn yellow and then continue to turn yellower with age.

My preferred look is aqueous based top coats because they produce the true color of the wood and they are more durable. If you need to match color tones to a solvent based product, apply 1 solvent based top coat to match the hue and then topcoat 2 times with waterbased finishes.

 
Thanks for the advice [member=44099]Cheese[/member]
Yeah, I can imagine the stuff they called plastic back then would not have held up so well, especially for exterior windows in possibly freezing environments.  [unsure]
The windows in the back/sides of the house where I grew up had sliding (casement) windows. They were single pane and all aluminum, which should be quite a clue as to the ear it was built.  [blink]
It had wooden double-hung in the front, but they were single pane too. 1963 wasn't the most efficient in terms of weather tightness  [embarassed]

I have been using water based Polycrylic for the furniture pieces I have built for myself lately, mostly for that exact reason. All of the base and door casings on the first floor of my house are Red Oak (with a golden oak poly/stain blend) so I have tried to make things fit-in without being 100% matchy and over-done.
The long entry table is all Oak, with the water based finish, to call out the match but not go too far...hopefully.
The more square side table has Oak legs and that spalted/blotchy whatever-wood on top. I used the water stuff on the top, too keep the non-color of the main part, and used our regular lacquer on the legs.
That gave them a little more color, but not as yellow as the trim.
Since this third piece is within sight of the other two, I want to keep with the same general call-out.
I may go with gloss for the first couple of coats though. The satin has so much flattening paste that you can actually see the whiteness, from too many coats.
That's something I learned from shooting lacquer for years.
 
Aha! Yep, I do pencil and paper too  [big grin]. There’s nothing like it..
I’ve used some drawing software a long time ago, but it really doesn’t tempt me that much.
A plan, roughly, on paper is quick and you can bring it to the work table..
I’m doing the extension of my outhouse now (Just in after a good few hours in -13°C (8,6°F)..)
This I’ve done on paper, very rough with a plastic protractor only to have an idea of the angle of the sloping roof. It works, no hiccups yet  [big grin] [big grin]

The wheel on the sliding doors sounds interesting. Not too far into next year I’m hoping to start remodelling my kitchen. Some cabinets I’ll buy, but I’m on to a bench that will be less deep than standard, and it will be long side a traffic point - so sliding doors and the cabinet is going to be self made. I saw this in a store once, and it triggered some ideas..

You know.. when doing for yourself, there’s no mentions of over engineering to be said or accounted for  [wink]  [big grin]
 
rvieceli said:
I used these 8 foot strips from Amazon and they have worked well. (I think [member=44099]Cheese[/member] put some in as well)
https://www.amazon.com/Barrina-8500LM-Daylight-Output-Linkable/dp/B07RKZFD5Z?ref_=ast_sto_dp&th=1

Ron

You are correct Ron... [big grin]

As a side note, I love the Barrina LED's because of the amount of light they produce. I went from 4 each 8' fluorescents to 4 each 8' LED's and the illumination easily doubled or tripled while the watts used were halved. I'd never go back to fluorescents.

Now a sour note, LED's are very susceptible to any voltage/current transients. Initially I connected them to an occupancy sensor and they went south after only about 1-1/2 years.
Also, some occupancy sensors are kinder to LED's than others are. On one house circuit the occupancy sensor killed the LED's while on a 2nd circuit, the LED's killed the occupancy sensor. [eek]

Coincidentally, I just noticed that Littelfuse has recently released a line of outdoor commercial LED protection devices. I may install one of these in one of the circuits and see how well it works.
https://www.littelfuse.com/~/media/electronics/datasheets/varistors/littelfuse_varistor_lsp10_datasheet.pdf.pdf
 
Cheese said:
rvieceli said:
I used these 8 foot strips from Amazon and they have worked well. (I think [member=44099]Cheese[/member] put some in as well)
https://www.amazon.com/Barrina-8500LM-Daylight-Output-Linkable/dp/B07RKZFD5Z?ref_=ast_sto_dp&th=1

Ron

You are correct Ron... [big grin]

As a side note, I love the Barrina LED's because of the amount of light they produce. I went from 4 each 8' fluorescents to 4 each 8' LED's and the illumination easily doubled or tripled while the watts used were halved. I'd never go back to fluorescents.

Now a sour note, LED's are very susceptible to any voltage/current transients. Initially I connected them to an occupancy sensor and they went south after only about 1-1/2 years.
Also, some occupancy sensors are kinder to LED's than others are. On one house circuit the occupancy sensor killed the LED's while on a 2nd circuit, the LED's killed the occupancy sensor. [eek]

Coincidentally, I just noticed that Littelfuse has recently released a line of outdoor commercial LED protection devices. I may install one of these in one of the circuits and see how well it works.
https://www.littelfuse.com/~/media/electronics/datasheets/varistors/littelfuse_varistor_lsp10_datasheet.pdf.pdf

I just randomly dropped in to see what was happening and found this.  I have these same LED's, which are bright, and was considering to add an occupancy sensor in my garage so I don't always have to reach over and flip on the light.  Thanks for sharing this, you just talked me out of the extra convenience at the cost of my lights!
 
I originally tried connecting a sensor but it wouldn’t work, guess I got lucky.  Mine have been working four years now, still no mains, running off 120’ of 10ga SJ
 
I did a "proof of concept", for the wheel idea, with some MDF scraps this morning. This would roll rather than slide in the lower groove. The slot is for a cover piece to hold the wheel in place. My original idea was to for it to be wood too, and be on the back of the door. Now I'm rethinking it and considering using metal for the strap (probably aluminum) and even putting it on the front? I guess as long as it is centered on the door, it could be turned either way. I could even make the panels look different, flat on one side and raised on the other.
Also, a little sketch of the whole idea. There will be a vertical partition on each side of the drawer, dividing the whole thing into 3 equal spaces, one shelf in each. The doors in the same groove, so only one opening can be exposed at any time. The drawer front will be behind the plain of the groove, so the doors can pass in front of it.
Thoughts, suggestions?
 

Attachments

  • Table drawing.jpg
    Table drawing.jpg
    313.2 KB · Views: 64
  • Tablewheels.jpg
    Tablewheels.jpg
    334.6 KB · Views: 50
Some Saturday time for myself saw some progress on the TV stand. I glued up some pieces for the bottom shelf earlier, so that was ready to go when I got the stretchers milled up today. I made the lower ones with the same 1 5/8" (42mm) dimensions as the legs. They are inset the same 1/4"(6mm) as the side stretchers. Since the lower shelf is solid wood, I didn't want to trap it. To that end, there are complimentary rabbets on the edges of the stretchers and the shelf. It will sit flush and get glued to the front one and be allowed to float on the rear. The frame and panel vertical dividers will come next. They will be connected to the stretchers at the ends and that lower shelf can move back and forth, front to back. The frame and panel construction will also allow me to use metal drawer slides, if I go that route.
As long as they only connect to the frame and let the panel move too. I may still skip the metal slides, since this would be a low-use situation anyway.
While it's not strictly necessary, my intent is to build this completely from solid wood, though I may give in and use some 1/4" sheet goods for the back.
The sides are glued permanently at this point, because the joinery intersects at the corners. I just cut into it for the adjacent parts. 10mm Dominos for the thicker parts and 6mm on the upper ones. It's not evident for these pics, but the upper members are 3 1/4" (82.5mm) wide and 13/16" (20.5mm) thick.
I still haven't decided on the top. I still have plenty of this Oak, but I could also be convinced to use a stone pattern Corian?
 

Attachments

  • Table TV console lt.jpg
    Table TV console lt.jpg
    412.2 KB · Views: 43
  • Table TV console rt.jpg
    Table TV console rt.jpg
    415.7 KB · Views: 39
  • Table TV console back.jpg
    Table TV console back.jpg
    416.3 KB · Views: 48
A bit more progress from yesterday.
I got the grooves for the doors routed in and a test piece fitted. Then milled and resawed some more of the matching crate wood for the door panels and some oak for the top.


Attachments

  • TV assy.jpg
    TV assy.jpg
    393.8 KB · Views: 31
  • TV door panels.jpg
    TV door panels.jpg
    425.8 KB · Views: 28
  • TV door panels2.jpg
    TV door panels2.jpg
    458.1 KB · Views: 31
  • TV top.jpg
    TV top.jpg
    0 bytes · Views: 8
Back
Top