You are using an out of date browser. It may not display this or other websites correctly.
You should upgrade or use an alternative browser.
You should upgrade or use an alternative browser.
Nothing to wine about....
- Thread starter tjbnwi
- Start date


tjbnwi
Member
- Joined
- May 12, 2008
- Messages
- 7,043
MikeGE said:Looks good! Is that a Liebherr wine cabinet?
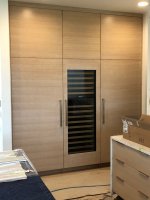
Sub Zero 30" wine column with 36" refrigerator and freezer columns.
Tom
Cheese
Member
- Joined
- Jan 16, 2015
- Messages
- 12,506
Good to know.. I thought it looked like a Sub but with the Miele photo I thought it may also have been a Miele product. A lot of people are into the “handle matching” thing. That’d be me. [smile]
Beautiful job as usual Tom.. just love the NY style segmented panel thing. That’s been a force of reckoning for years...hotel & condo stuff.
Question...how wide and deep are the grooves/dados between the panels and is any stain/paint applied to the recesses?
That’s exactly the look I’m trying to produce on some ambrosia maple drawer fronts.
tjbnwi
Member
- Joined
- May 12, 2008
- Messages
- 7,043
Cheese said:Good to know.. I thought it looked like a Sub but with the Miele photo I thought it may also have been a Miele product. A lot of people are into the “handle matching” thing. That’d be me. [smile]
Beautiful job as usual Tom.. just love the NY style segmented panel thing. That’s been a force of reckoning for years...hotel & condo stuff.
Question...how wide and deep are the grooves/dados between the panels and is any stain/paint applied to the recesses?
That’s exactly the look I’m trying to produce on some ambrosia maple drawer fronts.
The gaps were held at 1/8" on all doors and drawers.
In the first picture you can see a drawer and what looks like a drawer next to it. The second item is a panel with 1/8" wide kerfs, 3/16 deep, dark gray is the color we used in the kerf. All of the panels and doors were kerfed to emulate the drawers.
Tom
You're really starting to get the hang of this, [member=4105]tjbnwi[/member] ")
How did you do the cutout on the door for the wine cabinet? I can't tell for sure if you cut the rails/stiles or somehow made a square cut inside the panel.
Either way, it looks great. The effect of the grain matching with the consistent straight grain is simultaneously striking and grounded.
How did you do the cutout on the door for the wine cabinet? I can't tell for sure if you cut the rails/stiles or somehow made a square cut inside the panel.
Either way, it looks great. The effect of the grain matching with the consistent straight grain is simultaneously striking and grounded.
tjbnwi
Member
- Joined
- May 12, 2008
- Messages
- 7,043
[member=3192]rvieceli[/member],
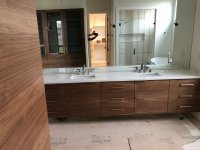
The material is rift sawn white oak. The finish is a two step process.
The material was ordered 10x4x3/4. Ordering the longer (10x4 instead of 4x10) length first means the veneer is place with the grain running in the short direction. I had the veneer laid up in a slip match instead of a book match.
My wife and I are closing on the house in Indiana next Friday. She retired last April, today was her last day at work (I can't figure it out either).
Tom
Cheese
Member
- Joined
- Jan 16, 2015
- Messages
- 12,506
Thanks for the reply Tom...like Ron I really like the wood, it looks like it’s been cerused. What a great look for a kitchen. Again...nice job.
You mentioned dark grey was used in the kerfs, would that be a paint or a stain? Did you apply it with a small brush or did you fabricate a small applicator?
You mentioned dark grey was used in the kerfs, would that be a paint or a stain? Did you apply it with a small brush or did you fabricate a small applicator?
tjbnwi
Member
- Joined
- May 12, 2008
- Messages
- 7,043
Cheese said:Thanks for the reply Tom...like Ron I really like the wood, it looks like it’s been cerused. What a great look for a kitchen. Again...nice job.
You mentioned dark grey was used in the kerfs, would that be a paint or a stain? Did you apply it with a small brush or did you fabricate a small applicator?
[member=44099]Cheese[/member],
Thank you.
It is not a cerused finish, that was to white for the designer. She wanted the cream color. We use a spray toner then an slight amber tinted waterborne finish.
The gray is KA+. We taped the kerf and brushed the finish in. Sanded the tape edge, removed the tape.
Tom
- Joined
- Jun 25, 2016
- Messages
- 624
Tom - your consistently outstanding work is not only a testimonial to your skill in planning and executing these outstanding projects - but you also keep demonstarting what is possible with the quality tools within financial reach of most anyone serious about doing good work without a shop full of stationary tools and CNC Routers.
Thanks for the continuing inspiration and encouragement by example!
Hans
PS: and CONGRATULATIONS to Mrs. B. on the completion of her career!
Thanks for the continuing inspiration and encouragement by example!
Hans
PS: and CONGRATULATIONS to Mrs. B. on the completion of her career!
tjbnwi
Member
- Joined
- May 12, 2008
- Messages
- 7,043
TSO_Products said:Tom - your consistently outstanding work is not only a testimonial to your skill in planning and executing these outstanding projects - but you also keep demonstarting what is possible with the quality tools within financial reach of most anyone serious about doing good work without a shop full of stationary tools and CNC Routers.
Thanks for the continuing inspiration and encouragement by example!
Hans
PS: and CONGRATULATIONS to Mrs. B. on the completion of her career!
Thank you.
What Hans is referring to is how we prep our pieces/product. Every single item you see in my posted pictures were sized/cut using nothing but TSO products.
The wife is already calling around looking for a new job....
Tom
Cheese
Member
- Joined
- Jan 16, 2015
- Messages
- 12,506
tjbnwi said:Thank you.
It is not a cerused finish, that was too white for the designer. She wanted the cream color. We use a spray toner then an slight amber tinted waterborne finish.
The gray is KA+. We taped the kerf and brushed the finish in. Sanded the tape edge, removed the tape.
I do like the cream undertones, they are a bit softer.
OMG...I've just asked the king of KA+ finishing if he uses a stain to finish the kerfs...what was I thinking...I must have OD'd on too many mashed potatoes tonight.
Seriously...had I given it a bit more thought it'd be obvious that your solution would somehow encompass the KA product line.
So, it's all about chemistry and you need to find the technique and the chemistries that work for you. Experimentation has always been the key.
Years ago I talked with a local motorcycle painter Jon Kosmoski and his position was that you needed to mix the stuff up and apply it before it became a viable finish. Application was the thing.
tjbnwi
Member
- Joined
- May 12, 2008
- Messages
- 7,043
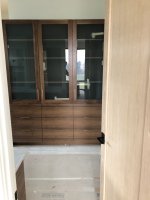
The dining room butler cabinet. The product is SALT. It is a panel product producted in Italy. The sheets are ~9'x7', suspossed to be water resistant for up to 7 hours exposure.
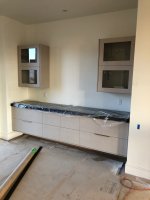
A short video of the Blum Aventos HF used on the upper cabinets functioning.
Tom
A short video of the Blum Aventos HF used on the upper cabinets functioning.
Tom
Attachments
tjbnwi
Member
- Joined
- May 12, 2008
- Messages
- 7,043
Cheese said:tjbnwi said:Thank you.
It is not a cerused finish, that was too white for the designer. She wanted the cream color. We use a spray toner then an slight amber tinted waterborne finish.
The gray is KA+. We taped the kerf and brushed the finish in. Sanded the tape edge, removed the tape.
I do like the cream undertones, they are a bit softer.
OMG...I've just asked the king of KA+ finishing if he uses a stain to finish the kerfs...what was I thinking...I must have OD'd on too many mashed potatoes tonight.
Seriously...had I given it a bit more thought it'd be obvious that your solution would somehow encompass the KA product line.
So, it's all about chemistry and you need to find the technique and the chemistries that work for you. Experimentation has always been the key.
No such thing as to many mashed potatoes....
Tom
Similar threads
- Replies
- 13
- Views
- 6K
- Replies
- 5
- Views
- 641