OF1010 Wall Panels

SMJoinery

Member
Joined
Nov 17, 2013
Messages
530
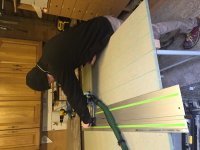
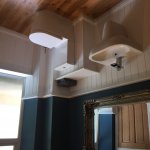
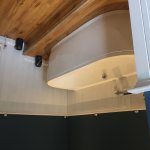
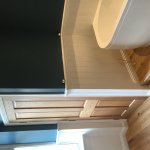
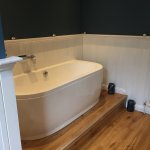
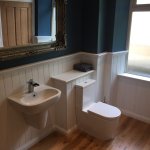
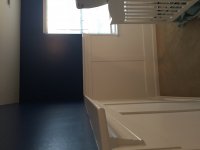
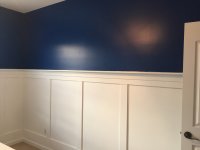
Recently finished a full family bathroom project, a real strip right back to brick and concrete and redo everything.
Made almost everything in the shop exc the ceramic and the mirror!
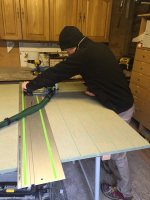
Used the Festool kit especially TS75 CMS and 2200CMS but really enjoyed using the 1010 and track to make the "V" panelling from sheets of MRMDF.
What a great system!
 

Attachments

  • image.jpeg
    image.jpeg
    1.3 MB · Views: 699
  • image.jpeg
    image.jpeg
    1.2 MB · Views: 650
  • image.jpeg
    image.jpeg
    1.1 MB · Views: 604
  • image.jpeg
    image.jpeg
    1.1 MB · Views: 619
Can someone please rotate photos. It's always the same when posted from my phone. Sorry and thanks. (Yes I know, how does the water stay in the bath!) [tongue]
 
NICE

[attachimg=1]

[attachimg=2]

[attachimg=3]

[attachimg=4]
 

Attachments

  • 4.jpeg
    4.jpeg
    248.3 KB · Views: 1,690
  • 3.jpeg
    3.jpeg
    235.6 KB · Views: 1,687
  • 2.jpeg
    2.jpeg
    267.2 KB · Views: 1,696
  • 1.jpeg
    1.jpeg
    471.7 KB · Views: 1,707
Sure thing! So question, the 'bump out' behind the toilet. Does that accommodate more of the tank or the plumbing for the toilet or..?
 
copcarcollector said:
Sure thing! So question, the 'bump out' behind the toilet. Does that accommodate more of the tank or the plumbing for the toilet or..?
Yes it hides the services at the back. What is impossible to see (and describe) is that part of the wall there is outside and part partition to utility room behind. The waste pipe comes down from upstairs turns 90deg at floor and exists outside to foul. The chosen style of toilet and ease of connection made it sensible to form a stub height boxing to cover the T joint into the stack and the bends going through the wall. Originally we were going with a concealed cistern at window location but it didn't work with drain lines unless we extended them externally.
It's really quite nice a feature as the room is actually quite big. It's an old farmhouse and was the kitchen but before that it was the original dairy.
 
Nice work.  Glad you posted as I had never heard of mrmdf before and its nice to know it is an option for these kind of environments. 
 
Sweet... How did you handle the spacing between the grooves? I would have thought perhaps go the other direction and use the last groove as alignment for the track and next groove.

I did a similar but simpler version in my expected grandsons BR. Just used plain mdf, and used the domino as alignment mechanism on the longer runs and to join the panels.

I have not seen the MRMDF over in the states, will have to look that up for damp location projects.
 

Attachments

  • image.jpeg
    image.jpeg
    1.4 MB · Views: 377
  • image.jpeg
    image.jpeg
    1.4 MB · Views: 409
The job looks nice. I take it the bathroom is all blue and the darker walls look more green from the photo? The blue looks very bright and rich. Did you use "Farrow and Ball" paint? I wish it was cheaper in the states, the local F&B dealer wants $100/gallon less 10% discount.

Your floor is Hickory I'm guessing from the tight knots and pronounced grain?
 
Love the woodwork. I'd be giving the painter a smack round the ear over the quality of the cutting in though !! [wink]
 
locaholic35 said:
Nice work.  Glad you posted as I had never heard of mrmdf before and its nice to know it is an option for these kind of environments.

Thanks.
It's great for this kind of work and it's a better cut and finish than standard board.
 
Jlovvorn said:
Sweet... How did you handle the spacing between the grooves? I would have thought perhaps go the other direction and use the last groove as alignment for the track and next groove.

I did a similar but simpler version in my expected grandsons BR. Just used plain mdf, and used the domino as alignment mechanism on the longer runs and to join the panels.

I have not seen the MRMDF over in the states, will have to look that up for damp location projects.

Thanks and nice work right back at you.
Spacing was done with a rod. I really like the precision of a rod and use them for any repititive work like this.
Over here MRMDF is not much more expensive than standard board but is much better to work with. We now don't buy any standard board.
 
mkasdin said:
The job looks nice. I take it the bathroom is all blue and the darker walls look more green from the photo? The blue looks very bright and rich. Did you use "Farrow and Ball" paint? I wish it was cheaper in the states, the local F&B dealer wants $100/gallon less 10% discount.

Your floor is Hickory I'm guessing from the tight knots and pronounced grain?

Thanks.
Yep it's all F&B paint. New colour called inchyra blue. Must just be the light as all walls are same spec. We used acrylic eggshell to get more resistance from the steam / splashes etc.
We got a lot of clients picking F&B paints and sometimes we use the unique code to mix up a tinted pot from another manufacturer especially when we are spray finishing it.
Floor is actually an engineered oak board with satin finish.
 
Kev said:
Love the woodwork. I'd be giving the painter a smack round the ear over the quality of the cutting in though !! [wink]

Thanks and thank goodness I'm a better carpenter than a painter. I'll have a word with my apprentice and tell him you don't like his cutting in!
He probably won't sleep tonight! :o
 
Lovely work and a top job.

Very timely as well as I have to make 2 fitted wardrobes next week and I didn't have any photos of panels made to look like tongued and grooved boards so I showed them your photos as an example and they loved it!
 
Woodwork Wizard said:
Lovely work and a top job.

Very timely as well as I have to make 2 fitted wardrobes next week and I didn't have any photos of panels made to look like tongued and grooved boards so I showed them your photos as an example and they loved it!

Thank you.
That's great news about the wardrobes, I'm delighted to help!
Hope this helps further..centre between centre of the "V" is 100mm. Depth is approx 5mm. We used a 45 degree bit. Slow pass up and slow pass back really kept the cuts clean with no dust.
Used the pistol grip clamp and stop on the underside of the rail.
It's really easy to set the kick back stops on the rail to form false skirting at bottom or stop the "V" pattern or simply to stop the router foot going past the end of the sheet.
Good luck.
Scott
 
You did a great job on the bathroom, enough said. No need to kibitz the colors, painting, design decisions, etc.
 
Back
Top