One material cart to rule them all

ryanjg117

Member
Joined
May 18, 2015
Messages
329
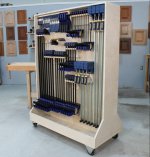
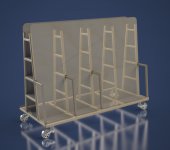
The shop is a mess, mostly due to insufficient storage space for plywood sheets and off-cuts, so I've finished up a design for a new gargantuan rolling material cart. Based on the familiar A-frame style, I scaled it up quite a bit and am looking to build the chassis from 1-1/2 x 1-1/2 x 3/32" square steel tube. This will be my first project to learn stick welding, so I figured, what better starter project than something weighing around 500 lbs empty and capable of easily killing myself if only a few welds failed?

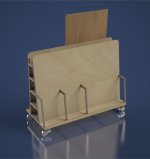
The cart is large enough to hold two stacks of 4x8 plywood sheets on end.

I'm not sure if the steel tubing is thick enough for this application, so if anyone has any metal-fab experience I would love to hear your opinion.

I was going to select sheet metal for the shelves but it appears 16 ga 4x8 sheet metal is phenomenally expensive (it would have been around $600 alone for the sheet metal on this project). So instead, I'll be using some of my plywood remnants. Knocking out two birds with one stone: using up some of the scraps while I build storage for more scraps.

Here's the design as it stands today:

D6BAb3xngBpmS1qMsCHMLsDhMnC5dNa4FKRCkzwkfDRYCdneaCxNCjBDX4jnDYP9w-7WDghIsu4qxEiIoVFL1KNB4K3JKRdruutiiBXRLfQxTKkBHK6ZZt2R-MqGhpa8mL49xabe7AZS5Awp6llDns1YsA6Z30RA_0PSKZ9hOKum1mO0Ko4KzbM5qFhApdV8nonB4mKAdWH2ULFxvzQvHin9OuohjNSEn68RmeudkIm9UbSSZm2u2iyYj_LuiVV4Tfv1Ty6p870CvxBFRZyxApfNTv8t9OpXdstravD9BZrD2NYZqZMUvDGeJZDRAFpIKnJztxHjd01UQ_PdH-wpYTMCSFVTpXF-X-BDSV9mbb4FbimOvUs-3h954kHTqyCgBCN37ybwa1pRithu74uibbIh9WdGpurfK9efgw0Iy9OFwQmY_N68R7Kmu-kwgb9wfiP5nf01vnxkGDxul-b8L_4TkKHFV99_NF1XB6-9ry2In87GXuKGgH6718g9pCSA8vl211rs2GhFlNIgEcK29Dzl0jaTR2nRTBqX_GSTvITtJpA2-JzWa63RBA0Zk6y7-AjMa_DASfLUrK9E1J-ERee3AP5IizwTxdY1U7U=w948-h1047-no


LpzFrK__-SoDAB_KbyKAdHQlK3wf1rNxQU4Y51gfJX0qHxLgW5Df6cxS7BHGd4-eMzk_tZ4rp0JsPnrRK05Ls2EeOKG3FEE_1gEC9oMD6qOdWjEy3Ph_2VcDFcpZ1eP2bbOKYaTaWowPUNVuIoUW1RFI-Dh12WeE6ByMdkMlwRl8P8Y6Sd3p8mPtgVlPGjgXGCnr6DjRa3rahLriPQpcShB9yecboqRxi7i3yFv6WqQgrVPQGxO6X7xuBrqj_QLFU2bgqrlB7OBHCeLjtB3RCyJRRwk_RdekY6Lf_HZVbBFP4kAdx94edFYlAqEt1vYjaDRXM3o7WTvH1FKb35IRNEaIzOPDa0rgwYAvuTgBmpXZG3dbM_pyTDL-8KTLImjp5KKO0xo_jdvOvdUQooM96dyG5PJmfnRHwrE5XiSQXf6Llg4K-kIq2FVEeeetRls1h96ZFMiRm_JX9FSKl1IM4HEEAET54rIFNojP_TXLceqUHISmRhO3jZtFYdG0FeIbYkGK59BtsPyUk662O4xRkuHyBtIcqFB-BuOGtmuR0NzEaqS-2Q0h_L0VOLwxhgRU3FqEUwgto7EqHx29mu5hB8AQNmB68nT1g5OH-Sg=w990-h1047-no


nvXEDXhBqtkhCSLCgyiaeVfF4zPuA-2gNWlbXLABYE9lpTVQWLdGG1dMLPEtrdw8KH-JM5eHeU4qD-4pAK6eVcs_0u03MpTJS8tZcdgZWQ6VvAluSf1BH8feJwfSNgkOJKO6Y9tETsDFudcbBSlBHdMmz8mPKUOufeNYOGq3pi69c9lzlJzEDZEct8rSi94e6QvspO2J-MWerFR6VVxPKL5HZT78cuZoUVkMDtuG9zY6nrdcj5izNmnziH3cNhv_oh28C4236H-taejVSW8SFzlwRk4Vb4I-aj4ecHPwigyJ5_yhiU8zbYzIr5NB77KRo1wsLEwdndy3Bdng7i5Tci_HF8cvsQYUmhp6MMjgPC86aURerwXOLFjwzBjrV7qRqfELTTW85IIt9XK-ErBCEW6xJ75GFPOx1_9qQ-LpNEYHGA79XBkd-izeiPPfgbdl1trmBpWfEameWyAYyQTIMzLBLqnYEaurhYjmkI6dDWGzbpWRC5llNtFwG40YI7DYBP9tp6MbNY5B3xZ012XkLRWWSy7EFvHjnYK6c5sCZDkao0PYMcT2RFJEZP5-51RPNXOp2Jc0RaaqGQx9Z2glihXb68wcep0KQ8j2sZU=w1180-h1047-no


2csBZz-1wJxLJfuILebr8XdqDuh6lFXxuLnApBr1wRMMQaNU2F3ji_4UlDI_zjeaV-CXZSLjRuwpnG8JHKVyzUo3bM3M8gUS25KLTe4QdBBqSnFQc7vjzmEtwdwi-8ytT4TBf7VnXgxJhSgDL8iB5aTgoufWCpGyz5HdUfIB_4WyJlJ8vk5UIkB5mizzcZg6UVytBYSrZMciy_x6GBfV5Hf3W3lyLGOhkAtxwC7kFrIcdMdnggod6fjMRX0CAPGTfuaxvQ5eUzP6xETBpUOGCDP-63pKOjLDIYzc-FGgb_3aougtvKLcPB4CYMCZAXcBMvDiXRUknoRJh-W8MekJQIpTUDNwlp_OVPDEOH-at9icpx7EIFwK-Jp368HOxm2Qkqx8Su_RYoHpDhvHLFd2NP5bdPOFSzJaBADybBQ4pBa6IG2_tWL2k2LhOX6q-UinVV3gXM00hNot1FNQnzcPgZjzY5_CIQAN1RIgDKHuty_-SucFRxAB_YIEWH0yi8-5lbYTlOE6tYUeJg7SZhA-OKmxC9E8baOaq74nVg3aPF5Iet9PjTunNoYr1ACs2cdiJMfyUpKJYaAz4_bWIz5f9A26z4pEQY7u6zhFHpY=w1034-h1047-no


cD_AJUjfPJRfTpKJCGYQNozIjsBiEkoTjMtSpJIWXVfo45QUo1195v06-HCxFNVnjwZKDJ0Ca1_Yet8jUj1ihWU8Xgnfc0gPPY350Slf1VrYkgnHBLfjcean0waxaS1_KpPsKLWe8Kok-FBsYKkS7sRXpbhyY9qOutfce0GxH6cjuC8VePjSV_mf0r0dgPwhwhILwg6sbiPR_bKl4lBM95_liPghenJLRBfm42pgoj43ApgywgMN0YW3s00N850eWWnHNgHP8DBFtzk5P1CPFuecc-3tCETalix8H3GR9DbCQlDx1vxmYShy1FcDGGVpJCZomSnIulC4VKddfuzRVzZpmX7OfPCZ4m3LIOIjZj6CwcALQJnA_uCdeYPSiJtJYhNjz63d-VcijnptywnKHfeJ9DRH1bBkFRfXSU22YU0oGDAlDe6V5E6nMqeEhRTPPVb3iPF7UcAGawZzf9Y2vetaLnRnL7LmRyOOszoLJ6FEqAp_-yXOzPixk9innRvdvJG-LpllNFNUDBXarBGFfYBlI4hnkrFBfTS30FPhLQw4q0D6o0HXiqn1cndQP2GS6FwME7vtk_SonA4UDi2m6aENOWRp533IfFOIBsk=w1278-h893-no
 

Attachments

  • Material-Cart-Welded.jpg
    Material-Cart-Welded.jpg
    87.7 KB · Views: 313
  • Material-Cart-Welded-2.jpg
    Material-Cart-Welded-2.jpg
    94.6 KB · Views: 328
  • Material-Cart-Welded-3.jpg
    Material-Cart-Welded-3.jpg
    70.4 KB · Views: 331
  • Material-Cart-Welded-4.jpg
    Material-Cart-Welded-4.jpg
    143.7 KB · Views: 359
Steel is not my field, but I've bought and welded it up on occasion.  16 ga. may be overkill in terms of thickness for supported material.  In any case, I wonder where you are buying your steel, because it's way cheaper at a real metal yard than at non-specialized stores.  I still sometimes buy a 3' length of something at Home Depot because I just need a short piece and it has a scan-tag on it for quick checkout, but the price to buy a 20' length is less by a silly amount at my local scrap yard.

1" x 1/16" is probably adequate.  Square tubing is insanely strong, though 1" tubes may not appear to be gym quality. 
 
This makes me want to buy a WIG welder. Or to spend some money on aluminium extrusions and connectors...

Nice render.
 
Your drawings are well done. 
Being a Ironworker and fabricater for 33 yrs I can give a few suggestions
1) build a solid jig on a solid surface to ensure all of your frames  come out looking the same
2) clamp everything down tight prior to tacking the frames up. 
3) you mentioned this is you first time, don’t practice on you project get some scrap and get comfortable with striking an arc. 
4) always wear PPE
5) more weld does not make it stronger,  weld only needs to be the thickness of the material being welded in most cases. 
6 clean all your material prior to welding
7) welding something using that thin of wall thickness do not weld in one area continuously move around and distribute the heat

Welding is like any thing else.  Good results are accomplished with time and practice.  Tack it up and examine your work. 
An electric hand grinder is a good item to have on hand
Good luck
 
@magellan

Great precise input on the tips. I am a welding n00b myself, but this is exactly what my grandpa pointed out, who had been in metal fabrication all his life!

Thanks!
 
No input on the metalwork, I'd just skip lining the inside shelves with plywood. That's just going to collect dust. Best to leave it open and let it drop to the ground for vacuuming. Very nice looking cart rendering though.
 
You are a master with SolidWorks Ryan! 

Last year, I made a china cabinet base out of 1" square tubing that I stick welded.  It had been YEARS since I had welded but it came back to me after a couple of practice runs.  Take your time and watch your amperage as it's easy to burn through that thin tubing.  Plenty of Youtube videos on technique, but practice is still best.  [member=10212]magellan[/member] has the experience but I think I might try it at 80 or 90 amps.  Too bad you don't have access to MIG as it would do a better job on the tubing and is easier to use.  Perhaps you could rent space at a local Maker space?

You'll definitely want to assemble each of the uprights in a jig and clamped down.  Ideally you have access to a large metal welding table to keep everything clamped and square.  On each assembly, I'd tack in a couple of places before doing a full bead to keep heated metal from wanting to warp on you and pull it out of square.

Once you do the five uprights, I'd place the two outside bottom rails on the table and clamp and square the outside upright in position, then tack it on both sides and work your way across to weld each in succession.  A large carpenter's square will help you keep it upright and held in place.  You might want a 1x4 piece of wood to clamp across the shelf cubbies to help hold things square and straight as you place the uprights and weld to the bottom rails.  Welders magnets might help down at the bottom while the square gives you support 2' up.

I personally like the idea of the interior shelves but 1/4" or 3/8" is sufficient for shorts.  If you want to deal with the dust, just cut some 2" to 3" holes in them to easily let dust drop down.  The idea of a 'skeletonized' plywood exterior would both reduce the weight as well as add a cool look to the cart.

One other thing.  The way you have this designed, the sheet side if fully loaded will put the bulk of your weight on one side and potentially result in an imbalance when trying to move or just pull sheets off the cart.  You might want to consider putting sheets and shorts on each side.  IF you were to lay the sheets down, it's less of an issue, but that much plywood standing upright on wheels can be dangerous when loading or unloading.

Please share photos.  This is a cool project!
 
This drawing and design looks fantastic. I want to give you some input based on my personal experience. I had a similar complaint many years ago in a two car garage home shop so I got a design for a cart similar to this (only made entirely out of wood) and I built it. It served me pretty well for a number of years only it was so heavy that I barely ever moved it. I had thought that I needed it to be mobile and it did but if you think that rack is going to be heavy enough to kill you while you build it just wait until you load it up with wood. I bought really great casters (overkill even) for mine and it still moved like a beast in hibernation, always in fear that it might wake up and kill me at any moment😊. Anyway, years later, I gave it away and rebuilt my lumber storage in a permanent location within the shop and integrated it into a cutting station so that I did not lose the use of the wall space, I just bumped it out a bit (I think that it was a Woodsmith plan). If you want more ideas around this concept go to Pinterest and type “lumber storage” into the search feature.

Also, there are tons of plans out there made strictly out of wood, I am curious as to why you have chosen the metal frame concept?

 
Too funny, I have that basic A frame cart sitting in my backyard right now. Used to use it on job sites, doesn't have the intermediate shelves or walls but the frame is there.
Anybody in the Chicagoland area wants it PM me. I don't use it anymore and probably won't. It would be a good cart for a shop and base for the pictured design.
markus
 
My ears were ringing when you posted this.  I have a cart/dolly I had welded up for a fishing kayak a couple years ago, but never used it.  I just got it out the other day and thinking about using it for a rolling clamp rack/lumber storage dolly.  I always liked the design of clamp rack Infinity Tools put together.  I don't keep a bunch of extra lumber around (usually buy what I need for each project), but this would work good to store the cutoffs and other remnants I have all in one place.  I mainly just need to roll it around the garage/shop area, but could also roll into my cargo trailer if I wanted to haul it somewhere.  Anyhow .. your post and renderings have given me the inspiration to move this project up on my list.  Stay tuned and I will show what I came up with when completed.
 

Attachments

  • IMG_4366.jpg
    IMG_4366.jpg
    997.7 KB · Views: 487
  • IMG_4368.jpg
    IMG_4368.jpg
    957.2 KB · Views: 434
  • infinityclamprack.jpg
    infinityclamprack.jpg
    142.2 KB · Views: 566
Thanks for all the feedback, great input. And good point - I could totally get away with keeping the interior cubbies bare, since those spans are only about 22" apart.

I hadn't thought of a jig for clamping but it certainly makes sense. I figured as long as the first one is done accurately, I could simply stack the next one on top, tack it, and then pull it off to do the final welds.

I'm lucky to have a large 4x8 steel fabrication/assembly table with heavy sheet on top to weld on. And I picked up a couple of 90° welding magnets for cheap.

I forgot to mention my welder is a Miller 150 STL, TIG+stick inverter unit. It's tiny. And I just wired a 220 outlet for it. So... If I really, really practiced, I suppose there's no reason I couldn't TIG weld this project. And it's a whole lot less messy than stick as well.

I'm hopefully going to get some lessons this weekend from a WABO-certified welder. I will be practicing on a lot of smaller pieces before undertaking this project.
 
One design change I do think I will make - adding a second set of casters in the middle point. Otherwise I think there will be a lot of bowing along those bottom spans, especially once weighed down with a lot of sheetgoods.

I went back and forth on whether I wanted a roller or a fixed cantilever rack. Honestly, I might have to do BOTH eventually if I keep accumulating material like a scrap yard. But I'm trying to literally put everything in my shop on casters to make it easy to reconfigure the workspace.
 
ryanjg117 said:
One design change I do think I will make - adding a second set of casters in the middle point. Otherwise I think there will be a lot of bowing along those bottom spans, especially once weighed down with a lot of sheetgoods.
It actually can't bend because the upright mounted boards offer plenty of counter-bendy-strength (if they are fixed to the bottom along the length of the cart, obviously).

Counter-bendy-strength is really the official name for this. Well, it should be.

I'm thinking six casters will make it move like BLEEP, unless your floor was previously installed in a hospital operating room.
 
First - I love your design, and your drawings. You show great attention to detail.

However -I have to say I'm with Alanbach on this. Are you really going to be schlepping this cart around the shop?

Rolling storage sounds nice, but seldom gets rolled.

I ended up doing a vertical plywood rack that only occupies 24" by 48" of floor space, built against a wall. Access is from the edge of the vertical sheets, and it's easy to pull out one piece without moving the others. I love it - it's much easier to load ply vertically. I think I originally saw this idea in shop notes.

I then built a 4' by 2' wide rolling cart that holds cutoffs vertically in a tiered fashion by height (about 10" tall at the front and 48" tall at the back). This cart immediately became and stays overfull, and has resulted in a horrid plastic garbage can next to it that is full of additional cutoffs too "good" to throw away. It's only been rolled a couple times in the last 8 years when I re-arranged the shop, and could have been moved with a hand truck. That said it doesn't hurt to put the casters under it.

I still need more cutoff storage. Will probably build one or two more vertical cutoff bins 3" wide by 18" deep against a wall, cabinet, or the back of a large stationary tool.

Ask yourself these questions:

How much plywood storage do you actually need?
How much cutoff storage do you really need?
Does storing either horizontally make it easier to see?
Does storing either horizontally make it easier to access?
Do you want to build a cart that requires you to move it to get to the stuff in the back?

In my experience horizontal storage of less than full length pieces makes it difficult to tell their length. It also means you have to move all the short pieces to get to longer ones. Stacking wood ALWAYS means moving wood to get at the pieces you want.

Just a few thoughts............
 
[member=51886]ryanjg117[/member] - I was just responding to a recent thread about lumber carts and having remembered this post I went back to reference it. After rereading it I became curious as to the outcome. Did you build it? Is it in place and filling up as we speak😊? Would love to hear about it or even see pics. Thanks!
 
[member=66185]Alanbach[/member] I ended up finding a large metal A-frame cart on Craigslist and have welded a steel rolling carriage to it, but sadly it's really too large for my shop. I think I will be cutting it down and going with a more space-efficient design that is taller but consumes a smaller overall footprint. Also, I have acquired for free some Madux open racking (think slighlty less burly than a full-size pallet rack but with shelves still rated for 1,500 lbs each) and am working to weld casters to that right now. My plan is for this rack to hold my long cuts horizontally, while I will dedicate the original cart to holding larger sheetgoods. I'll post pics when done.
 
I have a steel A frame cart similar to the one in the first pics of this thread. I used to use it on commercial job sites to haul materials.
I don't need it anymore, its sitting covered in my backyard. Someone could use it as a base to add onto.
If someone wants it, PM me. I'm on the Sside of Chicago
 
Back
Top