Pen Turning

woodguy7

Member
Joined
Apr 26, 2009
Messages
2,726
Are there any foggers that make their own pens ?  Something I have wanted to do for a while but never got round to it.  I ordered a selection of things from Axminster but the Mandrell was out of stock.  Should get it in 2 weeks but I think I have everything else I need.  I bought approx 10 blanks but most of them being Acrylic which I think look nicer.

Just looking for any hints or tips & possibly some pics ?

Thanks.
 
drill press if you have it. make a jig to hold it plumb.
try wood first before comitting to acrilic.
there is plenty of info on the web on how to do it.
sharp tools etc
the superglue finish is a nice finish on wood.
have fun , they are rewarding to make.
 
Watched quite a few YouTube videos but they make it look easy & as is most often the case, they are not.  Think I will try the Zebrano blank before trying the acrylic ones.
 
At one point I was interested in them but didn't have a lathe.  I used this with my router table:  Tompkins Turner

For sanding and finishing I rigged up something to fit into a corded 3/8" drill inserted in my Zyliss vise.

I made a couple of hundred and had a blast.  I still have a bunch of blanks and parts.  [eek]

Have fun!

Peter
 
This is something I would never have patience to do. Particularly the centre drilling. Ironically a tablet/iPad stylus doesn't need a centre hole ... All you'd need is the tip ... Could be a fun alternative ??
 
You have a good point Kev (pardon the pun). Bound to be someone doing a kit for a stylus ?
 
I turned pens for about 2 years, off and on.  I can say this:  it was one of the very few woodworking projects that you can knock out within an hour and have a finished product ready for delivery.

Tips:
Take your time drilling the blanks.  Use a drill press, with a very stable centering holding jig.  Set the drill press to the slowest speed and clear chips frequently.  Early on I had a number of pens split (AFTER they were done) and traced it back to heat buildup when drilling, which caused expansion and weakened things.

Practice turning on soft maple.  Why?  It has a super tight grain so its not prone to catching; it's fairly cheap; and it's hides mistakes easily (light colored).  Bloodwood is also a good wood to practice on, AND it's very nice when completed.

Special woods are the hardest:  snakewood is incredibly difficult; zebrawood (chips out easily); birdseye anything.  These require extremely sharp tools and extra patience.

Invest in good quality turning tools.  Sharpness is directly proportional to good and easier results.
Don't fall for the China junk.  European brands abound. 

Be comfortable sanding for a while.  Turn things pretty close, then sand the rest.  A few inches of sandpaper costs mere pennies.  The exotic or acrylic pen blanks cost 10-20 times more if you blow it or turn it too small.

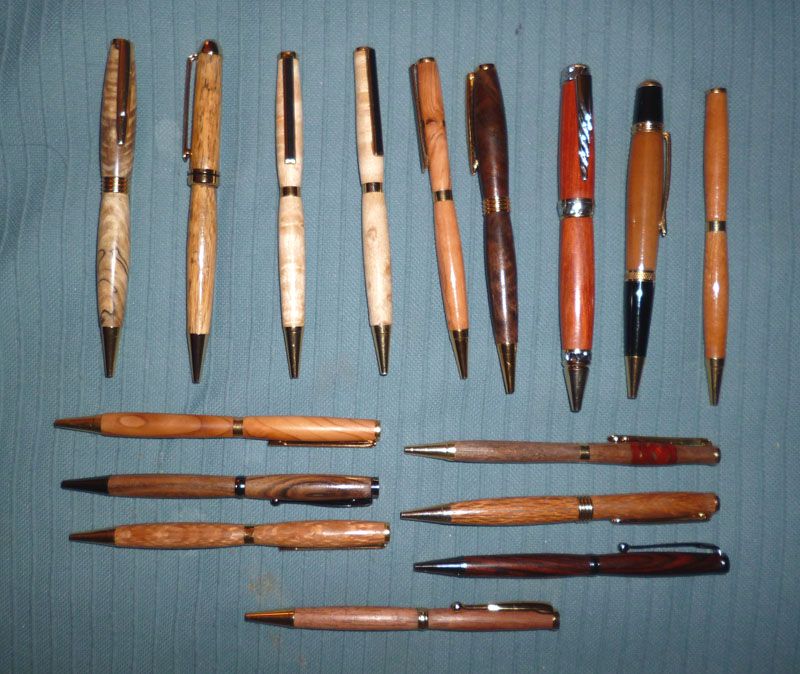
The absolute most beautiful naturally finished woods were IMHO:  African Blackwood, Olivewood, and Snakewood.  They sand smooth as glass and take lovely finishes.  Olivewood smells awesome as you cut it.  Ladies love the tulipwood.

Wear a dust must at all times, even if you have good DC going.  Those chips and that dust are right at your face level.  Also eye protection or a face shield.  One pen blank that explodes into sharp pieces can really ruin your day... errrrr, the rest of your life actually.

Play around with and learn the CA finish.  It really provides a nice attractive and protective finish.  There are a number of guides, but the simple story is:  apply thin or medium CA liberally, while it is rotating.  Immediately follow by applying boiled linseed oil (BLO) fairly liberally and very quickly.  The BLO thins the CA, causing it to dry super smooth and catalyzes it or something, so it dries fast.  I used the blue shop towels to apply both and after a few times got repeatable results I was very happy with.

Invest in extra mandrels.  At my busiest I was sometimes makeing 3-4 in a run, leaving each on the mandrel from roughing all the way to final finish.
In choosing a mandrel, try to find longer ones.  I had two that could just barely hold two blanks at a time for the Wall Street / Gatsby pen body.  That's turning two at once.

Woodnet is a good marketplace for pen blanks.  Lots of members with exotic and semi-exotic cutoffs for sale all the time.

The process is three steps (prep; turn; finish), two of which cannot be done same day (you have to let the glue/epoxy fully cure for the tubes).
Drill a bunch of blanks at once and glue in the tubes... that way you have a plethora on-hand to choose from whenever the fancy strikes you to do some turning.

Wear comfy shoes!! This sounds sily, but a good turning session can be 1-2 hours.. and you hardly move your feet in that time.

Last tip:  Keep a small stockpile of already-made pens.  Donate them for charity auctions; give them as gifts or thank-you's; use them at work!

 
You mentioned pics...

[attachthumb=#]
Matched set- Tulipwood fountain pen and rollerball.  Brushed satin kit.

[attachthumb=#]
Aboyna burl; black titanium cigar style pen.

[attachthumb=#]

[attachthumb=#]

[attachthumb=#]-
Miscellanous in my pen display case.  (The first two were a match pair, and given for a silent auction at my daughter's school.)
Left to right:
African Blackwood; African Blackwood; Purpleheart; acrylic (swirled look); acrylic (crushed velvet look); acrylica (granite look); Bocote; Purpleheart; Stabilized Box Elder Burl; Bloodwood

 
Wow stunning  [eek]. That's just the sort of advise I was hoping for.  From what you guys are saying, I need to get the holder for the drill press.  I did buy a specialised drill bit that reduces heat build up so hopefully that won't be a problem.  The one thing I have never done is sharpen turning tools.  I have the big Tormek so I guess I will need to get the gouge jig for it ?

Junkie, I presume there is no Finnish applied to the Acrylic pens ?  Or possibly some burnishing cream ?

Thanks guys.
 
woodguy7 said:
Wow stunning  [eek]. That's just the sort of advise I was hoping for.  From what you guys are saying, I need to get the holder for the drill press.  I did buy a specialised drill bit that reduces heat build up so hopefully that won't be a problem.  The one thing I have never done is sharpen turning tools.  I have the big Tormek so I guess I will need to get the gouge jig for it ?

Junkie, I presume there is no Finnish applied to the Acrylic pens ?  Or possibly some burnishing cream ?

Thanks guys.

You may want to look at the TNT-708 kit. It has the leather honing wheel and several other useful bits if you need to sharpen very fine turning tools.

I considered it when I was looking at the various sets, but the relative value wasn't there for me as I only needed the honing wheel and cover - I'm not a turner.

 
The finish I evolved into was as follows (it's been a while, so digging in the memory attic here...)

Wood pens:
Turn and sand to 400g.  I really liked the 3M no-load paper (it was yellowish).  I cut off 1" wide strips as needed.  Micromesh just a few grits if you're using a super fine wood, i.e. blackwood, olivewood, maple, etc that can be sanded glass smooth.  Don't bother on things like Wenge, ash, or anything with an open grain
Apply a coat of CA finish (CA + BLO).  Let dry 10-15 minutes. 
Apply 2nd coat CA + BLO.  Let cure overnight.
Sand with micromesh ~1500g just a touch.  Third coat of CA + BLO.  Cure overnight.
I then applied a thin coat of Renaissance Wax.  This gave it a satin sheen and protects from finger oils, etc.

Acrylic pens:
Turn and sand to 400g.
Micromesh to 1500g+
Rub down with HUT Ultra Gloss Plastic Polish (it's a liquid).  This will serve as a final "sanding" and makes your pen sparkle like crazy.
Be careful of friction build up.  This can cause a LOT of heat, very fast.  Keep the rag moving in a nice even motion back and forth.
Done! 

 
I have turned for years,  one thing i will warn you about!!! it is worse than cocaine!!
and there may be a fog pen in the works!!!!!!
if i can get Peter to give me the file for the emblem i can get it lazer cut into the pen!!!!
Allen
 
Allen

That sounds interesting.  Would like to see pics if you get it done.  I know what you mean about addictive  [blink]

Woodguy.
 
WoodPens.jpg


The Two top left are Spalted left is Pecan and right is Madrone (I think).  Third and fourth from the left are bird's eye maple.  Fifth from left is Olivewood.  Fourth from right is Walnut Burl.  Third from right is Redwood.  The last two are cherry.  There are two lacewood pens third pen on the left at bottom and the other is the second on the right side.

CurlyMaple.jpg


What can I say I like Curly Maple.  The center and second from the right have CA glue finishes.  The Sierra pen with the Celtic Knot is somewhat easy to produce.  You cut your blanks in two 45 degree cuts on two sides to make X's on all four sides.  The lines are straight when you glue it all back together, but when you turn them they are rounded like the interlocking circles.

Acrylics.jpg


The left most one is my favorite, all but one is acrylic.  The thick blue one in the middle is inlace Acrylester, it smells sweet when drilled and turned but far more trickier to work with than standard acrylic.
 
Really nice collection there.  Can you explain more about the celtic knot, do you have any pics ?

Thanks.
 
What you do is take your blank and make a 45 degree cut.  Glue in a strip of contrasting wood and reglue the cutoff back onto the blank.  Wait for it to dry.  Use a oversized blank with slightly undersized contrasting wood or use a flush trim saw to remove the excess wood protruding from the blank, sand flush.  Next turn end for end and make another 45 degree cut and repeat the above steps.  This is the halfway point and at this point you made two 45 degree cuts and after adding contrasting wood and re gluing you will have two X's on opposite sides of the blank.  You can drill and turn the blank now for a loose celtic knot, or you can turn on it's side and repeat the above steps so the contrasting wood will form X's on all four sides.

This video is just one way to do it, and you may have your own ideas as to how to do it, but my way is to use a tablesaw with a mitersled cutting into a long blank to keep my hands clear, much like the boy in the video.  What is important that if you use the bandsaw that the contrasting wood be the thickness of the blade kerf.  My table saw uses a 1/8" blade and I do have 1/8" stock on hand.  I'll try to upload a couple of pics tomorrow, but this video may give you an idea how it works.
Kid making Celtic Knot pen
 
I've made a few; fun and addictive.

Start with wood blanks if doing this the first time.

Acrylic is a bit harder.  Acrylester can be a real challenge to turn, but the results can be stunning when done well.
 
Back
Top