Pics and Frames

JeffSD

Member
Joined
Sep 5, 2019
Messages
47
Hi  gang, it looks like the Photography Forum could use a little love, so I'm posting a brief piece on some work I donated for a local Boys and Girls Club fundraiser.

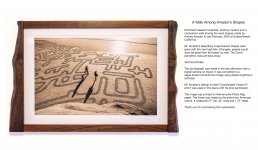
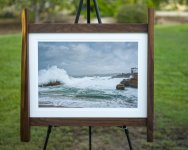
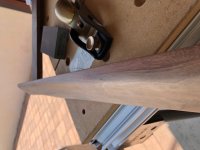
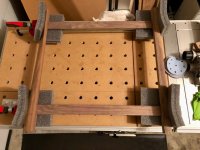
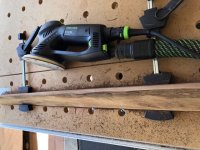
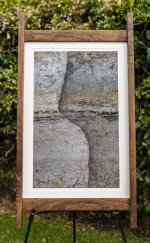
The original work was a print I made from a winter photograph at a local seascape (the Children's Pool in La Jolla, California). I built the frame (using my TS 55 track saw, OF 1400 router, Rotex 125, DTS 400 finish sander and MTF table) from a combination of Claro and Black Walnut. The finish was Watco Clear Danish Oil and Briwax.

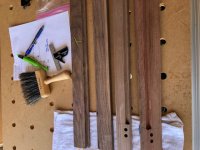
The work garnered a nice donation at the auction and a bidder, who hadn't won the auction, asked if I'd make another one in return another donation. I agreed, and took a few pics of the process.

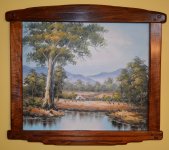
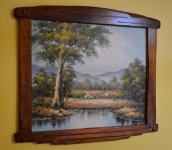
I've built a lot a frames for my prints over the past few years and have found it very rewarding.

Please let me know if you have any questions or comments.

Best,
Jeff

jeffmaysentphotography.com


Attachments

  • Children's Pool, Winter Swell McDonald.jpg
    Children's Pool, Winter Swell McDonald.jpg
    927.1 KB · Views: 393
  • IMG_2688.jpeg
    IMG_2688.jpeg
    90.3 KB · Views: 334
  • IMG_2687.jpeg
    IMG_2687.jpeg
    66.2 KB · Views: 314
  • IMG_2683.jpeg
    IMG_2683.jpeg
    85 KB · Views: 325
  • IMG_2682.jpeg
    IMG_2682.jpeg
    98.2 KB · Views: 312
  • IMG_2673.jpeg
    IMG_2673.jpeg
    115.4 KB · Views: 348
That's nice, fun to let your work help a cause too.
Watco and Briwax are a good finish combo.
 
Thanks.

Here's one more from a recent exhibition. The frame (American Walnut) was based on a design by George Nakashima. The finish is also Watco Danish Oil and Briwax.


Attachments

  • Maysent_1 framed.jpg
    Maysent_1 framed.jpg
    690.5 KB · Views: 312
Very nice! The grain is beautiful on that frame!

I'm a lover of Danish Oil myself as it can really make grain pop amazingly, how many coats did you put on, and do you buff inbetween with a steel wool or high grit media?
 
Thanks!

I used two applications of Watco Clear on that frame and hand rubbed it with linen cloth for several days until it was totally dry.

The Briwax was then applied with OOOO steel wool followed by more hand rubbing for several days.

While I didn't use it on this frame, I've recently tried the Festool White Vlies pads on several frames and I like it. Good results and less work compared to the hand rubbing.

Cheers,
Jeff
 
Haven't used Briwax myself, I'm trying a stack of oil based finishes the last year or so in the search for the perfect finish, but Cabot's Danish Oil is the one I seem to keep coming back to as I find it most hardy, and it gives a sensational finish without building up a thick coat obscuring the grain.

On Oaks and hardwoods like Vic Ash it does darken over time, but it really allows the chatoyance and fiddleback to shine through. I too use 0000 steel wool on most timbers with it almost buffing most of the coat off between coats.

I'm trying Osmo and Monocoat among many other finishes, but nothing seems to be quite as good as Danish Oil so far.

I'll have a look for some pics of a Greene & Greene style frame I made in Tas Blackwood and finished in D/O that has unbelievable grain.
 
I'd enjoy seeing the pics of your Greene & Greene frame, if you find them.  :)
 
I have gotta invest more time in photographing objects! These don't show the grain too great, but when the light hits the frame the fiddleback is just sensational!

Absolutely beautiful bits of Tas Blackwood!
 

Attachments

  • G&G Frame 01.JPG
    G&G Frame 01.JPG
    1.5 MB · Views: 294
  • G&G Frame 02.JPG
    G&G Frame 02.JPG
    1.4 MB · Views: 258
I'm really loving this style of frame. The unframed stuff I have laying around waiting for attention doesn't hold a candle to your art, but I think the frame style would do it justice.

Thanks for posting.

RMW
 
Hey, OP.

What do you use for "glass" on these lovely frames?  Where do you source it from?
 
Sorry for the tardy reply.

Thanks, stoverjack!

Oilers, the glass is Tru Vue's UltraVue. It has an anti-reflective coating which eliminates most reflections which is important to me.

It's widely available. I get it through a local frame shop.
https://tru-vue.com/

Best,
Jeff
 
Beautiful work, Jeff. Just stunning. You've inspired me to make a frame in that design. My nice photography site expired and I haven't messed with getting it organized again, but some old stuff here:
https://retake.smugmug.com

And some woodworking stuff here:
http://www.burlforest.com

I love that you've combined both.

I recently simplified my gear. I have a mirrorless R3 system from Canon, which I use when a friend needs a wedding shot, but mainly I just shoot with a Leica Monochrom (only does b/w) and two lens: a 50 and a 24mm. It keeps me more engaged. What part of the world do you live in? I live on a farm outside Nashville.
 
These are beautiful and a great inspiration! Do you have any photos of how you prepare the cutout for the mat and glass, and the hanging hardware you use?

I love the style of frame! I have a state flag I've been meaning to hang and this could be an awesome approach!
 
David, thanks for the kind comments and for sharing your terrific photos and woodwork.

I especially enjoyed your industrial scenes. "Remains of the Thirteen Levels" is very strong work.

Thanks, aCircle!

Since my workspace is small, I've been sending my finished prints and frames out for mats and glass. One day, I hope to have a clean space that's suitable for mat and glass cutting and assembly.

The hanging hardware consists of simple "D" rings and wire. Also, learn from my mistakes and be sure to drill pilot holes to avoid splits in thin stock!  :)

 
The asymmetry would seem to add significant challenges to this project.  Did you cut the rabbets after assembly?

I prefer wider mats; it seems to say, “This image is important”.

Very nice job.
 
Packard said:
The asymmetry would seem to add significant challenges to this project.  Did you cut the rabbets after assembly?

I prefer wider mats; it seems to say, “This image is important”.

Very nice job.

Thanks, Packard. Sorry to take so long to reply.

The rabbets were rough cut in pre-assembly using my OF 1400 router in a CMS-VL table. The rails were easy as the rabbets ran the entire length of the piece. The stiles were a little trickier as they had to be measured and cut to line up with the rails. The router cut for the stiles was approximate. After assembly, they were cleaned up using a corner chisel.

On mat size, I kinda go back and forth, depending on the print. I've done a lot of traditional pieces with larger overmats and neutral frames. That's the approach Ansel Adams used to great success, his goal being to draw attention to print.

I started to think a little differently after seeing some work by Japanese photographer, Takeshi Shikama that was framed in hardwood in colors that complemented the images. After that, I started to be influenced by the shapes used by George and Mira Nakashima. In these works, where the viewer is invited to see the print and frame as one cohesive piece, I think more modest size mats work well.

Here's a recent piece in that vein. It was done for a submission to a juried exhibition.

Best,
Jeff


Attachments

  • Maysent_3_LJA_2024.jpg
    Maysent_3_LJA_2024.jpg
    1.7 MB · Views: 56
Back
Top