Playing around with Xtools F2 Ultra Fiber Laser

luvmytoolz

Member
Joined
May 17, 2021
Messages
2,717
Location
Oz
Having recently got bitten by the laser bug, I bought an F1 from Xtool and while it's really good machine and being able to engrave logo's through the base is incredibly handy for big items, I soon hit the limitations.

One of which was metal engraving, I thought it would have been better than it was but sadly it was barely okay for engraving brass and copper, only giving a result that took a long time with a staggering amount of passes.

Engraving aluminium was better though, especially anodised, it would burn through the coating easily and give a very clear white engraved result. Light engraving on stainless steel was possible, but results were a bit faint.

So I ended up recently getting the Xtool F2 Ultra as they had a special on. The results are really good so far and as I get used to the numerous parameters available, I'm gradually cutting down the times while still getting great results.

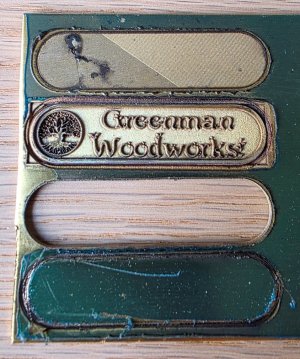
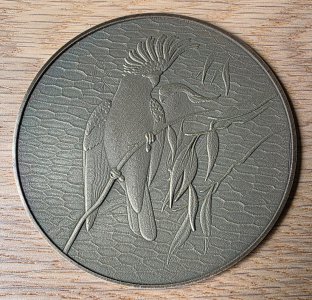
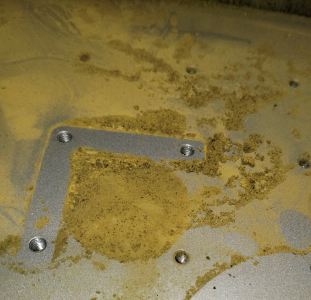
Here I've created a brass insert to go in the top of a turned box. The first lot of pics are of an 80mm x 2mm brass blank, engraved with a depth map converted from an STL I created from 2 models. Run time was around 5 hours, I'll put up the parameters if anyone's interested.

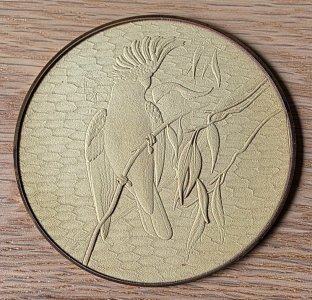
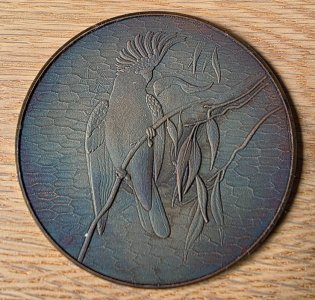
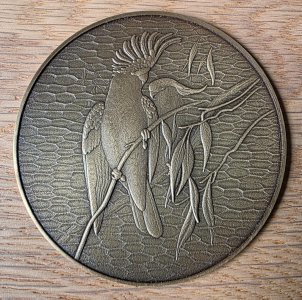
I'm very happy with the result, when brass is engraved with a fiber laser it ends up a washed out beige kind of colour that's not at all pleasant as can be seen in the first pic. In the 2nd pic I've applied some brass and copper antiquing solution, which will turn it from light brown to almost black depending on the dilution. The 3rd pic is after having buffed it with a 1500g woven pad. At this stage the results really start to stand out, but it still looks a little "flat" or lacklustre. The 4th pic is after I've buffed some Odie's oil into it. This gives a really nice tone and vastly improves the appearance, while leaving the surface dry to the touch.
 

Attachments

  • Major.Mitchells.80mm.01.jpg
    Major.Mitchells.80mm.01.jpg
    419.9 KB · Views: 21
  • Major.Mitchells.80mm.02.jpg
    Major.Mitchells.80mm.02.jpg
    320 KB · Views: 18
  • Major.Mitchells.80mm.03.jpg
    Major.Mitchells.80mm.03.jpg
    483.5 KB · Views: 17
  • Major.Mitchells.80mm.04.jpg
    Major.Mitchells.80mm.04.jpg
    426.1 KB · Views: 18
@MacBoy Thanks very much!

Glad you asked, I very severely underestimated how messy a laser can be.

There are 3 main issues with lasers, fire, dust, and smoke.

I'll cover the F1 first which has a blue diode laser for engraving organic objects, and a fiber laser for engraving metals.

Engraving any organic objects, especially wood, aside from the huge fire risk, creates an incredible amount of smoke with fine carbon particles. I can't stress this enough, deep engraving or larger jobs can completely saturate a filter in a matter of hours. The standard filter unit for the F1 has the filters rated for 10 hours of use!

As the F1 is such a low power machine, this means long machine times and multiple passes, generating a lot of waste. Engraving brass and copper however is reasonably clean as it's barely marking the surface. Engraving aluminium does generate quite a bit of dust though as the oxide layer is easily broken through.

For the F2 60W fiber laser I have (didn't get the blue diode option), the dust waste from brass is voluminous, and superfine, and despite it not billowing around as you'd think, it still seems to get into everything within the vicinity of the machine. Attached are some pics of the rear vent, and the base showing the massive accumulation of brass waste. I ended up not hooking up a filter to the default built-in fan, and instead removed the built-in fan, and connected a much larger pass-through fan with larger 3.5" ducting, with the output a couple metres away near the garage door, pointing into a bucket of water.

It's weird, the brass dust doesn't float or become air borne, it just sort of sits there and accumulates, with the stuff closest to the extractor being sucked out.

Any thoughts I had of putting this machine in my study are absolutely out of the question. I don't think there's any amount of dust extraction you could provide that would make it something that could go in a house. Certainly not when mainly doing metal as I do.

The last pic is a small stainless steel disc I'm embossing, the amount of and height of the sparks from this is quite amazing. Definitely something you need to monitor as you're working away. An accumulation of fine wood dust with those sparks could be a real issue.
 

Attachments

  • Sparks.Stainless.Steel.jpg
    Sparks.Stainless.Steel.jpg
    87.3 KB · Views: 16
  • Dust.Vent.png
    Dust.Vent.png
    2 MB · Views: 16
  • Dust.Base.png
    Dust.Base.png
    2 MB · Views: 16
Last edited:
Lovely results (y)

But even more interesting for me are your insights into real world usage. Those speeded up videos on YouTube and influencer reviews present quite a different picture.
You have rather dampened any enthusiasm I had to upgrade from my baby sized 5W 3018 laser (which I love, BTW) to anything more serious 🤪:ROFLMAO::ROFLMAO:
 
@Stevenski Thanks for the kind words.

Yeah the online videos all make it look much, much easier and faster than what it really takes to produce good results. And if they're doing a lot of metal embossing, then they're spending a lot of time in-between takes cleaning the machine!

I've been using CNC for at least 15 years now and thought operating a laser would be a similar designing and operating process, I couldn't be more wrong. For normal engraving it's easy enough, but for embossing it's sort of more akin to a mix of wishful thinking, suck it and see, black magic, and the manipulation of a myriad of parameters all working in tandem.

However simple engraving, which is basically following a vector diagram, can be blindingly fast. I can engrave my 32mm diameter logo onto brass in around 20-25 seconds.

If I want to emboss (3D engrave) the same logo, depending on the resolution and depth I want, and the various parameters that can be set, means that it could be anywhere from a shallowish relief taking 20 minutes as the absolute minimum, to a 1-1.5mm deep relief taking upwards of 1.5-2 hours (or more) on a 32mm brass blank.

The 5W laser you have I assume is a blue diode? If so I'd say it's definitely worth doing an upgrade. Going to a larger rating laser will still produce the same amount of dust and smoke, it will just do it faster as it will be quicker and take less passes for the same results. My F1 is 10W, but I think a 20W would be a far better starting point and more worth the cost of upgrading. This would also allow you to cut perspex very nicely, that would be insanely useful for template work.

Although now that Xtool has released the F2 Ultra and now the F2 which basically replaces the F1, you might see some F1's cheap?
 
Thanks very much!

Glad you asked, I very severely underestimated how messy a laser can be.

There are 3 main issues with lasers, fire, dust, and smoke.

I'll cover the F1 first which has a blue diode laser for engraving organic objects, and a fiber laser for engraving metals.

Engraving any organic objects, especially wood, aside from the huge fire risk, creates an incredible amount of smoke with fine carbon particles. I can't stress this enough, deep engraving or larger jobs can completely saturate a filter in a matter of hours. The standard filter unit for the F1 has the filters rated for 10 hours of use!

As the F1 is such a low power machine, this means long machine times and multiple passes, generating a lot of waste. Engraving brass and copper however is reasonably clean as it's barely marking the surface. Engraving aluminium does generate quite a bit of dust though as the oxide layer is easily broken through.

For the F2 60W fiber laser I have (didn't get the blue diode option), the dust waste from brass is voluminous, and superfine, and despite it not billowing around as you'd think, it still seems to get into everything within the vicinity of the machine. Attached are some pics of the rear vent, and the base showing the massive accumulation of brass waste. I ended up not hooking up a filter to the default built-in fan, and instead removed the built-in fan, and connected a much larger pass-through fan with larger 3.5" ducting, with the output a couple metres away near the garage door, pointing into a bucket of water.

It's weird, the brass dust doesn't float or become air borne, it just sort of sits there and accumulates, with the stuff closest to the extractor being sucked out.

Any thoughts I had of putting this machine in my study are absolutely out of the question. I don't think there's any amount of dust extraction you could provide that would make it something that could go in a house. Certainly not when mainly doing metal as I do.

The last pic is a small stainless steel disc I'm embossing, the amount of and height of the sparks from this is quite amazing. Definitely something you need to monitor as you're working away. An accumulation of fine wood dust with those sparks could be a real issue.
That is really fascinating. I wonder if a lot of people who buy these things get frustrated and then decide to get rid of them in short order.
My son works someplace where they recently bought a laser engraver. I am going to forward him the link to this thread and see what else I can learn about real world realities about these machines.
 
This is really quite interesting, thanks for taking the time to educate us. I find your brass medallion processing steps particularly interesting as after the initial embossing, all of the next steps taken, had nothing to do with additional laser steps, only different finishing steps/techniques. I wonder what hitting step #4 with some fine ScotchBrite would produce?
I like the idea of lasering router templates rather than machining router templates.That should be quicker to produce.
 
@Cheese The Odie's oil was buffed on using a very fine pad similar to ScotchBrite, my finishing coats are always done this way even when I use Danish Oil, gives superb results.

Sounds weird but after the tarnishing and initial buffing, the oil really brings out the detail on the brass and gives it a nice matt lustre. Even a kitchen vegetable oil would work the same here.

A mate has bought the 55W Xtool PS2 laser, and it's really amazing how on perspex he gets a beautiful perfectly clean cut. He's only done up to 6mm thick so far, but the edges are spot on, and it's amazingly fast cutting them.

I probably should have taken up the blue diode option with my F2, but it just wasn't worth the extra $2k-$3k to me.
 
Converting 3D STL's to a 2 level Depth Map & 2.5D Lasering

To emboss a logo in brass, I first create a 3D model and save it as an STL as seen by the first screenshot pic. I find I get better results with the detail on the depth maps if the original model is around 10-15 times actual size with the height 20 times actual size.

I then upload the model to "STL2PNG Converter" https://fenrus75.github.io/FenrusCNCtools/javascript/stl2png.html and generate a depth map as seen by the 2nd pic.

As I want the top surface flat, the depth map only has 2 height levels, which will cut down lasering times a little.

The result comes out very crisp and clean, and the settings selected as shown by the 3rd pic work out about 0.5mm depth in 1mm thick brass, each logo taking around 1 hour, but this time can be tweaked further to reduce it to probably around 25-30 minutes per logo. I think with this 60W laser 25 minutes is about the minimum achievable to still have a worthwhile result.
 

Attachments

  • Long Logo 50 x 12.7 x 1mm 01.PNG
    Long Logo 50 x 12.7 x 1mm 01.PNG
    228.7 KB · Views: 6
  • Long Logo 50 x 12.7 x 1mm 02.png
    Long Logo 50 x 12.7 x 1mm 02.png
    140.6 KB · Views: 5
  • Long Logo 50 x 12.7 x 1mm 03.png
    Long Logo 50 x 12.7 x 1mm 03.png
    15.2 KB · Views: 7
  • Long Logo 50 x 12.7 x 1mm 04.jpg
    Long Logo 50 x 12.7 x 1mm 04.jpg
    248.9 KB · Views: 8
Last edited:
Back
Top