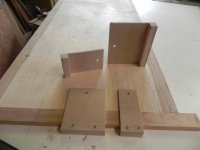
plywood shelf edging

dupres

Member
Joined
Jul 26, 2021
Messages
5
I am making some built-in bookcases. The bookcases will be made of plywood edged with solid wood, using tongue and grove joinery. My primary interest in edging the plywood this way is to add strength to the shelves.
However, now that I own a Festool Domino system, I was wondering if using dominoes would provide as much strength to the shelve as tongue and grove would.
Advice, please.
 
Will the edging be the same width as the plywood or are you planning on using wider edging to increase strength?
 
As above, we need more information..... the size of the plywood shelf (width, depth & thickness & type of ply) and the edging (depth & thickness and type of wood)
 
Strength wise?  It'll be 99% as good.  But glue alone, with no joinery, would be 98% as good.  All of which are 100% fine.

The real benefit is speed.  Dominos will be faster to cut than a spline, and they make clamping fool proof. 
 
I just applied 1.5" wide maple edging to plywood shelves with the domino. Anywhere a domino is placed the joint will be perfectly flush. In between there might be some variance that needs to be hit with a scraper or block plane and followed with some sanding. The T&G I suspect would not have the same issue, if you can call it that. It all went fairly quick and turned out great. 10 shelves and they're all the same looking and feel smooth at the transition.

i-SkbhhcP-X2.jpg
 
The shelves are Luan plywood, 3/4 inch (nominal, actual is 11/16); width of the plywood portion of the shelf (without edging) 9 3/8.

The edging will be Luan solid; it is 11/16 thick, same as the plywood (both are left over material from a stereo cabinet I made nearly 35!! years ago).
I was thinking the edging would be 1 inch deep by 11/16 wide (making the total width of the shelves 10 1/16). I could turn this around (making the shelves 10 3/8 wide) if it would make a significant difference in the strength to the shelves.

Thanks for the help.
 
I favor the time factor as well as safety for using Dominos over a spline. When I was starting out and relying less on the cross stop and paddles, I made up a set of varying templates to quickly locate pencil marks. From time to time I still use these but now recommend using the cross stop to locate the mortises finding this more efficient.

As time as gone on, the Dominos hold up well in terms of wood movement etc.

[attachimg=1]


Attachments

  • jig template.jpg
    jig template.jpg
    53.6 KB · Views: 1,685
Sedge posted a video recently on adding hardwood to plywood and then how to trim...may want to check it out.
 
I have not done this in a long time, but here was my method.

I used a tongue and groove router bit set and cut a groove in the edge of the plywood. 

I use the mating bit to cut a tongue on both edges of a piece of hardwood.

I then ripped the hardwood pieces to the width I wanted the edging. 

I then glued the edging to the plywood.

Finally I ripped the shelf to the exact size I wanted and trimmed a bit off both ends to make the exact width. 

This is way over-built for edging, and for most situations I just glue and clamp.  But if you want an edging that never falls off, this will do the job.

When I do just glue and clamp, I keep the edging to about 1/2 to 3/4" deep.  I drive tiny  brads into the glue side of the edging and clip the brads with a wire clipper.  The pointed ends will keep the edging from sliding around while clamping.  I run out of clamps pretty quickly so I glue up two shelves and place the glued edges facing each other and clamp the two pieces together. 

So with a 12 deep shelf, I end up clamping across 24" and I end up with two shelves clamped at the same time.
 
This type of edging is exactly why I have the "Paul Marcel modification" to the MFK 700.
Over the years, I have edged shelves many different ways. Biscuits, splines, rabbet in the hardwood and finally Dominos. Sometimes I have to do this on a radius and that can change things. Usually, it is still better to do the rabbet with those. Getting Dominos to fit around a radius can be a challenge. It depends up how tight the radius will be. If it is fairly slight, where you can just force the bend, not so bad, but if it is too small to where you have to preform the bend, they fight that quite well.
I had the MFK700 before the Domino and used it for the final flushing of the hardwood edge. It works very well for this operation, but the most important thing in my situation is speed.
If I was doing this at home, for myself, a block plane and some sandpaper would be fine.
 
dupres said:
The shelves are Luan plywood, 3/4 inch (nominal, actual is 11/16); width of the plywood portion of the shelf (without edging) 9 3/8.

The edging will be Luan solid; it is 11/16 thick, same as the plywood (both are left over material from a stereo cabinet I made nearly 35!! years ago).
I was thinking the edging would be 1 inch deep by 11/16 wide (making the total width of the shelves 10 1/16). I could turn this around (making the shelves 10 3/8 wide) if it would make a significant difference in the strength to the shelves.

Thanks for the help.
With ply that thick I dont believe the edge trim will add anything substantial to the strength, but will look excellent.

Me, I would use my table router to cut tongue and groove. (I've also used the table saw to cut slots in both and used biscuits)
 
The best way I've found to do edge banding is to use the Amana Tool 55468 edge banding bit set.  When it's set up right, all it takes is a minor sanding to blend it to the shelf material, then a 1/16" round-over bit to roll the edge.  One could even use a chamfer bit, if so desired. 
 
Sparktrician said:
The best way I've found to do edge banding is to use the Amana Tool 55468 edge banding bit set.  When it's set up right, all it takes is a minor sanding to blend it to the shelf material, then a 1/16" round-over bit to roll the edge.  One could even use a chamfer bit, if so desired.

Those  do work fine if you are just "edgebanding" at the same thickness of the panel, but not when you are trying to add a wider (thicker) wood edges.
The other limitation I have found with that style of cutter is that it works best if you cut that profile on a board that is much wider than what you ultimately want for your edge.
If you would try to route that shaped profile in a piece of stock the same size as they show in the cross-section picture, ugly things will occur. If you cut that same profile onto the edge of a 4" wide board, things will go much better. Then cut it apart, before gluing or after, depending on your style of clamping.
 
With these Amana style cutters I generally cut the edge piece at double width, profile both edges then rip in half. Makes things much less stressful at the router table.

Sent from my iPhone using Tapatalk
 
I've used T&G, slot cutter with biscuits, and dominos, but the next time I build a bookcase I want to try this method shown by Spencer Lewis/Insider Carpentry channel on YT. The edging work starts at about 3 mins.
 
CeeJay said:
With these Amana style cutters I generally cut the edge piece at double width, profile both edges then rip in half. Makes things much less stressful at the router table.

Sent from my iPhone using Tapatalk

Yes, this was kind of my point about gluing on a wider edge than you need, but some people may not be able to clamp across the width of two shelves at once. Of course I wasn't really thinking about where I was when saying that. This is not exactly an area of beginners or those who can't afford such things.
 
Back
Top