Prime before joint compound-skimming plaster walls?

huntdupl

Member
Joined
Oct 27, 2016
Messages
157
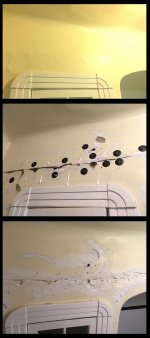
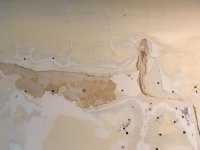
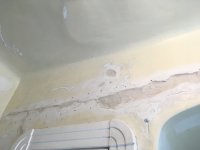
Refreshing rental unit bathroom with plaster walls and latex paint. Quick sanded off any peeling paint and leveled previous crack repairs. Giving Plasters Magic a shot on some of these larger cracks followed by mesh and rolled-on skim coat of joint compound on the walls/ceiling. Looking for process advice.

Without sanding all the paint off, any need to prime the walls before skimming with compound - what about wiping with tsp or mixing some primer in with the compound before rolling it on? I've read of people thinning PVA glue as a primer before skimming...

I'm not a tradesmen and I'm not repairing with plaster, joint compound is a little more approachable.  No vent in the bathroom and some spot peeling of several layers of paint, any issues with adhesion in this would-be wet area or will prime/paint after skimming be sufficient for sealing the bathroom? Paint/primer recommendations for wet areas, (it's a rental) Behr Premium/plus, semigloss sound good?

Plan to use premix compound or 45 minute thinned down, any tips are greatly appreciated and thanks in advance.
 
Having done this job more times than I can count, it sounds like you are overcomplicating it. I'd stay away from joint compound except for final touch up skimming. Use Durabond all the way. If you end up with big cracks or holes (which it doesn't sound like you have) you could add in structolite for volume.
Tape and skim with durabond, prime, paint, caulk, move on. On side note if you use hot water instead of cold it will cut the drying time in 1/2 of whatever number durabond you use.
Beyond that, if you've got the unit vacant put in a exhaust fan. Not putting in a exhaust fan in a rental unit bath just doesn't serve you well over the long term. Expecting tenants to open the window for ventilation isn't all that realistic, especially in winter. You may not like the idea of putting in an exhaust fan but its one of the best easy cheap things you can do to protect the interior.
Exhaust fan $100 or less. 4.5" hole saw for wood or rent a core bit and SDS from Home Depot. Electric easy enough. Don't put the fan over the tub, keep it in the room area; if you have to just drywall the ceiling after you are done, its probably only 1 sheet or less.
 
Holzhacker said:
... it sounds like you are overcomplicating it.

I am. I 9 to 5 as an architect and unfortunately get paid to overthink. I'm most worried about the final skim bonding to any of the layer exposed below during sanding (different paints, plaster, gyp...lead who knows)

I did some more digging on compounds etc and the choices are overwhelming, but what I gather is:
>Using mesh tape = using setting type or hot mud
>Easy Sand stronger than All Purpose and Durabond (brown bag) hard to source

Advice on my current mo?
Scrape old repairs, sand walls to 80
Fasten cracks, spot prime, mesh tape/skim (Easy Sand)
Kilz Complete (oil based) prime walls, roll on skim coat of thinned Easy Sand compound
Two coats all in one paint...and install vent

Suggestions?

 
dupe said:
Holzhacker said:
... it sounds like you are overcomplicating it.

I am. I 9 to 5 as an architect and unfortunately get paid to overthink. I'm most worried about the final skim bonding to any of the layer exposed below during sanding (different paints, plaster, gyp...lead who knows)

I did some more digging on compounds etc and the choices are overwhelming, but what I gather is:
>Using mesh tape = using setting type or hot mud
>Easy Sand stronger than All Purpose and Durabond (brown bag) hard to source

Advice on my current mo?
Scrape old repairs, sand walls to 80
Fasten cracks, spot prime, mesh tape/skim (Easy Sand)
Kilz Complete (oil based) prime walls, roll on skim coat of thinned Easy Sand compound
Two coats all in one paint...and install vent

Suggestions?
  Pictures for your thread/post would help greatly... Tape is generally used to make seams go away or to hide cracks.
Easy Sand is great for light coating or Skim coating, but is not as durable as Time Setting Compound or 'Hot Mud'.
Unless you really need to skim coat an entire wall, it seems you just want to patch and smooth a wall or two before painting, yes?

I would prime the walls AFTER applying your repairs or skim coat and that sanding. Sand the walls with a higher grit than 80g, like 150g before priming to etch or scratch the old paint as a bonding help. Your post shows way too much priming and confusing skim coating in it.... And get better Ventilation into that bathroom to save wear and tear on your repairs and paint work.

So, Patch and skim only as needed.  Sand the patched work to blend it in and level it with the walls. 120g is the lowest you should need to go, esp. if you're using Granat Abrasive from Festool. 150g might just work fine for you for all the sanding.  Please remember that patch tape applied to a surface is going to stick out like a sore thumb unless you either grooved /undercut your crack before applying the tape or you're skim coating a deep enough coat over the tape to hide the tape in the first place.
Try it once on a scrap board or piece of drywall to see what I'm talking about.  You can end up with a hump in the wall or surface if you didn't do the above ^^^^^^ techniques/tricks.
Prime a single coat of Oil Based Primer
Add 2 coats of  semi-gloss or your choice sheen paint, but not Flat since it's a Bathroom
 
Something I learned the hard way -  Do not patch cracks with mesh tape and "drying type" joint compound; the repair isn't very strong and they will reappear.  Paper tape and joint compound works.  Fibatape and joint compound may work. 

Use the Durabond "setting type" compound with mesh tape to prevent the cracks from returning.

What Holzhacker said about the exhaust fan - if you pursue this, be sure to wire the fan so that it comes on when the light is on.  Otherwise, it won't be used.
 
Thank you very much for your time!

As typical with older homes, you come to that point of "where do I stop (cleaning joints/scrapping paint)?" All the surfaces were hit with Granat 80 and grooved all the cracks. Big Wally's Plaster Magic worked great for reattaching the lath and plaster. 24hrs later, Granat 40 along the cracks/holes to compensate for mesh/tape.
[attachimg=4]

This is where I may have jumped the gun...I spot primed some of larger cracks. Sure the mud would've stuck to the plaster, but I did so more in hopes of consolidating the edges of the loose paint. I went with Zinsser 123 primer, I didn't suspect any bonding issues with compounding over top? I have seen others use a concrete bonding agent which may have been a better choice, at least for the crumbling plaster.

I can't get ahold of brownbag Durabond or Structolite. I did buy some plaster of paris, I was going to mix 50/50 setting compound for the initial fills. Tape then float.

Disregard time and costs, is there a problem with priming before skim coating?
[attachimg=3]
 

Attachments

  • plaster1.jpg
    plaster1.jpg
    199.7 KB · Views: 1,758
  • IMG_7551.JPG
    IMG_7551.JPG
    2 MB · Views: 1,303
dupe said:
Thank you very much for your time!

As typical with older homes, you come to that point of "where do I stop (cleaning joints/scrapping paint)?" All the surfaces were hit with Granat 80 and grooved all the cracks. Big Wally's Plaster Magic worked great for reattaching the lath and plaster. 24hrs later, Granat 40 along the cracks/holes to compensate for mesh/tape.
[attachimg=4]

This is where I may have jumped the gun...I spot primed some of larger cracks. Sure the mud would've stuck to the plaster, but I did so more in hopes of consolidating the edges of the loose paint. I went with Zinsser 123 primer, I didn't suspect any bonding issues with compounding over top? I have seen others use a concrete bonding agent which may have been a better choice, at least for the crumbling plaster.

I can't get ahold of brownbag Durabond or Structolite. I did buy some plaster of paris, I was going to mix 50/50 setting compound for the initial fills. Tape then float.

Disregard time and costs, is there a problem with priming before skim coating?
[attachimg=3]
.  Hmm, you can’t find Durabond Setting Type Drywall compound???  No Big Box Home Depot- Lowe’s- other Chain near you?
.  I see the Plaster Washers... So the plaster was that loose from the lath... Find some 90 Min Durabond compound and skim all of that plaster mess to a decent looking wall surface.
I don’t think any tape would matter much in the area where you used the washers and screws since you’ve changed the movement pattern of the lath.  I typically Durabond whole areas like this and don’t have any issues.
For the next time you do this , I’ll share one tip that speeds things up for me with using plaster washers.  I  create a shallow recess for my plaster washer to sit in so they’re just below the surface of the plaster.  I use a Carbide Tipped Forestner Bit in a Cordless Drill that’s just a little larger in diameter than the plaster washers. You just kiss the finish layer of plaster with the drill bit, making sure you don’t drill through the Brown Coat of plaster since it’s typically not as hard as the top layer.  If you’ve got the technique down , you now have a perfect shallow recess of about 1/8” to pop that washer into and install your screw.  And skim coating over it is now easy.
It’s a better trick with thicker plaster since  thin layers won’t work with losing that 1/8” or so of top /finish plaster and still be supportive under the washer without cracking on you.
Also, water damaged plaster may be too crumbly and you’re making an assessment call in that type of Situation with your repair plans.
 
Okay, I looked up Big Wally’s repair System, Rory Brennan came up with it as a smaller scale version of what he’s done commercially with adhesives reattaching the Plaster to the lath.
I see with his system that the plaster washers and screws are temporary, to be removed once the adhesive has set up. Interesting....
I now also understand the black pencil Xs from your pictures as well, noting where the drilled hole missed the lath so you don’t put consolidation liquid in that hole or the adhesive either.
Let us know how this turns out. [scratch chin] [scratch chin] [thumbs up] [thumbs up]
 
I’m going to disagree with you guys a little on this, to preface though there are many ways to skin a cat.

I never use hot mud to set tape. You are asking for trouble. My process for taping new drywall or patches is the same.

Set the tape in setting compound. If your worried about adhesion use a rough grit (80 is fine just do t year trough to the paper) on the painted walls WITH a sander attached to a vac. Worst thing you can do for adhesion is sand something up and leave all that dust on the surface.

Once you smooth all of the mud from under your tape and get everything set well you can immediately coat it. That mud underneath will dry and it’ll give you a leg up on drying time by getting a nice wide and thick coat on. I’ll usually run my 6” taping knife with a coat on either side of the joint. Try to keep those coats at the same level and if you need to leave a low spot ( maybe your not super experience I do t really know) leave it in the middle. You’ll be able to use the dried coats as a guide to fill the middle on your next coat.

Let that dry a good 24 hours. Come back when it’s fully dry and take your knife and run it up and down your joints to knock off any ridges. If your anal you can sand at this point. Then you have two options, skim out the whole wall if your going that route or grab a wider knife and feather it out wider. I’m lazy and just use my same knife because I’m good with that size but many people find a better finish with a wider blade.

Let that dry and then sand. I use a dts400 attached to a 27mm hose with the vacuum turned all the way down. Move quick and get everything into the same plane. Don’t go nuts and try to fix any imperfections you just want everything FLAT. Then you can take a very very thin coat and skim over it all. This is your fill cost for any holes, swirls or booger drags from your previous coats. You are pretty much applying joint compound and pulling it off as hard as you can with the knife at a high angle. This cost will dry in a few hours and you can hand sand it before painting.

Then prime, then paint. You don’t need to prime before painting as long as you rough it up a little. Sorry for being so long winded.
 
[member=20320]rizzoa13[/member] , after reading your post and your disagreement with previous posters I wonder if there is just a semantics issue with other posts versus yours.  When you say you use "setting compound" what product are you using?

I am only asking this because this is a good thread that could help many both now and in the future.

Peter
 
Peter Halle said:
[member=20320]rizzoa13[/member] , after reading your post and your disagreement with previous posters I wonder if there is just a semantics issue with other posts versus yours.  When you say you use "setting compound" what product are you using?

I am only asking this because this is a good thread that could help many both now and in the future.

Peter
.  I don’t think the OP has any drywall to work on in this Bathroom, just plaster from what I thought I read.  I generally never use any tape of any kind on Plaster repairs, but am curious why [member=20320]rizzoa13[/member] shuns Timed or Setting Compound for Drywall work.
Premixed Compound for me shrinks more than I usually expect, but I’m happy that I don’t work with Drywall for a living, so I don’t worry about it... [smile]
 
Sorry Peter ya just a lingo thing. I don’t use hotmud which I guess many call setting compound when taping. I probably misspoke because I usually say greentop or bluetop which correlates to the color of the USG drywall spackle buckets. I figured that was regional so was trying to use lingo that would appeal to a broader audience.

I don’t like the adhesion that hot mud gives for a tape joint. I’ve had far too many peeling tape joints even on new drywall when using hot mud under my tape. I also dont like putting hot mud over still wet “normal mud” because as the chemical reaction goes off in the hot mud it traps the “normal mud” and makes it so that doesn’t ever really dry. This is why I’ve gone to a thin tape joint and then a thick and wide coat right afterwards. It lets everything dry up well and gives a good base for feathering out wide.
 
Green lid or All Purpose with paper tape.

Setting type with mesh tape.

Setting type with paper tape does not work well in my experience; it seems to fail pretty easily.
 
Tape—paper is fine with either setting compounds (hot mud, powered mud that dries through chemical reaction) or pre mixed compound will work. If you’re using setting compounds mix it a little thin. I prefer USG All Purpose formbedding the paper tape, it shrinks nor the Plus 3 so it pulls the paper into the joint as it dries. Plus 3 after the compound has dried. Mesh tape you must use setting compounds for the first coat. It gives the mesh it’s strength. The other option is Fibafuse Tape, can get itchy if fiberglass bothers you. Dont rush the subsequent coats.

On the job in the original post, I would have scraped the walls and ceiling, use screws with plater washers on any loose areas, scuffed it a little, cover with FibaTape wall liner, rolled on thinned 120 Easy Sand, struck off with Tape Tech finishing knives. Let dry, rolled on Plus 3, strike off again with the Tape Techs. Let dry, spend 15 minutes sanding with Planex, prime paint.

On larger rooms I would have sprayed the compound on—-yep I’m that lazy.

If I wanted a L5 finish I would spray on USG Tuff Hide.

Tom
 
leakyroof said:
.  I use a Carbide Tipped Forestner Bit in a Cordless Drill that’s just a little larger in diameter than the plaster washers...you now have a perfect shallow recess of about 1/8” to pop that washer into and install your screw.

[member=10952]leakyroof[/member] Thats a great tip, thank you

-I pumped adehisve into every hole including those not hitting on lath (marked with X's)
-Temporary plastic washers are used about every other hole or 8-10". After a trial run, I decided to set a few permanent screws just next to those holes not receiving the temp washers - this helped a lot.

Thanks so much for all the input, and as mentioned there are many ways to 'skim' a cat. To clarify my comments

1) The 'Durabond' I've seen come up in multiple articles and mentioned on most boards is a brown bag sometimes referred to as natural and comes in different minutes. I'm sure someone in the parish may have it, but this joint compound is not readily available with few commenting on their recent difficulties in being able to source it.

2) I thought at one point, there were two bags labelled "Durabond", one brown and one white. The white (probably light weight) was relabeled or formulated as "Easy Sand" X. With no drywall experience, I'm referring to both of these as 'Setting Type' joint compounds/hot much i.e. they come with minute rates and thermally react to set. I had not planned on using any premixed compound on this project.

My response> mix 50/50 Easy Sand 45 with plaster of paris for prefilling large holes. After scraping loose paint/bubbles and cutting/keying cracks, it seemed safer to spot prime and consolidate the old paint and previous repairs before prefilling with the 50/50 mix.
[attachimg=2]

After drying, 6" Fibatape was cut to size to and applied with Easy Sand 45 setting type joint compound. The major cracks and holes will be close to level before sealing/priming all surfaces, dry, final skimcoat of thinned out Easy Sand 45. I know there's a lot of redundancies and when I do it again, I think I'll prime everything before any filling occurs. May be chicken or the egg?


Attachments

  • IMG_7585.jpeg
    IMG_7585.jpeg
    1.4 MB · Views: 1,181
Re: the fan issue. 

Placing the exhaust closest to the source of humidity is the best practice.  Not doing so in order to save on drywall work is false economy.  Put in / over the shower or tub.

If getting people to actually use the fan is an issue, forget a switch entirely.  Use a unit with humidity sensing feature. 

The reality is that the vast majority of bath fans are woefully undersized.  Coupled with the poor ducting install practices of most installers, their efficiency drops even more.  The result is they must run for a looooooong time in order to exhaust the warm humid air that wrecks buildings.  Which, means the fan needs to run long after the occupant has finished bathing.  I prefer a timer switch, but that requires training up the users - which isn't always practical or possible.  Wiring the fan to the light seems like a good plan if the fan is sized to remove the air while the occupant is in there.  This means a big, powerful fan - which presents other problems. A normal sized fan with a humidity sensing feature is a decent, off the shelf compromise.   
 
xedos said:
Re: the fan issue. 

Placing the exhaust closest to the source of humidity is the best practice.  Not doing so in order to save on drywall work is false economy.  Put in / over the shower or tub.

If getting people to actually use the fan is an issue, forget a switch entirely.  Use a unit with humidity sensing feature. 

The reality is that the vast majority of bath fans are woefully undersized.  Coupled with the poor ducting install practices of most installers, their efficiency drops even more.  The result is they must run for a looooooong time in order to exhaust the warm humid air that wrecks buildings.  Which, means the fan needs to run long after the occupant has finished bathing.  I prefer a timer switch, but that requires training up the users - which isn't always practical or possible.  Wiring the fan to the light seems like a good plan if the fan is sized to remove the air while the occupant is in there.  This means a big, powerful fan - which presents other problems. A normal sized fan with a humidity sensing feature is a decent, off the shelf compromise. 
  Good point, I'm constantly battling with my wife on the timed fan.  I'm the first to admit, the Fan IS older, so probably a newer one would be less dBs, or if we really went all out on a bathroom redo, remote mounted to really cut down on the noise, but then I would still have to wire in a sensor to defeat her turning off the fan too soon before it's had a change to clear out the humidity in the first place...... [embarassed] [embarassed] [embarassed]
 
Back
Top