Refinishing a mystery table

mrFinpgh

Member
Joined
Oct 30, 2015
Messages
568
I picked up an Ro150 a couple of weeks ago, and I'm delighted by it.  It is clean, efficient, more comfortable than my Bosch ROS, and it does an excellent job.  I used it to help my parent's refinish an old blanket chest last weekend that had layers and layers of finishes on it - it saved a lot of time, as they had previously spent about 6 hours just working at stripping the top.

I figured that I might want to find another project to play around with and get comfortable using it.  The relatively quick gratification of refinishing doesn't hurt, either. 

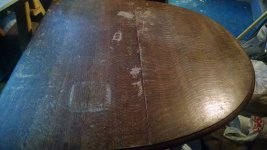
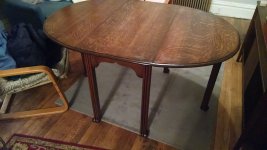
I found a nice solid oak table and picked it up for very little money.  It has a fair amount of damage to the finish and some water damage on the top, but nothing too crazy.  A couple opening in the joints that will need to be filled.  The base is much cleaner, although I will need to disassemble and reglue. 

Here is the top:

View attachment 1

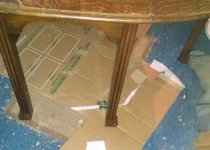
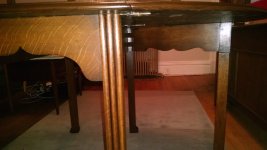
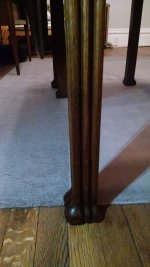
A picture of the legs -- it's a gate-leg drop-leaf style table.
View attachment 2

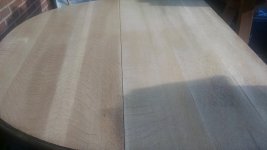
And here's the top taken from 40 - 80 in Rotex mode.  8)
View attachment 3

I'm in the process of bleaching the top, which has some green/black staining from water.

I haven't been able to identify the table in any way.  The previous owner told me he bought it at an antique shop in Portland, Oregon. 

The species and finish make me think it's inspired by Mission style, but the bottom is attached to the top with pre-kreg pocket holes, and the screws all appear to be modern.

At the same time, the base is held together using a combination of some very rough mortise and tenon joints as well as dowels.  The dowels were glued in with hide glue. 

The legs are a mystery to me.  The only thing I found that came close was an old english table with a much more ornately carved top.

If anyone has any ideas, I'd be very interested.  I spent a year studying violin makers, and I always enjoyed the professor's explanations of the various factors that distinguished one era/region/maker from another.

-Adam
 

Attachments

  • IMG_20160705_211135684.jpg
    IMG_20160705_211135684.jpg
    3 MB · Views: 415
  • IMG_20160705_211141766.jpg
    IMG_20160705_211141766.jpg
    1.1 MB · Views: 339
  • IMG_20160706_192125209.jpg
    IMG_20160706_192125209.jpg
    2.9 MB · Views: 389
No insight on the style but looking at those cracks id consider cutting it down the joints with the track saw and re-joining each piece back together by putting a tongue and groove or dominos in each side. The wood is really nice and they did a great job matching the grain but without properly joining the pieces those cracks are just going to come back. Awesome find good luck!
 
Great find.  What are you going to use to strip the edge profile on the top (not to mention the legs!)?
 
rizzoa13 said:
No insight on the style but looking at those cracks id consider cutting it down the joints with the track saw and re-joining each piece back together by putting a tongue and groove or dominos in each side. The wood is really nice and they did a great job matching the grain but without properly joining the pieces those cracks are just going to come back. Awesome find good luck!

That's an interesting idea.  I'm not sure exactly what's going on there.  I think it was probably water penetration, since the stains are directly on top of the cracks.

I'm hesitant to pull out the track saw on a piece like this, since it might also cause some issues with the profile along the edge.

Best,
Adam
 
Edward A Reno III said:
Great find.  What are you going to use to strip the edge profile on the top (not to mention the legs!)?

Probably my hands  :-\  I have a limited sander collection.  I thought about trying to make a card scraper or something to conform to the profile, but that would probably take me as much time as sanding.

I'm thinking I'll leave the legs as is, and do some minor touchup to the finish.  They are mostly in good shape, and wish some cleaning, shellac, and wax, they should look pretty good. 

I think if I had to do the legs, I'd break out the citristrip -- way too many crevices.

Best,
Adam
 
You could always rejoint the table and spin a new profile (matching if you like it) knto the whole thing. A bearing guided bit set at the correct depth could do it depending on the profile. I only say that because it's always so time consuming trying to strip and prep a profile and your just going to warp the profile in some spot and end up not happy with it.
 
rizzoa13 said:
You could always rejoint the table and spin a new profile (matching if you like it) knto the whole thing. A bearing guided bit set at the correct depth could do it depending on the profile. I only say that because it's always so time consuming trying to strip and prep a profile and your just going to warp the profile in some spot and end up not happy with it.

Wish I had read this before I went to town with the sandpaper yesterday! 

It took me a long time to sand all the finish off the profile.  And it made much more of a mess than using the Rotex did.

I'm going to have to keep that trick in mind for next time.

Thanks,
Adam
 
I got started on the finish yesterday.

Because I'm trying to avoid refinishing the base of the table, I'm doing my best to get the color as close as possible to that. 

So far, I'm kind of there but not close enough.

I put together a few samples using different amounts of transtint medium brown.  I sealed these with a 1lb cut of shellac, and then put some GF Java gel stain over it.  I wiped off the stain pretty aggressively, while trying to make sure to get into the pores of the oak.

It's not a bad look on its own - I actually prefer it to the original finish.  But the java gel stain must have some red in it, because the tone of the finish definitely went from tan to more warm and dark.

Here's a shot of a sample on top of some of the original finish:

View attachment 1

If I want to break out the Citri-strip, I could probably just do the whole table in this and it would look decent.  Otherwise, I need to find something a little more brown with even a bit of greenish tint in it.  I'm thinking Dark Walnut, but I don't know exactly why.

Any suggestions?

-Adam
 

Attachments

  • IMG_20160710_160817579.jpg
    IMG_20160710_160817579.jpg
    3 MB · Views: 292
I went over to a place in town that does a lot of decorative finishes.  More importantly, they are about 20 minutes closer to me than the nearest Rockler.  [laughing]  I spent some time with the owner looking at the finish and some gel stain samples out in the sun.

After doing this, I ended up getting some Antique Walnut gel stain.  I think that may match the colors of the table a bit more.  I'm planning to put together some more samples tomorrow.

One possibility I thought of was doing a brown dye, antique walnut glaze, and then a secondary glaze of diluted Java gel stain over that.  I've never done two gel stains over each other (with a seal coat between them), but I'm thinking I might want a bit of red in there still, just not nearly the level I was getting. 

Am I going to just end up with the same result?  Stay tuned.

-Adam
 
Work has been keeping me very busy the past month or so.  I haven't had much opportunity (or energy) to work on this table. 

I finally found some time to make up some more samples and ended up settling on this schedule:

1. Antique Walnut gel stain
2. Shellac seal coat (1# cut)
3. Java gel stain
4. Shellac seal coat (1# cut)
5. Arm-r-seal gloss, rubbed to a dull finish

I was surprised to find that this came closest to what I was after.  It's not a perfect match, but it is the most in the ballpark out of all the things I tried.  The grain on the top is so pronounced, I'm not too worried about muddying things up with the gel stains.  Also, I remove the stain aggressively, wiping first with the grain and then at a 45 degree angle to the grain.  This helps a lot.

I'll post some photos soon.  Glad to have some time to get back on this.

-Adam
 
I finally wrapped this one up and reassembled the table.

It basically sat idle for months as I procrastinated removing the finish off of the legs. Ultimately, I just spent a few hours with some sandpaper and a good pair of headphones.

Finish followed the same schedule as I listed above.

I still don't really know much about the table's origins. A lot of the joinery looks like it was cut by hand, and not necessarily cleaned up.  The curves along the stretchers still have tool marks along them. At the same time, I think a router was employed at some points in the process.

If anyone has any ideas about origin, I'd be appreciative. I doubt I will be hanging on to this in the long run - just not enough room in this place. It would be nice to let whoever purchases it know something about it.

View attachment 1
View attachment 2
View attachment 3
View attachment 4
View attachment 5

Best,
Adam


Attachments

  • IMG_20161210_171619699.jpg
    IMG_20161210_171619699.jpg
    136 KB · Views: 205
  • IMG_20161210_173444501.jpg
    IMG_20161210_173444501.jpg
    163.3 KB · Views: 209
  • IMG_20161210_173529951.jpg
    IMG_20161210_173529951.jpg
    112.2 KB · Views: 172
  • IMG_20161210_173652598.jpg
    IMG_20161210_173652598.jpg
    359 KB · Views: 203
  • IMG_20161210_173714621.jpg
    IMG_20161210_173714621.jpg
    117.8 KB · Views: 208
Back
Top