iamnothim
Member
- Joined
- Feb 5, 2014
- Messages
- 1,436
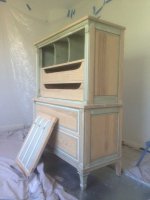
[attachimg=3]My wife wanted me to take some Davis bedroom furniture and make it look like trendy distressed Restoration hardware pieces. Originally I was going to use GF black milk paint until I hit it with the RO90 and found out the whole thing is white oak. (maybe it red). I switched to GF ebony dye/stain.
That bad boy (RO90) is amazing. It zipped through the accessible flat surfaces in no time and saved me from the mess and expense of Soy-a-Gel on these large areas. The delta pad is great too. I compared it to my ETS 150/3, with 80 grit on flat areas. The 150 took forever.
Yes I know it's a finish sander and that's why I bought it. I used it to flatten in dishes left by the RO 90.
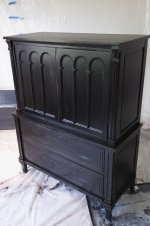
My new Fuji Mini-Mite3 arrived and blew the doors off the product my Earlex 5000 produced. Night and day. Toy to tool. I shot GF water based lacquer. I got a tip from Charles Neil on using black stain. I was getting ghosting from remnants of the Soy-a-gel and paint residue in the deep grain. Charles said to use 2oz of India Ink per quart of black stain. It worked great!
Be sure to get the non-waterproof kind when using water base stain.
[attachimg=2]
[attachimg=1]
That bad boy (RO90) is amazing. It zipped through the accessible flat surfaces in no time and saved me from the mess and expense of Soy-a-Gel on these large areas. The delta pad is great too. I compared it to my ETS 150/3, with 80 grit on flat areas. The 150 took forever.
Yes I know it's a finish sander and that's why I bought it. I used it to flatten in dishes left by the RO 90.
My new Fuji Mini-Mite3 arrived and blew the doors off the product my Earlex 5000 produced. Night and day. Toy to tool. I shot GF water based lacquer. I got a tip from Charles Neil on using black stain. I was getting ghosting from remnants of the Soy-a-gel and paint residue in the deep grain. Charles said to use 2oz of India Ink per quart of black stain. It worked great!
Be sure to get the non-waterproof kind when using water base stain.
[attachimg=2]
[attachimg=1]