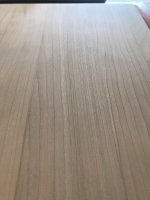
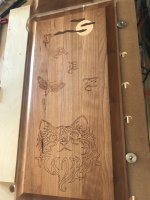
My first attempts with Shaper on repurposed Cherry cabinet door. I used 60-80-100 and 120 with the RO150 rotex for all grits and orbital for 100 and 120 then the RO90 with 220 and 320 both rotex and orbital. I then used the 320 and a bench cookie for a quick with the grain sand.
You are using an out of date browser. It may not display this or other websites correctly.
You should upgrade or use an alternative browser.
You should upgrade or use an alternative browser.
repurposed cabinet doors
- Thread starter Bertotti
- Start date
I wouldn't call it a steep learning curve but even with all the stuff online once you dig through it doesn't really start to make sense until you put it to use. The Affinity software was harder to come to grips with, I haven't yet, but there is a lot of online help for it and good vids.
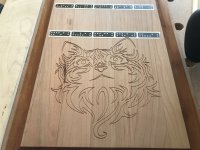
I didn't design that cat it was on a free svg website so I can't take credit for the picture but I did load it in Affinity and manipulate it a bit. I am wondering why it looks wider on the board than on my computer screen.
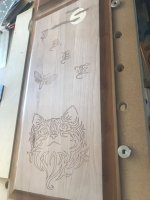
My daughter wants a moon on it still and I think I will add a moth since it looks like the cat is looking at something. I will get to try out an inlay and hope it works out. I really need to think ahead because it seems one small missed item or mistake can ruin the entire project. Kind of like that dark streak. It really bugs me I missed how that would affect the design. I usually like stuff like that in wood. I think it adds character but I should have realized it would interfere with the picture.
Thanks. I have 30 or more various panels I hope to do something with and sell at a local craft bazaar or farmers market! I have to pay for this beast quickly!
I didn't design that cat it was on a free svg website so I can't take credit for the picture but I did load it in Affinity and manipulate it a bit. I am wondering why it looks wider on the board than on my computer screen.
My daughter wants a moon on it still and I think I will add a moth since it looks like the cat is looking at something. I will get to try out an inlay and hope it works out. I really need to think ahead because it seems one small missed item or mistake can ruin the entire project. Kind of like that dark streak. It really bugs me I missed how that would affect the design. I usually like stuff like that in wood. I think it adds character but I should have realized it would interfere with the picture.
Thanks. I have 30 or more various panels I hope to do something with and sell at a local craft bazaar or farmers market! I have to pay for this beast quickly!
- Joined
- Feb 22, 2016
- Messages
- 2,858
"I am wondering why it looks wider on the board than on my computer screen."
Check your monitor/display settings.
Right-Click on desktop and choose Display Settings near the bottom of the pop-up menu.
Look at 'Scale and Layout' and also other settings like 'Display Resolution'.
Check your monitor/display settings.
Right-Click on desktop and choose Display Settings near the bottom of the pop-up menu.
Look at 'Scale and Layout' and also other settings like 'Display Resolution'.
tjskinny said:Very cool ! That’s great for the 1st shaper project !
Thank you!
Bob D. said:"I am wondering why it looks wider on the board than on my computer screen."
Check your monitor/display settings.
Right-Click on desktop and choose Display Settings near the bottom of the pop-up menu.
Look at 'Scale and Layout' and also other settings like 'Display Resolution'.
Not a lot of choices on my MacBook it says default for display.
Bertotti said:I am wondering why it looks wider on the board than on my computer screen.
I had some issues with proportions when I first started using Affinity SVGs with Shaper. This fixed my problem--maybe it will help you?
That could be it because my settings were slightly different. I had 300dpi and didn't flatten the transform! Thanks!cider said:Bertotti said:I am wondering why it looks wider on the board than on my computer screen.
I had some issues with proportions when I first started using Affinity SVGs with Shaper. This fixed my problem--maybe it will help you?
- Joined
- Oct 16, 2015
- Messages
- 5,791
That's a cool looking image and quite a lot of lines to follow. How long did it take to do that?
I spent way more time finding it and loading it in Affinity than actually doing the engraving, that maybe took 30 minutes. Picking the bit size setting the grid changing type of cut and cut depth all took extra time at first. So hands on the machine and loading it in and engraving maybe an hour of learning and doing. I was quite tentative at first. It is actually so much faster to change type on cut for a given cut on tool but with all these lines I would have been better off using the tools in Affinity designer to select them all and change them at the same time. Because changing it on tool for each cut took a bit longer.
Nope, it was downloaded as a free tribal cat svg.
I need to figure out how to draw in Affinity Designer. Using my finger on the touchpad is not working well at all. And when I find a free one online most of the time it opens Corel and wants me to subscribe to it. But I don't want any subscriptions!
I need to figure out how to draw in Affinity Designer. Using my finger on the touchpad is not working well at all. And when I find a free one online most of the time it opens Corel and wants me to subscribe to it. But I don't want any subscriptions!
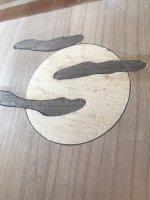
Just an updated picture. I made a few mistakes went to engrave the clouds but had the 1/8" bit in and well now it is inlaid. Inlaid the moon with birdseye maple but had the cuts reversed in on the moon and out on the cut out ooops! But it was a good learning process. Thanks everyone!
Attachments
Looking at the performance and steep angle of the engraving bit that came with the SO I decided to look for a more detailed bit with a smaller tip. I bought this Amana CNC bit has anyone here tried this one?
Amana Tool 46280 CNC 2D and 3D Carving 6.2 Deg Tapered Angle Ball Nose x 1/32 D x 1/64 R x 1 CH x 1/4 SHK x 3 Inch Long x 3 Flute SC ZrN Coated Upcut Router Bit
Amana Tool 46280 CNC 2D and 3D Carving 6.2 Deg Tapered Angle Ball Nose x 1/32 D x 1/64 R x 1 CH x 1/4 SHK x 3 Inch Long x 3 Flute SC ZrN Coated Upcut Router Bit
Similar threads
- Replies
- 11
- Views
- 1K
- Replies
- 18
- Views
- 5K
- Replies
- 2
- Views
- 842
- Replies
- 17
- Views
- 2K