sancho57
Member
- Joined
- Jan 13, 2011
- Messages
- 7,089
I decided to sign up for this course based on Peter Parfitts post about Peter Seftons Furniture School ,Store etc.
http://www.peterseftonfurnitureschool.com
I took the first of the 2 day course yesterday. The course is 2 days over 2 consecutive Saturday's .
I happily discovered that this course isn't solely a french polishing course. It is more of a furniture refinishing / repair/ restoration course.
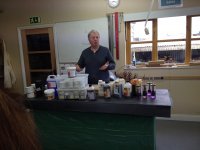
Peter himself didn't teach it. He had a friend who is currently a furniture finisher for a large company with over 30 years experiance in the industry.
After the usual health and safety brief we got into a discussion of the best materials to use and where to buy them. He basically told us that the commercial ones that can be bought at the home improvement stores are not very good. Next to useless really.
However he gave us details of industrial strippers and where they can be bought by the public. Which were what we used. They supplied the PPE which if you don't like getting a burning feeling you don't need. My wife who took the course with me and a couple of the ladies used them.
Straight away we got to the work shop and after a demo of proper stripping technique we all got to work on the pieces we brought to refinish.
During the course of the day we would stop when someone had a teachable moment on their project.
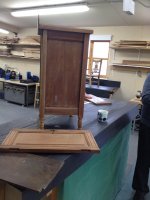
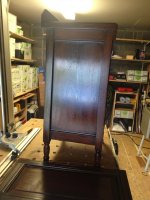
In my case my piece was a Georgian side table with a lot of knooks and crannys , moulding ect that made it difficult to get the stripper into and cleansed out of.
Another one was what to use to remove stains and black rings etc off the pieces, how to mix and apply the solution,
what stainable fillers to use to make repairs after stripping etc.
Though I didn't take any photos of the first class I'll take some the next class.
The next class will be the repair, staining and finishing of the pieces. It should be interesting as mine had some very large chips that need filling.
I mentioned to the instructor that I would use a burn in filler. He told me he has another method so He caught my attention.
Summary or is it worth the time and money ?..
Well the class was filled up with people who had little or no wood working experiance, so far I found that I have learned quite a bit about the refinishing process, little tricks etc and finding the specialty suppliers alone is a plus.
Yes I would say so far it was worth the expense.
I'm looking fwd to next week when we get to the good stuff.
I'll follow up with some photos to.
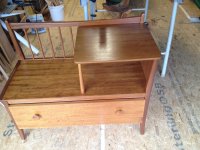
I forgot to mention how he recommended we do repairs. Now this old piece had a gouge in the leg approx 12 mm wide and 35 long with a long crack extending down the leg for another 50-60mm and a long crack in one of the side panels.
So what he used to repair it was a 2 part wood filler sanded smooth, it still showed white after the stain and shellac etc. so before the final coat of shellac he took some earth pigments black, orange and yellow mix a very small bit almost dry and used a artist brush to color the filler. Then we over it with a a final coat of shellac.
Personally I would use another method. In the states A supplier I went to taught a one day furniture repair class.They had a filler that was colored and could be mixed with other fillers to give a exact color match, drying very fast and very hard. So hard that the instructor said it could be used to repair screw holes for hinges that hold up entry doors. And when re drilled would be stronger then the original material.
I don't know if that product is available in the UK. Anyway that's my take on the class.
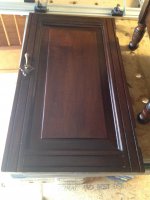
I do have a couple of photos, one after the piece was stripped and before stained and finished. I got to take the finish photos and I'll post them later on today.
http://www.peterseftonfurnitureschool.com
I took the first of the 2 day course yesterday. The course is 2 days over 2 consecutive Saturday's .
I happily discovered that this course isn't solely a french polishing course. It is more of a furniture refinishing / repair/ restoration course.
Peter himself didn't teach it. He had a friend who is currently a furniture finisher for a large company with over 30 years experiance in the industry.
After the usual health and safety brief we got into a discussion of the best materials to use and where to buy them. He basically told us that the commercial ones that can be bought at the home improvement stores are not very good. Next to useless really.
However he gave us details of industrial strippers and where they can be bought by the public. Which were what we used. They supplied the PPE which if you don't like getting a burning feeling you don't need. My wife who took the course with me and a couple of the ladies used them.
Straight away we got to the work shop and after a demo of proper stripping technique we all got to work on the pieces we brought to refinish.
During the course of the day we would stop when someone had a teachable moment on their project.
In my case my piece was a Georgian side table with a lot of knooks and crannys , moulding ect that made it difficult to get the stripper into and cleansed out of.
Another one was what to use to remove stains and black rings etc off the pieces, how to mix and apply the solution,
what stainable fillers to use to make repairs after stripping etc.
Though I didn't take any photos of the first class I'll take some the next class.
The next class will be the repair, staining and finishing of the pieces. It should be interesting as mine had some very large chips that need filling.
I mentioned to the instructor that I would use a burn in filler. He told me he has another method so He caught my attention.
Summary or is it worth the time and money ?..
Well the class was filled up with people who had little or no wood working experiance, so far I found that I have learned quite a bit about the refinishing process, little tricks etc and finding the specialty suppliers alone is a plus.
Yes I would say so far it was worth the expense.
I'm looking fwd to next week when we get to the good stuff.
I'll follow up with some photos to.
I forgot to mention how he recommended we do repairs. Now this old piece had a gouge in the leg approx 12 mm wide and 35 long with a long crack extending down the leg for another 50-60mm and a long crack in one of the side panels.
So what he used to repair it was a 2 part wood filler sanded smooth, it still showed white after the stain and shellac etc. so before the final coat of shellac he took some earth pigments black, orange and yellow mix a very small bit almost dry and used a artist brush to color the filler. Then we over it with a a final coat of shellac.
Personally I would use another method. In the states A supplier I went to taught a one day furniture repair class.They had a filler that was colored and could be mixed with other fillers to give a exact color match, drying very fast and very hard. So hard that the instructor said it could be used to repair screw holes for hinges that hold up entry doors. And when re drilled would be stronger then the original material.
I don't know if that product is available in the UK. Anyway that's my take on the class.
I do have a couple of photos, one after the piece was stripped and before stained and finished. I got to take the finish photos and I'll post them later on today.