RO 90 Abrasives Systainer

Sparktrician

Member
Joined
Dec 4, 2009
Messages
4,606
I had some time available yesterday, so I made a divider for a Systainer specifically to hold abrasives for my RO 90.  You'll note that the center (front-to-back) partition sits a hair to the right, but that's due to the location of a rib inside the Systainer.  I could have cut it shorter to fit with the rib, but since the abrasives are flexible, why bother. 

[smile]
 

Attachments

  • Dranesville-20120622-00107.jpg
    Dranesville-20120622-00107.jpg
    1.3 MB · Views: 3,097
I like what you have done. Make me wonder why Festool inserts are not the same design.

Cheers,
Steve
 
Willy, very nice! [thumbs up]  Now that you've done all the work in figuring out the sizes to cut all the part have about sharing them with the rest of us lazy types. [big grin]
 
Brice Burrell said:
Willy, very nice! [thumbs up]  Now that you've done all the work in figuring out the sizes to cut all the part have about sharing them with the rest of us lazy types. [big grin]
 

Thanks, Brice.  You don't know what you're asking for, though.  Of the seven parts, only two are identical, due to the dimensional variances inside the Systainer.  I did this pretty much seat-of-the-pants, fitting as I went.  I may take it apart again and make photos of the individual parts for reference (with a couple of modifications).  The partitions are 110 mm high, so I think I'll cut them down to 95 mm to make the compartments easier to access.  What can't be seen are the bottom cuts needed to clear the molded-in bracing on the bottom of the Systainer.  I did make one tactical error in cutting the egg-crate slots.  That resulted in a need to curve the bottom front and top rear partitions so they could slide into place.  I should have looked at the way I did the partitions in the Systainer I use for the RO 125 abrasives which I did correctly first, but alas... 

[smile]
 
Sounds like a job for a CNC router setup. Too bad someone with a CNC router does not sell a kit.
 
It's funny, I was thinking about something very similar and have been sitting on my couch getting ready for the heat vs. okc game measuring a systainer and drawing out a design, now I get to throw something on the grill because I just get to copy yours!!! [thanks]
 
Great set-up.  I agree the systainers are not the best for the RO90 -- at least if you are trying to have more grits than spaces...putting two grits together in the same slot is not ideal.

Scot
 
There is so much wasted space with the Festool abrasives insert - although it is perfectly serviceable it does resemble the inserts that you get in some cheap biscuit assortments. Thank goodness my domino set is closer to the solution from Sparky.

Peter
 
Looks nice.  You must have the divider height just short enough that the front lid projection is above them.  I have had to modify  some of mine when moving  from a Classic to the T-Loc. That strengthening rib structure gets in the way of some things I have wanted to put in a T-Loc. 

Could probably make the dividers a bit shorter and not bother cutting the notches in the bottom edges to fit the cross ribs on the bottom of the Systainer.  I have done it both ways.  I use drops of super glue at the bottom of dividers to keep them from shifting around, helps keep the whole unit stable when taking things out.

Looks great, 20 compartments, excellent!  [thumbs up]

Seth
 
I purchased the Festool Abrasive Systainer but, this design looks much more usable and it seems to hold more disks.  Thanks for sharing, I might ditch the Festool insert and make one like yours.

Jack
 
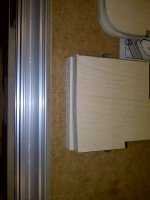
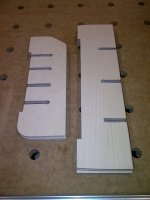
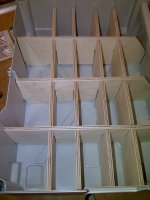
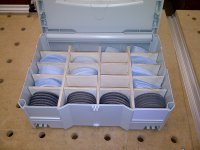
I wasn't happy with the height of the dividers, so this morning I disassembled the setup and cut the dividers' height down from 110 mm to 95 mm.  While I had the dividers out, I shot a few more photos.  The first photo shows the divider system upside down so you can see the cutouts I used to clear the reinforcing ribs on the bottom of the Systainer.  The second one shows the different end cuts needed on the side-to-side dividers.  The shorter ones fit in the rear half of the Systainer.  The third photo shows the cut pattern for tops and bottoms as well as the rounding needed on the front-to-back dividers required when slipping the assembled dividers into the Systainer.  The fourth photo shows the modified dividers inside the Systainer.  The final photo shows the way the abrasives fit inside the dividers, and how much easier it is to reach the abrasives now.  Sorry, Brice, I don't have any skills with Sketchup.  Copy away, guys. 

Edit: One thing I would do differently next time would be to cut the slots in the front-to-back partitions from the top to the bottom, and those in the side-to-side partitions from the top down.  That will make assembly a bunch of easier. 


Attachments

  • RO90_Abrasives_Systainer_20120622-02.jpg
    RO90_Abrasives_Systainer_20120622-02.jpg
    1.4 MB · Views: 1,452
  • RO90_Abrasives_Systainer_20120622-03.jpg
    RO90_Abrasives_Systainer_20120622-03.jpg
    1.3 MB · Views: 809
  • RO90_Abrasives_Systainer_20120622-04.jpg
    RO90_Abrasives_Systainer_20120622-04.jpg
    1.3 MB · Views: 1,141
  • RO90_Abrasives_Systainer_20120622-01.jpg
    RO90_Abrasives_Systainer_20120622-01.jpg
    1.3 MB · Views: 1,144
  • Dranesville-20120622-00107.jpg
    Dranesville-20120622-00107.jpg
    1.3 MB · Views: 1,153
Back
Top