Routing a dado on the mft table

oakhilltop

Member
Joined
Apr 15, 2015
Messages
32
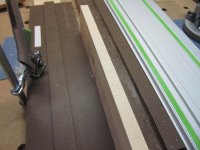
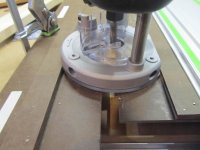
I am trying to find a way to make accurate and repeatable dados using the mft and a router. I am wondering if there is a way that is similar in setup time to using a dado stack on a table saw. I have a early 1990's Delta contractors table saw which is not great for dust even after closing up many gaps. I tried making the guides shown in the photos which are similar to plans that I have seen. I lined up the two guides on each side of the board that I wanted to put in the dado. But my router, a Dewalt 618, does not fit in the gap between the guides.

Has anyone used a Festool OF1400 with these type of guides?
Is there a better method if I got a OF1400 and a rail guide attachment?

For now, I will go back to the table saw, but this just keeps nagging me. It seems like there should be a way of doing this and I just don't see it.

Steve


Attachments

  • router_2204_s.jpg
    router_2204_s.jpg
    90.2 KB · Views: 741
  • router_2203_s.jpg
    router_2203_s.jpg
    85.3 KB · Views: 729
Do you have or can you buy a edge guide for the DeWalt?

I do dados with the OF1400 with the edge guide attached to it all the time.  I don't mess with using the MFT/3 and rail if the dado is within the reach of the edge guides rods.

Eric
 
There may be an edge guide for the Dewalt. I forgot to say that I am trying to make a 3/4" dado using a 1/2" bit. This method with the 2 guides is suppose to result in a perfect fit, but requires a pass up one side and down the other. Using an edge guide would require making a pass then adjusting the guide a little to cut the rest. And knowing me, I would get that second adjustment slightly wrong. Then I would have to go back to the first setting for the next board that I want to put a dado in at the same offset.

Perhaps using the edge guide, with a test piece of wood, and noting the 2 settings used for the 2 passes would be easy and repeatable??
 
I use the 1400 on the guide rail to make 3/4" dados, with a 1/2" bit on 2 passes. The Bridge City Toolworks KM1 is what makes it a breeze for me. Unfortunately, it's a pricey little widget, but there are youtubes showing how to make a basic single width/kerf version that does the same job. Paul Marcel also has a nice video review of the KM1 that shows how to use it for routing. I find it very quick to set up and extremely accurate, making for nice tight joints.
 
oakhilltop said:
There may be an edge guide for the Dewalt. I forgot to say that I am trying to make a 3/4" dado using a 1/2" bit. This method with the 2 guides is suppose to result in a perfect fit, but requires a pass up one side and down the other. Using an edge guide would require making a pass then adjusting the guide a little to cut the rest. And knowing me, I would get that second adjustment slightly wrong. Then I would have to go back to the first setting for the next board that I want to put a dado in at the same offset.

Perhaps using the edge guide, with a test piece of wood, and noting the 2 settings used for the 2 passes would be easy and repeatable??

If I had a 1/2" bit and wanted to make a 3/4" dado I would use the edge guide on the OF1400.  I would make one pass on each board, that way the first cut is the same on each piece.  Then I would setup the router for the second pass.  I would make a test piece and check the fit before making any cuts.  Make the same cut on each board before moving to the next cut ensures each cut is the same and will help eliminated setting up the router multiple times.

Buying a 3/4" dado router bit would be cheaper then buying the OF1400 and edge guide.    [tongue]

You stated that the DeWalt router does not fit in the gap of your shop made rails.  If you make the rails/fence  taller would that work?

Eric
 
If I understand those edge guides that you are using they would specifically be made to suit a particular router and cutter combination. The left hand guide distance would be the distance from the edge of your cutter to the left hand edge of your router and the right hand one would be the distance from the cutter to the right hand edge of your router. You then place the dado material thickness between them, clamp them together with cross pieces and route an exact dado width.

The easiest way to make the guides is to use a dimension that is slightly larger than required and trim it with the router/cutter combination that you intend to use.

The edge guides are then only usable with that particular router/cutter combination but should work with no problems and can be made to suit any router/cutter combination.
 
[member=49497]oakhilltop[/member] without having to buy anything extra, you just need to redo your jig.

In the photo, the jig part on the right side appears to be fit properly. you want the inside edge of the jig to touch the bit. As bohdan says the easiest way to do that is to oversize the base piece and use the router to cut it.

the left side of the jig seems to be the problem. Remake that piece, either start fresh or pop that guide strip off and redo it. since you router base is not symmetrical (the edge is farther away from the bit on one side) you need to always have the router face the same way. So measure the distance from the rounded router base edge on the side opposite the straight edge to the edge of the bit. Then add a quarter inch or so to that measurement. Position and fix your guide strip that distance away from the inside edge.

Now take you router and with the rounded edged opposite the straight edge of the base against the guide strip, use the router to trim the edge of the jig all the way down the piece.

Now you jig should be custom fit to your router. Position like you did before. Keeping the flat edge of the router base against the right side of the jig and using that opposite rounded edge against the left guide.

there are a lot of refinements to that jig on the web. Adding a 90 degree stop to the end for right angles, etc. But what you will have is the basics and will work. If you google "router dado jig" you'll see quite a bit of hits.

Ron
 
Thanks for the help,

After I made the post, I figured that I would have to use the round side of the base. Originally, I wanted to use the flat side for both passes. I modified the "left" guide to be the width of the round side to bit. I am able to get a clean tight fitting dado now. At least on a 3" wide piece. I have not tried making a longer dado yet. I will try using this method for awhile and see how it goes. There seems to be more room for error due to the guides sliding, or the piece that I'm cutting sliding. I put non-slip material under the piece and it works well. The quick clamp for the MFT table is nice for this. I have 2 of the manual clamps and just bought one of the quick clamps to try. I like it, and will be buying another one.

Thanks again
 
Back
Top