Self Centering Guide problem

stvrowe

Member
Joined
Jan 27, 2007
Messages
834
I tried using the RTS self centering guide for the first time today on the Domino XL.  I went through the calibration procedure and have run out of adjustment.  It will not even get all the way to the center mark on the base.  The best I can get it is a 0.88 mm offset so I need another 0.44 mm of adjustment.  I have checked the window center of the Domino and it is dead on.  Using the Festool Trim Stop, I can't even get my fingernail to catch on the joint.

Here are some pictures;
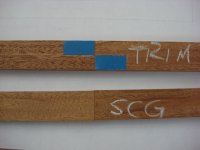
Top is trim stop, bottom is SCG
[attachimg=#]
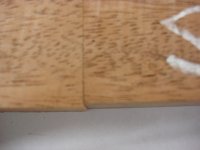
Shows 0.88 mm offset using SCG
[attachimg=#]
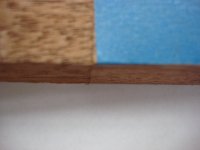
Shows perfect joint using Trim Stop adjusted to window markings
[attachimg=#]
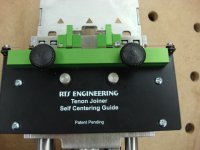
Need to move the SCG left but it is hard up against the mounting screws.  (BTW - the centering plates are not causing this problem)
[attachimg=#]

I need to move the SCG more to the left to make it centered.  It looks like I could loosen the cable clamps to and move the mechanism to restore the adjustment but, I shouldn't have to do this on a brand new accessory and this procedure isn't discussed in the owners manual.  I had great hopes for this accessory but, unless this issue gets resolved, it is going back.

Any help would be appreciated.
 

Attachments

  • DSC02259.JPG
    DSC02259.JPG
    143.4 KB · Views: 619
  • DSC02260.JPG
    DSC02260.JPG
    122.6 KB · Views: 602
  • DSC02261.JPG
    DSC02261.JPG
    112.3 KB · Views: 622
  • DSC02262.JPG
    DSC02262.JPG
    138.1 KB · Views: 669
Have you tried contacting RTS themselves?  Maybe its a lemon unit that slipped past quality control or something, or they could tell you how to fix it.
 
Steve Rowe said:
I need to move the SCG more to the left to make it centered.  It looks like I could loosen the cable clamps to and move the mechanism to restore the adjustment but, I shouldn't have to do this on a brand new accessory and this procedure isn't discussed in the owners manual.  I had great hopes for this accessory but, unless this issue gets resolved, it is going back.

Because the mortise center position can vary from one Domino joiner to another, all that I can do is ballpark-set the stops in the center of the SCG's baseplate when I tighten the cable. If the variances within the Domino, or within the mounting of the guide, are beyond the adjustability of the mounting screws, then the expected solution is to adjust the cable. That part is expected. What is a surprise is that so far I've never had to tell anyone that yet.

The engineer in me would like to figure out why there is an issue in your setup, but that isn't really important in the grand scheme. Let's just get it centered for you so you can get working on your projects.

The easiest way to reset the cable is as follows:

1 Using a 3/32" hex key, loosen one button head cap screw securing the cable to the stop arm. (The one on the right side in your picture above).

2 Slide both stop arms as close to center as you can, and with their "dovetail bases" touching each other. If you know that the scribe line on the bottom of your Domino is centered or close to centered, then use that to center the two arms.

3 (Important) Firmly tighten the black thumbscrews to lock the stops in this position.

4. Retighten the button head cap screw on the cable.

5. Check and/or adjust the final calibration using the procedure in my manual.

Just out of curiosity, before you make this adjustment, slide both stop arms all the way to the outside. Both of them should be touching their respective pulleys. If only one of them touches the pulley, then I installed the cable wrong. I usually double check this, but maybe I missed it.
 
Thanks Rick,
I will try this later today and report back.  I will try to center the jig in the screwholes first. 
Steve
 
Rick Christopherson said:
Just out of curiosity, before you make this adjustment, slide both stop arms all the way to the outside. Both of them should be touching their respective pulleys. If only one of them touches the pulley, then I installed the cable wrong. I usually double check this, but maybe I missed it.

Rick, I haven't calibrated this yet but I did check the above and found with one stop arm touching the pulley (left side as pictured above), there was a 2 mm gap between the stop arm and the right hand side pulley.
 
Steve Rowe said:
Rick Christopherson said:
Just out of curiosity, before you make this adjustment, slide both stop arms all the way to the outside. Both of them should be touching their respective pulleys. If only one of them touches the pulley, then I installed the cable wrong. I usually double check this, but maybe I missed it.

Rick, I haven't calibrated this yet but I did check the above and found with one stop arm touching the pulley (left side as pictured above), there was a 2 mm gap between the stop arm and the right hand side pulley.

That's a bit of a puzzler, because I expected it to be the exact opposite for the way I install the cable. With the sequence that I tighten the screws, if there was a gap, it should have been the left one. It comes from the fact that the cable tends to tension clockwise as you tighten their respective screws. Without exception, I always put the cable ferule under the left (underside) stop arm and tighten that screw first. If I wasn't paying attention, this would pre-tension the underside of the cable, and the gap would be on the left stop. But maybe I over-compensated when I tightened the right screw.
 
Unless we got our lefts and rights mixed up.  My description is based on reading the text on the bottom of the SCG.  ;)
 
Back
Top