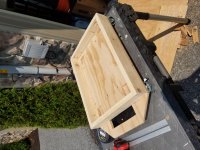
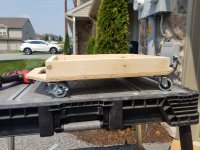
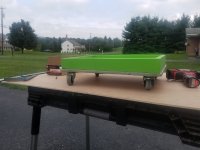
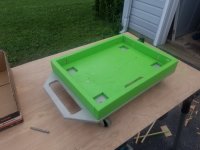
Super simple sys cart using some wood from my scraps pile. Plan on painting it Festool green and light gray. i also plan on applying some grip tape to the handles. Only thing I purchased were the 2" casters and the bat grip tape. More of a prototype. My next one will have a much higher level of finish.
You are using an out of date browser. It may not display this or other websites correctly.
You should upgrade or use an alternative browser.
You should upgrade or use an alternative browser.
Simple sys-cart
- Thread starter ColossusX
- Start date
Dick Mahany
Member
- Joined
- Jan 8, 2016
- Messages
- 555
Simple is good and looks like it will work just fine. Having a systainer stack on wheels is way handy. Nice job on the locking casters on one end, especially if you have any slope to your driveway. Mine started to go down the driveway to visit the neighbors across the street before I changed a couple of casters.
I knew I definitely wanted locking casters. Have had too many things roll away. Still trying to master the level of precision needed for wood working vs rough carpentry. But I'm having more clients asking for built ins and such so I'm trying to improve. This was a very rough attempt. But I do love pocket screws lol
Mario Turcot
Member
- Joined
- Nov 26, 2017
- Messages
- 1,288
Well done [thumbs up]
IMO pocket screws makes strong enough & quick joinery. Keep in mind that there is a side that make it a lot stronger but not always preferable. When the sides are visible I like to use Dominos.
IMO pocket screws makes strong enough & quick joinery. Keep in mind that there is a side that make it a lot stronger but not always preferable. When the sides are visible I like to use Dominos.
Michael Kellough
Member
- Joined
- Jan 23, 2007
- Messages
- 7,096
Good going! You can paint this any way you want of course but I just wanted to point out that the “Festool color” is dark blue-black. The bright green color in Festool’s color nomenclature is reserved for functional adjustments. Actionable items such as switches and levers.
The exact opposite of Festool policy would be to paint a wall green. Several people have done that and didn’t get arrested so feel free to paint this how you want.
The exact opposite of Festool policy would be to paint a wall green. Several people have done that and didn’t get arrested so feel free to paint this how you want.
Mario Turcot
Member
- Joined
- Nov 26, 2017
- Messages
- 1,288
Michael Kellough said:Several people have done that and didn’t get arrested so feel free to paint this how you want.
[eek] [eek] [not worthy] [eek] [eek]
I think I'm still a long way from getting a domino. Maybe as my business grows I'll be able to justify getting one. But this cart should at least get the job done. My next one hopefully will be more refined.
I never thought of it but yeah, my sanders are all that bkue-black.
I never thought of it but yeah, my sanders are all that bkue-black.
As my friend taught me if the design worked the first time, then it is a success! Also never point out your own flaws as the chances of others noticing are not very good. Struggled with that last one for awhile.
Without doing anything more than trying to help, I hope you take this as a way to learn. I would have run a round over bit where you put your hands before assembly, or even after assembly is still possible on the side where you pull. Plus run the round over bit along every outside/inside corner possible, again in some places which would have needed to be done before assembly (Like the vertical of the box). Smoothing the sharp corners by faking them in with either a quick hand sand or using a powered sander to take the corners off past even a router bit too. Speed holes either drilled or routed in (Squares?) would lighten it up. I doubt it needs much strength at all, unless you are putting more than a few Systainer's on it.
Functional is the single most important thing, and your cart should work great as it is. In fact I see no reason to build another one, unless you want two")
Without doing anything more than trying to help, I hope you take this as a way to learn. I would have run a round over bit where you put your hands before assembly, or even after assembly is still possible on the side where you pull. Plus run the round over bit along every outside/inside corner possible, again in some places which would have needed to be done before assembly (Like the vertical of the box). Smoothing the sharp corners by faking them in with either a quick hand sand or using a powered sander to take the corners off past even a router bit too. Speed holes either drilled or routed in (Squares?) would lighten it up. I doubt it needs much strength at all, unless you are putting more than a few Systainer's on it.
Functional is the single most important thing, and your cart should work great as it is. In fact I see no reason to build another one, unless you want two
six-point socket II
Member
- Joined
- Jun 26, 2016
- Messages
- 2,222
Hi!
I like your sys-cart!
One suggestion I'd like to make is to find a way to "lock" the first Systainer to your sys-cart, so you can securely lift it over a step and/or maneuver it over curbsides.
I'd go crazy if my sys-cart wasn't locked/fixed to the stack")
Kind regards,
Oliver
I like your sys-cart!
One suggestion I'd like to make is to find a way to "lock" the first Systainer to your sys-cart, so you can securely lift it over a step and/or maneuver it over curbsides.
I'd go crazy if my sys-cart wasn't locked/fixed to the stack
Kind regards,
Oliver
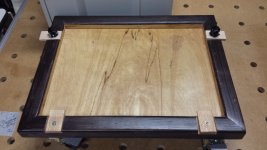
Again, thanks for the tips. I was in a time crunch to finish up, meant to use a round over. However I can disassemble the whole thing and plan on "prettying it up" this weekend.
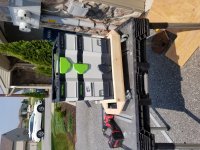
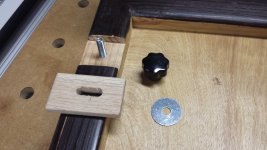
I've been worrying about locking in the systainers so I'm having some 3d printed clips coming soon.
I've been worrying about locking in the systainers so I'm having some 3d printed clips coming soon.
Attachments
It might work better if the clip was redesigned to make it longer with the groove in it, and maybe a small ridge on the top to help lock the clip in place when the wing nut is tightened. Unfortunately, I don't have the skill to do that. You would only need to have two- one for each side. The clips shown would work for the front.
Mike A.
Mike A.
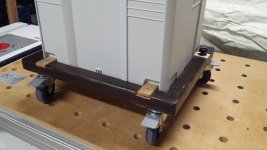
Still trying to keep it simple. Rebuilt it, routed all the edges, and painted. Systainers are still not secured to the cart, but the built up box is snug enough I can lift the whole thing briefly. Still working on that though. Nothing fancy, but it gets it done on the jobsite.
Attachments

JZ Bowmannz
Member
- Joined
- Nov 27, 2013
- Messages
- 145
JZ Bowmannz
Member
- Joined
- Nov 27, 2013
- Messages
- 145

Mario Turcot
Member
- Joined
- Nov 26, 2017
- Messages
- 1,288
[member=67056]ColossusX[/member] Simple and efficient. If you do a second cart I suggest to rotate 90deg the bottom ply you have the handle. that way it would be stronger. You may also try to have a pocket like in the handle to hold saw rails. [big grin]
[member=25829]JZ Bowmannz[/member] That's a fancy cart [wink] I like the simplicity of the systainer attachments [thumbs up]
[member=25829]JZ Bowmannz[/member] That's a fancy cart [wink] I like the simplicity of the systainer attachments [thumbs up]
Similar threads
- Replies
- 16
- Views
- 1K
- Replies
- 2
- Views
- 3K