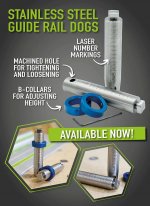
Stainless Steel Guide Rail Dogs

Mark Katz

Member
Joined
Jan 24, 2007
Messages
172
Just got an email on this. What the heck are they used for? Can't think of a need to have precision markings and collar on a dog. No video on the site except for a TikTok that shows nothing that I can see. It seems the markings determine the height of the guide rail above the work surface.

Am I missing something obvious?  I've added the image from the email as the website has no pictures of this device.
https://benchdogs.co.uk/products/gu...525&utm_medium=email&utm_source=shopify_email

[attachimg=1]


Attachments

  • Stainless Steel Guide Rail Dogs.jpg
    Stainless Steel Guide Rail Dogs.jpg
    148.7 KB · Views: 1,295
I'm guessing they're for people with mild OCD who really, really need the height of the guiderail to be exactly so high?
 
I received the same email and am equally puzzled about the use of these dogs for guide rails.  The website does have photos of the dogs, but you have to scroll through the ten manufacturer banners before you see the dogs.  Apparently, the web designer for this product didn't think seeing the product was very important.

 
Perhaps the markings are to allow you to set the dogs and rails to a pre-set height above your work surface to allow you to easily just slide work under and then out for repetitive operations?  The markings in the descriptions are for common metic thicknesses of sheet goods.

Peter
 
Peter Halle said:
Perhaps the markings are to allow you to set the dogs and rails to a pre-set height above your work surface to allow you to easily just slide work under and then out for repetitive operations?  The markings in the descriptions are for common metic thicknesses of sheet goods.

Peter

I could see that being handy. I often place small off-cuts under the rail, near the dogs, to keep it from dropping when I remove the cut piece. I use the UJK clips and dogs, since my table is too wide for a hinge system.  As it is now, I can crosscut over 30". There is more table space, but I think I just got lucky when I first built that top. I wouldn't be able to reach any farther anyway. I have thought about remaking the top and changing a few things, including more holes for wider cuts, but it would only really work if the end I was cutting of was short. I would need to be able walk with the saw to cut wider.
 
I suppose that if the dogs were set too low, you could not slide in fresh stock under the track.  And if it were too high, the track would bow. 

But…

One of the areas were the human eye excels is alignment. We (humans) are able to align things with great precision.  It is the principle behind the vernier scale on calipers. So making the collar match the height of stock would be in our wheelhouse.  No markings required.  Slide it until it looks like the height is the same.  If it looks identical, it almost certainly will be identical. 

A hand-held block to stick the dog in will be helpful as it eliminates the need to crouch down to see if the height matches.  Insert the dog into the small square of MFT table (6” x 6” sounds like a handy size).  Compare the height in that small square with the thickness of the material being cut.  All done by eye.  All with excellent accuracy and repeatability.

But that makes sense only if my original supposition makes sense.

(We are also able to match colors with great precision—or more likely—notice when a color does not exactly match another.)
 
These remind me of the Dashboard PWS Spirail dogs

The T notch at the top can slot into the groove underneath a Festool rail (too thick for my Bosch/Mafell) and with a pair you can drop the rails down into the holes to prevent movement. This assumes they twist to tighten in place.

They also can slot into the extrusion of your MFT track and serve as a balance point for long pieces.
 
All these are good comments and speculations but I'm waiting for a video that explains how to use them and why they were designed the way they were.
 
Back
Top