just finished my daughter Sophie's Steamer Trunk...well really a toy box for the first few years. I decided to hold off on making the lid for now mostly because she would not be able to open the lid herself and more importantly I considered it a safety hazard for her fingers. For me this project was a challenge, I had never used a bunch of the joinery or techniques that were used in the building of this trunk. It also gave me a chance so see how the work flow in my shop was and use a bunch of my new tools...all of them in fact. That was the one really cool thing about building this chest, I used every tool in my shop.
The details:
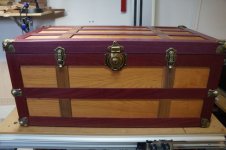
The chest is made out of Purple Heart and Cherry. The purple Heart was 4/4 material and the Cherry was 8/4 material that I resawed. The design is a frame and panel design based on the one Marc Built on his site a few years ago, which is based on the Rockler Steamer Trunk. The panels are floating panels and the legs are rabbeted and each piece has a 1/4" groove for the for the panels to float in. The faux straps are walnut and I decided to go with two instead of three strips. For the hardware I used the steamer trunk hardware that Rockler sells. For the finish I used Minwax Polycrylic water based finish and I sprayed it on using an LVLP gravity feed sprayer that I bought from Grizzly.
I had never done frame and panel joinery before so there was a small learning curve. Having never used a dado stack before it took me a little longer than it normally should to set up for each cut. Any to be honest I was really nervous running the 36" long rail pieces across the dado stack fortunately I took my time and used The Magswitch dual roller guide to help keep the rails in place while going over the stack.
Resawing was also something that I had never done before and there was plenty of it. I was mostly happy with the results but I did end up with some drift. My expectations were not to high for my little 14" Grizzly bandsaw but it was up for the task. I made sure I had it set up properly thanks to one Michael Fourtune's videos on the Fine Woodworking website. Once I resawed the lumber I was faced with another issue and that was now having to joint one face flat before sending through the planer. I ended up using double stick carpet tape and attaching it to a piece of plywood and running it across the jointer. This method was recommend by a couple people on this forum and I was very pleased with the results. I sprayed two coats of finish on the inside of the trunk prior to installing the bottom.
There were a few mistakes that were made. First off I glued up the legs a lot earlier than I should have and this posed a few problems. The biggest problems is that I could not glue up each panel individually. The second and even bigger problem was that I could not cut the rabbet for the bottom in each panel individually and had to use router to route the rabbet. I have very little router experience and had never cut a rabbet like this before so I made a couple mistakes. Fortunately the mistake were on the bottom and covered up pretty well by the hardware. The rabbets on my legs were a little gappy so I had to fill them with a glue mixture that I made from purple heart sawdust and glue.
I have never sprayed on a finish either and I have to tell you that the LVLP sprayer is probably the best $40 I have ever spent. The water based finish dried very quickly and I was able to finish the outside of the trunk in a day. I used a Festool S1000 abrasive pad between coats and a S2000 after the final coat. The finish turned out awesome, very happy with this finish!
Final thoughts:
I literally used every tool in my shop for this build and it gave me a good idea of how the functionality of my shop was. I was very pleased for the most part but there are a few concerns. I just recently added a new dust collector but I noticed dust collection on my table saw is very poor. This is not flaw with the collector but with the design of the contractor style table saw, one that I will be addressing in between builds. I also noticed that Purple Heart and other hardwoods may just be a little to hard for the tooling in my shop. I am going to stick with woods that are softer from now on and may only go as hard as maple for future projects.
I really enjoyed this build and it was a very gratifying experience. I am probably only going to build a couple items for the shop in the next couple of months and enjoy the summer here in the Pacific Northwest, there will be plenty of shop time when the rain and cold start back up.
James
The details:
The chest is made out of Purple Heart and Cherry. The purple Heart was 4/4 material and the Cherry was 8/4 material that I resawed. The design is a frame and panel design based on the one Marc Built on his site a few years ago, which is based on the Rockler Steamer Trunk. The panels are floating panels and the legs are rabbeted and each piece has a 1/4" groove for the for the panels to float in. The faux straps are walnut and I decided to go with two instead of three strips. For the hardware I used the steamer trunk hardware that Rockler sells. For the finish I used Minwax Polycrylic water based finish and I sprayed it on using an LVLP gravity feed sprayer that I bought from Grizzly.
I had never done frame and panel joinery before so there was a small learning curve. Having never used a dado stack before it took me a little longer than it normally should to set up for each cut. Any to be honest I was really nervous running the 36" long rail pieces across the dado stack fortunately I took my time and used The Magswitch dual roller guide to help keep the rails in place while going over the stack.
Resawing was also something that I had never done before and there was plenty of it. I was mostly happy with the results but I did end up with some drift. My expectations were not to high for my little 14" Grizzly bandsaw but it was up for the task. I made sure I had it set up properly thanks to one Michael Fourtune's videos on the Fine Woodworking website. Once I resawed the lumber I was faced with another issue and that was now having to joint one face flat before sending through the planer. I ended up using double stick carpet tape and attaching it to a piece of plywood and running it across the jointer. This method was recommend by a couple people on this forum and I was very pleased with the results. I sprayed two coats of finish on the inside of the trunk prior to installing the bottom.
There were a few mistakes that were made. First off I glued up the legs a lot earlier than I should have and this posed a few problems. The biggest problems is that I could not glue up each panel individually. The second and even bigger problem was that I could not cut the rabbet for the bottom in each panel individually and had to use router to route the rabbet. I have very little router experience and had never cut a rabbet like this before so I made a couple mistakes. Fortunately the mistake were on the bottom and covered up pretty well by the hardware. The rabbets on my legs were a little gappy so I had to fill them with a glue mixture that I made from purple heart sawdust and glue.
I have never sprayed on a finish either and I have to tell you that the LVLP sprayer is probably the best $40 I have ever spent. The water based finish dried very quickly and I was able to finish the outside of the trunk in a day. I used a Festool S1000 abrasive pad between coats and a S2000 after the final coat. The finish turned out awesome, very happy with this finish!
Final thoughts:
I literally used every tool in my shop for this build and it gave me a good idea of how the functionality of my shop was. I was very pleased for the most part but there are a few concerns. I just recently added a new dust collector but I noticed dust collection on my table saw is very poor. This is not flaw with the collector but with the design of the contractor style table saw, one that I will be addressing in between builds. I also noticed that Purple Heart and other hardwoods may just be a little to hard for the tooling in my shop. I am going to stick with woods that are softer from now on and may only go as hard as maple for future projects.
I really enjoyed this build and it was a very gratifying experience. I am probably only going to build a couple items for the shop in the next couple of months and enjoy the summer here in the Pacific Northwest, there will be plenty of shop time when the rain and cold start back up.
James