baycal94566
Member
- Joined
- Jan 15, 2014
- Messages
- 31
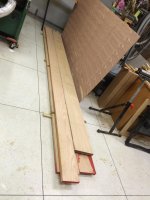
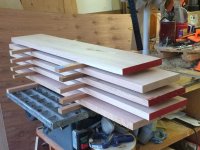
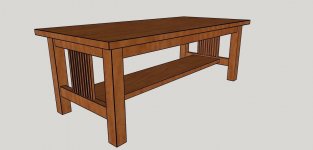
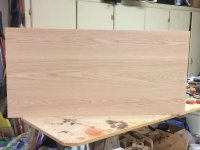
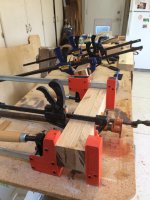
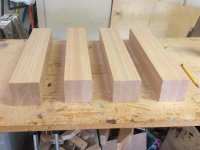
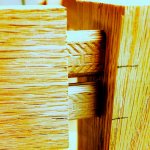
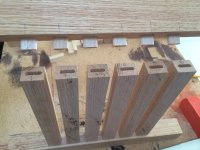
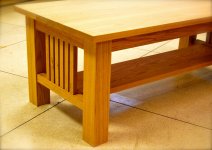
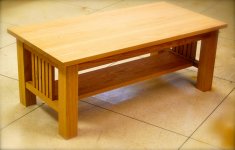
Building a few pieces for a furniture gallery. Living in Northern CA, I figured what could be better than to pay tribute to the local missions that inspired these designs so long ago. As a child we went on school trips to the missions and I always thought they were so beautiful. The first piece I did is based on a Gustav Stickley cocktail table. I have made some adjustments such as as mine is 2" longer, taller,wider, ect... The basic design is no different from tables I have built many times before but with that added Mission style to it. The entire table was built with my domino joiner. I decided to use red oak on the trial piece. Future pieces will be built using quarter sawn White oak.
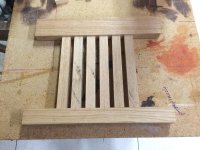
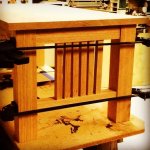
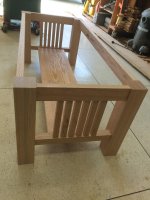
Thoughts... It's funny to me. This is not a difficult table to build. But it's sneaky. It is such a simple design that when I first decided to do it I almost tried to change too much, thinking I wanted people to say wow!!.. Here's the thing, from my point of view anyway. I came to realize that the beauty of this design is in it's simplicity. And the sneaky part is in the offsets and small details that attract the eye. If you don't pay attention you can miss them. But at least on mine. Nothing is flush. Everything has an offset, or is inset in some way. Even the width of the bottom shelf I made one inch wider on each side of the vertical spindles to add another offset. Those are the things that attract the eye and make the piece visually appealing. It doesn't have to be some crazy new design to catch the eye. This design is almost 120 years old and I believe done properly, it can stand up against anything out there.. I learned a lot about design during this project. Building the easiest thing I've built in a long time. I may have learned the most... Pretty cool. [attachimg=2][attachimg=3][attachimg=4][attachimg=5][attachimg=6][attachimg=7][attachimg=8][attachimg=9][attachimg=10][attachimg=11][attachimg=12][attachimg=13]
Thoughts... It's funny to me. This is not a difficult table to build. But it's sneaky. It is such a simple design that when I first decided to do it I almost tried to change too much, thinking I wanted people to say wow!!.. Here's the thing, from my point of view anyway. I came to realize that the beauty of this design is in it's simplicity. And the sneaky part is in the offsets and small details that attract the eye. If you don't pay attention you can miss them. But at least on mine. Nothing is flush. Everything has an offset, or is inset in some way. Even the width of the bottom shelf I made one inch wider on each side of the vertical spindles to add another offset. Those are the things that attract the eye and make the piece visually appealing. It doesn't have to be some crazy new design to catch the eye. This design is almost 120 years old and I believe done properly, it can stand up against anything out there.. I learned a lot about design during this project. Building the easiest thing I've built in a long time. I may have learned the most... Pretty cool. [attachimg=2][attachimg=3][attachimg=4][attachimg=5][attachimg=6][attachimg=7][attachimg=8][attachimg=9][attachimg=10][attachimg=11][attachimg=12][attachimg=13]
Attachments
-
 IMG_1693.jpg289.3 KB · Views: 163
 -
 IMG_1696.JPG275.1 KB · Views: 674
 -
 IMG_1698.JPG75.5 KB · Views: 664
 -
 IMG_1701.JPG210.4 KB · Views: 675
 -
 IMG_1703.jpg298 KB · Views: 637
 -
 IMG_1704.JPG238 KB · Views: 641
 -
 IMG_1707.JPG522.3 KB · Views: 652
 -
 IMG_1721.JPG275.2 KB · Views: 648
 -
 IMG_1720.JPG321.5 KB · Views: 632
 -
 IMG_1718.JPG101 KB · Views: 631
 -
 IMG_1724.jpg286.7 KB · Views: 634
 -
 DSC_2603.JPG275.5 KB · Views: 639
 -
 DSC_2602.JPG250.4 KB · Views: 627
")