Struggling to butt joint a carcase together with my DF 500

EJFRT

Member
Joined
Jan 25, 2022
Messages
2
Hi,

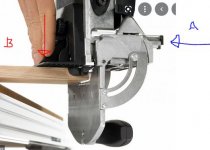
Pretty new to domino joining (I have the df 500) when cutting my mortise for my 16mm material. I make sure the size setting is set to 16 as per the instructions but I can’t see why my mortises aren’t in the middle of the material, it means nothing is lining up when I go to do a dry run. Any help would be much appreciated.

Thanks
 
Hi,

  Welcome to the forum!

          It can be pretty hard to get and exact center even when using the setting gauge.  Just tightening the lever is sometimes enough to move the fence a tiny bit. EX- a 1/2 mm off becomes 1mm if the pieces get flipped.

          Many people don't worry too much about getting the exact center. As long as the reference surfaces are matched, the centering won't matter. I try to center just to have about the same amount of material on both sides of the mortise. But I make sure to choose reference surfaces that will match up (and keep track of them) to be certain that parts align.

        In general Domino is a really precise machine which tends to make any little variance show up. There are a few ways that a variance can be accidentally introduced even when being very careful. There is no wiggle room in the thickness dimension of the mortise.

        Seth
 
EJFRT said:
I make sure the size setting is set to 16 as per the instructions but I can’t see why my mortises aren’t in the middle of the material, it means nothing is lining up when I go to do a dry run. Any help would be much appreciated.

Make sure you're always referencing the correct face of your material when setting up a joint. The mortise usually won't be dead center, which is ok, but the alignment will be spot on.

If you haven't seen this video, it goes into detail for a variety of joints on how to mark your reference faces for the Domino plate.
 
On a related note, I've never been able to use the DF vertically like that.  It always moves and makes a mess of the slot.  Is it just a lack of strength on my part?
 
I think lack of strength wasn't the cause, but where you put pressure on the machine to hold it (particularly the fence) against the edge of the board. The plunge should also be done in a gentle manner to avoid moving the machine.

The finger pressure should be on the center of the bridge (A) while the plunge action is gentle and steady. Alternatively, the finger pressure can be put on the support bracket behind the machine (B). One can also spend money on an after-market handled bracket (bigfoot) for use with the (B) approach.

I prefer A because I can see the placement line.

Make a few practice runs on a scrap till you get the hang of it.
 

Attachments

  • DF500 vertical plunge.JPG
    DF500 vertical plunge.JPG
    34.2 KB · Views: 264
I initially had the same issues, which Chuck addressed.  I do use the TSO Bigfoot though, I find it helps me keep things stabilized.  Once I set the machine in place, I press both sides of the fence to ensure I am pushed up tight. 
 
There are countless examples of users struggling to get the mortises exactly in the center of a board. I think that practice is highly counter productive. If you are careful with reference surfaces, being somewhere near the middle is good enough. If the mortises are offset a little from the centerline, it is easy to verify mating orientation. I use pencil marks and blue tape to mark reference surfaces.
 
I usually avoid that configuration, for that exact reason. It's not so stable that way. What I would do is either:
1) Stand the piece vertically on the bench, against some fixture blocks that I keep handy, and reference the DF500 on its base on the bench surface too.

2) If the part is too large, lay it flat on the table and still reference the bottom of the DF500 against a fence of some sort. This is similar to the way that is generally recommended to insert mid-panel partitions. I do this on a table top that has MFT style holes though, which makes this easy.
 
Not to hijack this thread but I have a question regarding domino use.

I watch Festool UK/ International and they show putting the material flat on the MFT and domino the material that way.

Here in NA they say to keep the domino off the table to domino it.

Why the difference?

I understand the benefits for doing it both ways I dont get why they demo it and claim each is the way to do it.
 
If your wood is perfectly flat, referencing off the table will work. If the wood isn’t perfectly flat, you are likely to end up with uneven surfaces at the joint. I find referencing off the “show” surfaces using the fence gives me the best chance of achieving a flat surface. And it matters not if my mortises are off dead center. I use narrow/wider mortises for optimal adjustments. Works well.
 
Birdhunter said:
If your wood is perfectly flat, referencing off the table will work. If the wood isn’t perfectly flat, you are likely to end up with uneven surfaces at the joint. I find referencing off the “show” surfaces using the fence gives me the best chance of achieving a flat surface. And it matters not if my mortises are off dead center. I use narrow/wider mortises for optimal adjustments. Works well.

Ditto this, especially "referencing off the “show” surfaces".

In addition to the need for the work to be flat when referencing off the bench and bottom of the tool all the surfaces need to be clean. Debris under any of the parts will displace the mortise.
 
thats why i got the vacsys with the accessory heads for it. its great for referancing the domino faces and edge banding.

I was just curious why the Euros and NA recommend different methods
 
Michael Kellough said:
Birdhunter said:
If your wood is perfectly flat, referencing off the table will work. If the wood isn’t perfectly flat, you are likely to end up with uneven surfaces at the joint. I find referencing off the “show” surfaces using the fence gives me the best chance of achieving a flat surface. And it matters not if my mortises are off dead center. I use narrow/wider mortises for optimal adjustments. Works well.

Ditto this, especially "referencing off the “show” surfaces".

In addition to the need for the work to be flat when referencing off the bench and bottom of the tool all the surfaces need to be clean. Debris under any of the parts will displace the mortise.

And referencing off a flat surface (bench, e.g.) works only for a limited range of thicknesses of workpieces because the distance of the cutter is fixed at 10mm (for the DF500) from its base. If the work is too thin or too thick, one still has to go back to the standard method for best efficiency -- that's using the fence for registration. I never use the base for referencing except when making mid-panel/shelf mortises.
 
I still reference the base against the bench whenever I can, if the height (10mm) is too low, a simple shim will move it to where I need it.
 
In a situation like this, carcass sides or drawer sides, etc. I just feel like it is more stable to reference off of the bench top with the part held vertically. I have plywood blocks/boxes that I clamp to the dog holes. This gives a stable, square place to hold the parts against for plunging the Domino into.
 
Using the base is awesome.  It's stable enough that you can work fast with less effort, and you don't have to worry about a wrong setting or fence drift. 

For anything in the 3/4" range, a 10mm offset is just fine.  If you're building cabinets with shaker doors, and have a Domiplate, you really don't need the fence at all. 

And if you're working with parts that don't rest flat on the bench, you can clamp it down pretty easily (but why not just prep the stock better??)
 
My suggestion is watch few videos from reputable sources like Sedge’s Festool Live or others, New Brit Workshop, or Half Inch Shy. After that, practice on scraps. What you’re doing requires familiarity with the Domino and how it handles along with finding the way to hold it so it doesn’t move. I don’t have the Big Foot accessory but I will say that the Domino is designed to be a self-contained machine with the Festool designed accessories. While I would never discourage a woodworker from buying cool accessories or jigs which help him/her do better work or make a job easier or even just because they are cool, the Domino can work well without accessories. I have bought accessories but most just stay in their storage locations as it generally is easier to just use the Domino as is or with the standard items that come with it. Depends on what you use it for and whether your woodworking is repetitive or not.

 
grbmds said:
Snip.
but I will say that the Domino is designed to be a self-contained machine with the Festool designed accessories.
Snip.

Can't agree more on that. The more I've used the DF500 (since 2013) on many typical as well as non-standard applications (I have owned only the accessories made by Festool). the more I'm convinced of how brilliantly the machine has been designed and field-tested (?) before its release.

Granted, some after-market accessories may help some users, e.g. the Dominoplates for people building mostly or exclusively with 1/2" or 3/4" plywood sheets. But without any of the non-Festool gadgets, the machine can still excel as long as the user has put in the effort to learn how to use and control the machine. In addition, I've been able to complete every project using the standard techniques covered in the manual. Like anything else, the more I use those standard methods, the more "masterful" I'm of them. And that's important in achieving consistency in results from project to project, and avoiding unnecessary user errors.

Certain features, or the lack of them such as an LED light, of the machine can be improved of course, but the machine as is is more than good enough for any tasks that it is designed for -- and much more if one is creative. Except when I use handcut joinery, all my project joints are now done with the DF500. No more dadoes, rabbets, M&T, etc. that I used to do on the table saw and with the mortiser. In terms of efficiency improvement, I'd say 50% to 70% overall for my kinds of furniture builds.
 
Back
Top