Swedish Disaster

Stephen B

Member
Joined
May 6, 2013
Messages
2,749
[size=10pt]

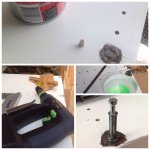
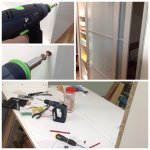
We are using IKEA wardrobe carcasses as built ins and when manoeuvring one into position this afternoon we had a total carcass collapse. Yes there was 'language'!   [embarassed]  It was a hot day.

All calm now.    [popcorn]

I am not an IKEA 'Virgin ', but one can become complacent, one corner stuck on the floor, then a twist and 'the rest is History'.

As the nearest IKEA is 2hrs drive away, I am thinking repair. Although most holes for the IKEA fastening system are torn out, there appears to be sufficient 'meat' for most of them to re-screw. They then could provide some alignment guide for re-assembly, clamping and then inserting through dowels or dominos. Most if not all current damage will I believe be hidden and the cupboards will not be in a wet area.

What do others think? Other suggestions welcome.

 
A LOT of glue.

IKEA is so fragile if you do anything with it other that sit squarely in it's chairs or place books carefully on it's shelves ... also not a great fan!

But honestly - apply a bucket load of glue [cool]
 
I appreciate the reminder of why I don't buy any of their flat pack products. Can you add some reinforcements using real wood and screws?
 
CJ'60 said:
Fill the torn out places with epoxy, redrill and rebuild.

[size=12pt]
Thanks CJ'60.

I followed this advice, rebuilt and reinforced further with chipboard screws.

Step 1. Lightly sanded edges of damage and filled with resin and sanded smooth when set.

Step 2. Re-drilled holes through resin, after carefully measuring with adjustable square and metal ruler.

Step 3. Re-screwed fittings and re-assembled. As fittings were now going into resin it was necessary to provide lubrication. I used liquid detergent. This would normally cause swelling in melamine but remember the repairs were resin. Where there were dowels, these were pulled out and replaced with 6mm dowel after enlarging holes from 5 to 6mm.

Step 4. Reinforced joins with 8g 35mm chipboard screws.

Step 5. Following IKEA instructions joined with other unit, attached rails, assembled and attached sliding doors.

Tools - ETS 125, CT22, CXS, Centronic 5mm bit with depth stop, 5 and 6 mm dowel bits, long nose pliers, Philips and Flat manual ratchet screwdrivers, sliding square, 150 and 450 mm steel rulers and 140 and 450mm squares.

This was the first significant use of my CXS, what a little gem!


Attachments

  • image.jpg
    image.jpg
    767.6 KB · Views: 674
  • image.jpg
    image.jpg
    835.4 KB · Views: 541
Just don't be surprised if it fails again.  It broke for a reason - the material is weaker than usual.  I've had similar failures from even the relatively high-end material used by California Closets; some caused by age, some caused by serious overloading, some caused by using the product for things it should never have been used for, some caused by material that should never have left the factory.  YMMV. 

 
Untidy Shop said:
CJ'60 said:
Fill the torn out places with epoxy, redrill and rebuild.

[size=12pt]
Thanks CJ'60.


You're welcome. Thank YOU for the feedback!

I was reading the thread, including what I wrote in January. Didn't pay much attention to the authors of the posts. When I read my suggestion, I thought "Yes, that's what I would have done". Until I read your post with "Thanks CJ'60". I had totally forgotten it was my own answer I agreed with. [embarassed]

Best, Karel
 
Back
Top