T-joint with domino

rr326

Member
Joined
Apr 11, 2025
Messages
2
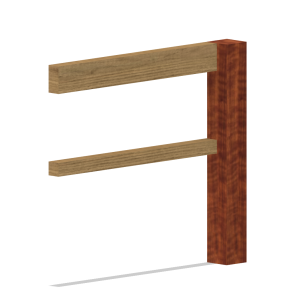
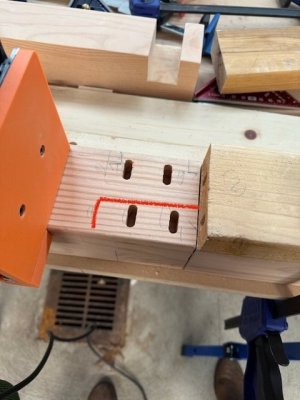
I am adding side supports (1.5"x1.5" and 1.5" x 3") to a 3"x3" leg. See first photo.

How would I use the domino to joint these? (8mm dominos). I have 3d-printed my own jig to get them centered, but I'm wondering if there is an easier way.

I want 1 horizontal domino in the small support and 2 horizontal ones spaced out for the 3" one.

Thanks in advance.

-Ross

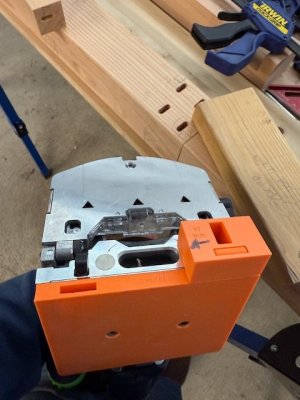
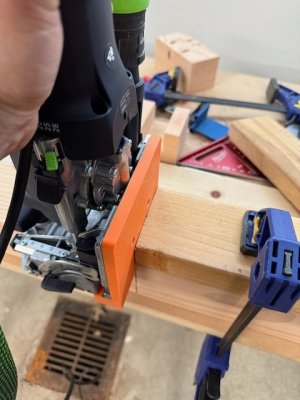
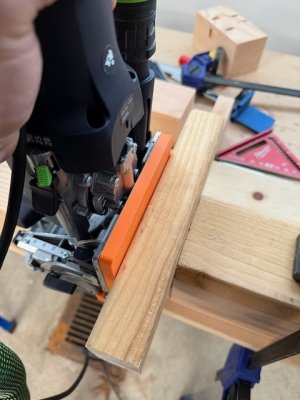
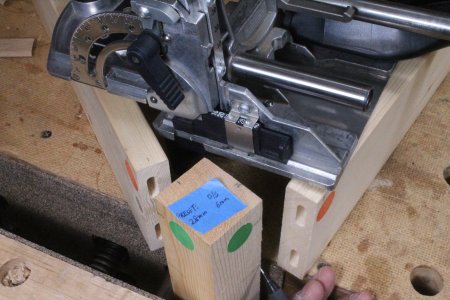
PS I've included my setup, but it's quite elaborate and I'm wondering if there is an easier and faster way. My jig adds 10mm to the base and has a 17mm spacer on the side so that the domino center is 20mm from the edge (about center of 1.5") instead of 37mm, which is way too far. And the vertical cuts seem to wander and make bad mortises, if I'm not very careful and well-clamped. For the 3" piece, I do one cut with just my orange spacer, and another with an additional 2x4 (for 1.5" extra spacing).
 

Attachments

  • Screenshot 2025-04-11 at 1.27.58 PM.png
    Screenshot 2025-04-11 at 1.27.58 PM.png
    342.6 KB · Views: 24
  • IMG_2309.jpeg
    IMG_2309.jpeg
    58.1 KB · Views: 23
  • IMG_2310.jpeg
    IMG_2310.jpeg
    56.1 KB · Views: 21
  • IMG_2311.jpeg
    IMG_2311.jpeg
    56.8 KB · Views: 17
  • IMG_2312 (1).jpeg
    IMG_2312 (1).jpeg
    52.6 KB · Views: 22
The left and right flip paddles (indexed stops) that come with your support bracket are 20mm from the cutter's centre point.

Orient your tenons and mortises vertically on the legs and aprons/stretchers (not horizontally as shown in your photos) so you can mill all your mortises horizontally instead of vertically by setting the fence height(s) properly.

Where needed, for stable vertical cuts, there're several ways to skin the cat, such as:
1) Get the TSO Bigfoot or make your own since you have the 3D printer (Etsy has many examples) and/or
2) Use spacers of the same thickness of the stock around the workpiece to provide a larger registration surface for the DF500
 

Attachments

  • IMG_3162.JPG
    IMG_3162.JPG
    1.8 MB · Views: 16
Last edited:
Like @ChuckM says, first order of business is to orient the tenons vertically, not horizontally. This is both for strength and ease of milling:

1) You can use the fence to set the distance from the long edge. Use the sliding stop or be sure to cut all the mortises needing the same fence setting so the edges line up perfectly.
2) What I see in the CAD drawing doesn't match up with the stock you've already milled. The CAD shows the 1.5x3 piece with the 3" vertically, so it's only half width of the "leg," but you show mortises across the whole width of the "leg.? Did you design change?
3) Use the paddles to set the topmost mortise distance and cut that on narrow.
4) Use pencil marks for the other mortises, and cut one side of each on the middle wide setting.
 
Recycle the 3D printed thingy; it serves no purpose. (Like most 3D printed stuff if you ask me)

Rotate the dominos 90 degrees > you can make them with the standard supplied tool. Aligning the pieces will get easier too then.

And the vertical cuts seem to wander and make bad mortises, if I'm not very careful and well-clamped.

Yeah you need to get that under control first. The Domino being a tall tool with in some cases a small support surface needs some special attention. Personally I always make sure the cord nor hose pull on the Domino.
 
Thank you all.

I think the key insight was to do vertical orientation. Once I did that, I could use the height adjustment to get the distance into what I wanted. And then for alignment I just drew Marx and use the center line and to my amazement that was totally sufficient even when I was doing two on the same piece of wood. That line is very easy to read.
 
Back
Top