Tasting Room Project

SMJoinery

Member
Joined
Nov 17, 2013
Messages
530
Hi Folks

I frequently post completed pics of projects but this time I fancied posting pre, during and post updates as it's quite a unique project.
We have a client here who lives in Monaco but is returning to Scotland as part of his retirement plans. They purchased a lovely relatively new build home here and proceeded to knock it to bits, change lots and my company has undertaken most of the alts so far.
We have been discussing the next stages for sometime and two projects are in the pipeline, an orangery and a tasting room. The Tasting room has required loads of prep, samples, sketches and design input and I'm pleased to confirm that phase 1 (prep) was recently completed and phase 2 (wine store) was recently awarded.

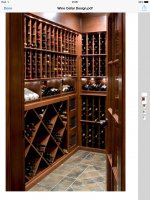
The overall brief was to provide a separate room with oak framed glass display cabinet back wall and glass storage. Glass topped oak bar with stools and a separate environmentally controlled wine store. The bar is being fitted with a hydra tap which is a single spot tap that can dispense hot, cold, fizzy, filtered water in any combination.
Phase 1 was remove the existing utility room and boot room space including wet room and form the layout. Fit the exterior mounted air con plant and install oak door frames, viewing windows and tile floor.
Phase 2 is complete the wine storage (see sample photo) all in solid oak. Maximise storage area to accommodate as much wine storage as possible.
Phase 3 is bar / tasting room area.
Phase 4 is orangery which is just off the tasting room and will provide a little break out area to sit.

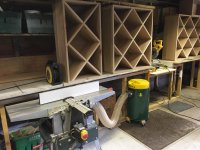
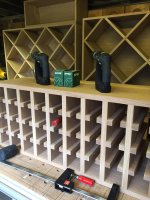
Proposed layout of Phase 2 is (looking at the attached photo), 16 of the large "cross" cubed storage modules, 8 of the inclined bottle displays and 12 of the single sliding modules. Which at the last count is around 450+ bottles but we are playing around a bit with layout at the moment so likely to change.
We start Phase 2 in a couple of weeks.

I'm going with selected locally sourced oak plank which will come as 225mm x 27mm sawn boards, mill down to approx 22mm and jointed to form a 300mm board. I planning to get 2m for every 3m of board. Backs will be 12mm oak ply or mdf.
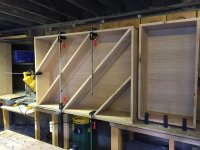
First step though will be to form an MDF plinth template of the room, lay that in the workshop and then build components modularly and then build it up in the room.
I intend to build each component separately as access isn't great for large pieces and it means the room layout can change fairly easily.
Obviously DF500 will be invaluable on this job.

Any comments, experiences to share will of course be gratefully received.

Scott


Attachments

  • image.jpg
    image.jpg
    433.4 KB · Views: 1,170
Project started this week with processing the off sawn oak boards planing to final dims and joining to wide boards with domino.
First time tried the track saw and panther blade to straight edge cut boards which worked well and was quicker than jointer alone.
Plinth and templates are done to ensure accuracy Of finished components.
Photos follow in next post.
 
Progress photos
 

Attachments

  • image.jpg
    image.jpg
    674.8 KB · Views: 599
  • image.jpg
    image.jpg
    644.9 KB · Views: 540
  • image.jpg
    image.jpg
    762.9 KB · Views: 560
  • image.jpg
    image.jpg
    752.6 KB · Views: 655
Well done Scott this post slipped right past me that job sounds amazing and you is stunning I am loving the photo of the wine rack this job is going to be amazing
 
Very nice looks like a sweet project to get to do. Please take lots of pictures and keep them coming our way.
 
Nippychippy said:
Well done Scott this post slipped right past me that job sounds amazing and you is stunning I am loving the photo of the wine rack this job is going to be amazing
Thanks Robert.
The job is a cracker even had me in the workshop all weekend which I never ever do.
Need to finish by Mon 7th as we have two large sash & case windows to do.
Hope married life is suiting you and the workload diary is full.
Thanks again.
Scott
 
Sparky said:
Very nice looks like a sweet project to get to do. Please take lots of pictures and keep them coming our way.
Thank you.
It's definitely a unique project and I will try to take photos along the way.
 
Very nice work. Bring back memories of when I collected wine and had a wine cellar. 5 year ago we finished drinking all the wine and I sold all of the wine racks/storage on Kijiji. Now it's a storage room.
Cheers.
 
JCLP said:
Very nice work. Bring back memories of when I collected wine and had a wine cellar. 5 year ago we finished drinking all the wine and I sold all of the wine racks/storage on Kijiji. Now it's a storage room.
Cheers.
Thank you.
It can be an expensive hobby, but enjoyable if you eventually drink it.
 
In the 4th photo down, how do you secure the bits together? Just glue? Am curious as I have as much confidence in glue as I did in rubber when I rode motorbikes.

I've recently bought a bostitch pin nailer and am addicted to glueing things now you see.
 
Wuffles said:
In the 4th photo down, how do you secure the bits together? Just glue? Am curious as I have as much confidence in glue as I did in rubber when I rode motorbikes.

I've recently bought a bostitch pin nailer and am addicted to glueing things now you see.
Titebond 3 and 32mm brads. I have a great trust in glue also especially titebond 3.
 
I converted to Titebond II a couple of years ago after nursing the same bucket of watery crap from Toolstation for a decade, now I get it. What gauge are the brads? 18? How do you deal with the resultant mar or are you hiding the spot nicely?

Just curious. Am finding the pin nailer hole can just be ignored it's so small.
 
Wuffles said:
I converted to Titebond II a couple of years ago after nursing the same bucket of watery crap from Toolstation for a decade, now I get it. What gauge are the brads? 18? How do you deal with the resultant mar or are you hiding the spot nicely?

Just curious. Am finding the pin nailer hole can just be ignored it's so small.
My apprentice is a ninja with 2 separate shades of filler, mixes up a match and fills with a plastic blade. Quick sand and it disappears. If it's getting varnished or stained it needs another sand before first coat or you see the filler.
 
SMJoinery said:
Wuffles said:
I converted to Titebond II a couple of years ago after nursing the same bucket of watery crap from Toolstation for a decade, now I get it. What gauge are the brads? 18? How do you deal with the resultant mar or are you hiding the spot nicely?

Just curious. Am finding the pin nailer hole can just be ignored it's so small.
My apprentice is a ninja with 2 separate shades of filler, mixes up a match and fills with a plastic blade. Quick sand and it disappears. If it's getting varnished or stained it needs another sand before first coat or you see the filler.

Right on. Anyhoo, if the glue is effectively doing the holding (which kind of what I was asking in a stupid way) then you may want to look at the pin nailers, less faff. But then, in my place, I'm handling the faff, not an apprentice.
 
Wuffles said:
SMJoinery said:
Wuffles said:
I converted to Titebond II a couple of years ago after nursing the same bucket of watery crap from Toolstation for a decade, now I get it. What gauge are the brads? 18? How do you deal with the resultant mar or are you hiding the spot nicely?

Just curious. Am finding the pin nailer hole can just be ignored it's so small.
My apprentice is a ninja with 2 separate shades of filler, mixes up a match and fills with a plastic blade. Quick sand and it disappears. If it's getting varnished or stained it needs another sand before first coat or you see the filler.

Right on. Anyhoo, if the glue is effectively doing the holding (which kind of what I was asking in a stupid way) then you may want to look at the pin nailers, less faff. But then, in my place, I'm handling the faff, not an apprentice.

Sorry, yes I should have said they are put in with my Dewalt brad nailer.
The brads sure save a lot of clamps!
 
SMJoinery said:
Wuffles said:
SMJoinery said:
Wuffles said:
I converted to Titebond II a couple of years ago after nursing the same bucket of watery crap from Toolstation for a decade, now I get it. What gauge are the brads? 18? How do you deal with the resultant mar or are you hiding the spot nicely?

Just curious. Am finding the pin nailer hole can just be ignored it's so small.
My apprentice is a ninja with 2 separate shades of filler, mixes up a match and fills with a plastic blade. Quick sand and it disappears. If it's getting varnished or stained it needs another sand before first coat or you see the filler.

Right on. Anyhoo, if the glue is effectively doing the holding (which kind of what I was asking in a stupid way) then you may want to look at the pin nailers, less faff. But then, in my place, I'm handling the faff, not an apprentice.

Sorry, yes I should have said they are put in with my Dewalt brad nailer.
The brads sure save a lot of clamps!

Ah yes, you're battery aren't you. I've just switched from battery brad to air brad with a small compressor, and chucked in the pin nailer whilst I was at it. I like to think I'm hipster for that, but I probably wouldn't go back now, unlike hipsters who will eventually figure out beards aren't a fashion accessory and tight jeans aren't really helpful.
 
I think an air brad is a great tool in a workshop environment.
With tools now I try to make everything capable of being used effectively in the workshop or mobile in case I have to set up somewhere remote.
It's one of the main reasons for loving Festool.
Also It's easier to pop out to the van and get the dewalt battery nailer when I need it....its in a SYS 5!
 
SMJoinery said:
I think an air brad is a great tool in a workshop environment.
With tools now I try to make everything capable of being used effectively in the workshop or mobile in case I have to set up somewhere remote.
It's one of the main reasons for loving Festool.
Also It's easier to pop out to the van and get the dewalt battery nailer when I need it....its in a SYS 5!

Yes, I'm not as out and about any more, why I swapped from the portable electric. But, I did swap my enormous, never really switched it on as it was buried, compressor for a small portable(ish) one so I can shift it over to the house to use it. Very happy with that. I'd take it to site too, but that's my choice, if it was every day I wouldn't. I basically bought a Bosch 18v brad nailer from eBay Germany 2 years ago and sold it a month ago for about a hundred quid more than I bought it. No idea why, just how it worked out.
 
Maybe if they make a connection for air gun to connect to those small compressed air bottles rescue divers use I'll go back to air brads.  [tongue] a hoseless gun would be handy.  [big grin]
 
Back
Top