Tearout during rabbetting - solutions?

JonathanJung

Member
Joined
Apr 7, 2018
Messages
257
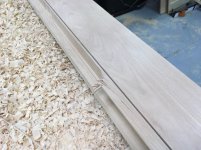
Hi all, I'm currently on a solid birch barn door project, and have been experiencing tearing while cutting uphill grain during rebating the door for the interior panel. I took my track saw and scored the material on the outside perimeter of the rabbet, but how can I prevent the inside from ripping out? Backwards routing works, but is dangerous and  is so slow because I can't remove more than an 1/8" at a time without it grabbing. My goal was a 1" wide by 1-1/8" deep rabbet.

[attachimg=1][attachimg=2]
 

Attachments

  • IMG_8843.JPG
    IMG_8843.JPG
    556.2 KB · Views: 754
  • IMG_8844.JPG
    IMG_8844.JPG
    479.9 KB · Views: 748
The bites were too heavy. Making multiple passes, gradually removing the material, is one way to avoid the tear-outs. Another way is to use a smaller bit.

There're two types of multiple passes: One is about depth of cut and the other is about width of cut. In the former, you reduce the depth of cut, but make full passes; in the latter, you make shallow passes in full cutting depth.

I haven't attempted this (I always use shallow passes), but it may be worth a try. Use a marking gauge to make a deep scribed line or a series of scribed lines for the rabbet before routing.
 
I see a table saw in the background. I’d suggest cutting those on it before assembly.

Ron
 
If you feel comfortable enough you could climb cut

Shallow passes, steady hands and clamp your work down.

Be VERY carful.
 
If a climb cut is done (at your own risk, of course), consider these:

1) Light passes are essential -- for control and safety purposes
2) That Festool router is a beast and can be tiring to use when it's supported on only one side (rail/stile). Support the other side with a filler board/block if practicable.

The climb-cut technique is usually my last resort, and I do it only when the amount of work involved is small, like only a section of the work has reverse grain. Whenever possible, I rabbet the work on the table saw  or router table before assembly which will avoid the tear-out issue -- too late for you now since it has been glued up.
 
I would first make a plunge cut with the router at the end of the rebate.
Next you can cut counter rotation on the save side.
You still will have massive tear out but most of it will be removed anyway and at the previous plunge position it stops.
 
Thank you every so much for the replies. On my mock-up, I had cut the rabbet on the table saw, but that was on my shorter pieces - the mock-up was only a section from one corner. Now with 84" 8/4 birch I didn't want to lower something so heavy into a dado blade.

Just picked up a shaper, maybe I could use that next time to remove the bulk of the material.

tobiaskurz said:
I would first make a plunge cut with the router at the end of the rebate.
Next you can cut counter rotation on the save side.
You still will have massive tear out but most of it will be removed anyway and at the previous plunge position it stops.

I assume you mean using a guide of some sort - maybe a guide rail - to prevent chewing into the save side?

ChuckM said:
If a climb cut is done (at your own risk, of course), consider these:

1) Light passes are essential -- for control and safety purposes
2) That Festool router is a beast and can be tiring to use when it's supported on only one side (rail/stile). Support the other side with a filler board/block if practicable.

The climb-cut technique is usually my last resort, and I do it only when the amount of work involved is small, like only a section of the work has reverse grain. Whenever possible, I rabbet the work on the table saw  or router table before assembly which will avoid the tear-out issue -- too late for you now since it has been glued up.

Support on the inside would have been much better. Doh! Next time.

ChuckM said:
The bites were too heavy. Making multiple passes, gradually removing the material, is one way to avoid the tear-outs. Another way is to use a smaller bit.

There're two types of multiple passes: One is about depth of cut and the other is about width of cut. In the former, you reduce the depth of cut, but make full passes; in the latter, you make shallow passes in full cutting depth.

I haven't attempted this (I always use shallow passes), but it may be worth a try. Use a marking gauge to make a deep scribed line or a series of scribed lines for the rabbet before routing.

Shallow passes at full depth, that's what I should have done. Also only the final cut would have been the "money cut", so I'd have had only one cut to truly be concerned about being super steady on.

I realise that door shops would use at least a T&G bit all the way through the corner joints. But could I have still used dominos at the corners, if they have their own big joints already?
 
After looking at your pics more closely you could have eliminated most of your problems by starting from the top and doing 2 equal passes instead of hogging out all the the material and leaving that thin cleanup strip. Birch is also known splinter type wood. A shaper will present a new set of issues you will have to overcome depending on the spindle size and cutter diameter. I suggest lots of practice especially if you don't have a powerfeeder. Real easy to wear a piece if your not trained.
 
kcufstoidi said:
After looking at your pics more closely you could have eliminated most of your problems by starting from the top and doing 2 equal passes instead of hogging out all the the material and leaving that thin cleanup strip. Birch is also known splinter type wood. A shaper will present a new set of issues you will have to overcome depending on the spindle size and cutter diameter. I suggest lots of practice especially if you don't have a powerfeeder. Real easy to wear a piece if your not trained.
looking at the photos I would have been tempted to rough cut the rabbets on a saw first to remove the bulk, leaving 1/8” heavy, then assembled the frame and  the next three passes with a router, just a thought? I just looked at your photo. Ha stick a dado blade on the nice sawstop and that would fix the issue. My table saw is not even close to that, you could do 90% you would need to set a stop on the stiles? I’m not sure of the safety aspect of raising the blade while the saw running while over the stock, per SawStop or general safety guidelines?
 
Just looked at my google newsfeed. Popular woodworking has a new article about “Tablesawn glass-panel doors”  It looks like a bridal joint and with your super nice saw you should go that route... ditch the router next time?
 
I agree that the router is the wrong tool for this job even though it seems like it should work. I have attempted to solve this problem with a sturdy oak zero clearance router fence and festool rabbetting bit. Still there tended to be some tearout when routing against the grain. I think the best solution to this fundamental problem is to cut your rebates before cutting and assembling the frame.

JF
 
Back
Top