U-Scribe Jig

DynaGlide

Member
Joined
May 16, 2017
Messages
1,697
Perhaps I'm too much of a dummy or maybe it's because I've never had to scribe anything before but for those of you who own and use the U-Scribe Jig, how do you like it? https://www.u-scribejig.co.uk/

I've watched some videos on YouTube from them and others (Peter Millard especially) which feature it. I'll be scribing in some bookshelves and a frameless base cabinet in the coming months and I like to arm myself for success as much as I can. Look forward to hearing thoughts of those who have it and use it.

Matt
 
It's a european cabinet installer's wet dream for fillers, soffits, and flush toekick.

For the general carpenter or framed cabinet guy - it's just a collector's item.

n.b - you must match the ( thickness in mm ) of your scribe material exactly to the jig - or you will be disappointed.

 
I bought two sets over the xmas break and got a chance to use them on an install last week - very, very handy. One thing I learnt - leave your scribe line on, plane or cut etc right up to it, but leave the line there. As [member=67935]xedos[/member] mentioned, match your scribe block exactly...but still leave the line on.
I'll be using them all the time now.
 
I have the 18mm and the 16mm U Scribe jig sets. I fit both British and European cabinets, so do use both sizes.
Very useful, especially for tall fillers and when scribing long lengths of material.....

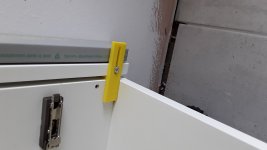
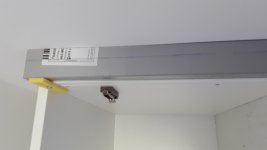
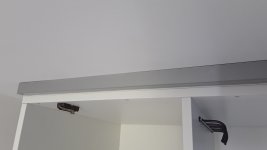
These are the ones for 16mm cabinet material....The kitchen is German.

[attachimg=1]

[attachimg=3]
 

Attachments

  • 20180803_134353.jpg
    20180803_134353.jpg
    723 KB · Views: 10,329
  • 20180803_134639.jpg
    20180803_134639.jpg
    534 KB · Views: 2,032
  • 20180803_140817.jpg
    20180803_140817.jpg
    617.4 KB · Views: 6,985
Yea that doesnt make sense to me either. I thought most people scribed with something like this: LINK or LINK

That said, something like that U-Scribe looks CRAZY easy to 3D print. Give me some dimensions for it and I could slap together a 3D model and throw it up on Thingiverse in 20 minutes for ya!
 
You can definitely use those scribes that you linked, it's just convenient to use an offcut of your carcase material.
 
Hi Matt

For the project that you showed to me recently, I think you will be able to scribe it with just a compass. HD used to sell General brand compasses and they were inexpensive and easy to modify as needed. I don't know if HD still has them but if not I can give one to you.
 
I have scribed MILES of fillers and toekick and I dont see the need for this tool. $1.00 General Tool compass and accurate measurement is all that is needed. The key for accuracy for me is to bend the tip  a bit away from the pencil.
 
interesing, i had questions but then i found


i can see not special for toekicks or shorter side pieces. but the long stuff or ceiling .... yea
 
Its has to be me. But after watching I still don’t understand how this is supposed work. Guessing someone installing this, probable will.

Anyway, for the noobs, some closeups of what it actually does, might be handy! I do understand it helps for scribing. But thats more the name of jig then the video.

Sent from my iPhone using Tapatalk
 
basically all it does is to hold the filler piece solid while you use some other tool to scribe the line. if you use it so the filler is aligned witht eh edge of the cabinet then you can use a piece of the cabinet material to scribe rather than a variable compas or other adjustable scribe tool
 
Once you realise it holds the scriber/filler flush with the INSIDE of the cabinet it makes more sense. So, if your cabinet is made from 18mm material, it's holding it 18mm from the wall. You then need to use something 18mm thick as your scribe guide, which cancels out the offset.
Bit hard to explain, hope that makes sense.
 
morts10n said:
I have scribed MILES of fillers and toekick and I dont see the need for this tool. $1.00 General Tool compass and accurate measurement is all that is needed. The key for accuracy for me is to bend the tip  a bit away from the pencil.

and your helper hold the material while you use that compass right ?
 
hi gents, My name is Dan im 50% of @uscribejig and the one you see on social media or you tube etc.

I forgot my old personal login to FoG but recently came across this thread, Ill happily answer any questions any of you may have, Thanks Dan
 
Xedos....not sure where you were going with that comment, but I've worked alone for the last 30 years
 
morts10n said:
Xedos....not sure where you were going with that comment, but I've worked alone for the last 30 years
You need to hold filler piece still and perfectly aligned while scribing (this is is what U-Scribe Jig does, it's a holder). How do you do that, particularly with long pieces? Or do you have another technique?
 
Very simple for me...measure the required width in a few spots...mark width (with a  .9mm pencil), set scribe to all pencil marks....scribe away. I frequently clamp a block to bottom of cabinet to hold filler at correct height.
 
morts10n said:
Very simple for me...measure the required width in a few spots...mark width (with a  .9mm pencil), set scribe to all pencil marks....scribe away. I frequently clamp a block to bottom of cabinet to hold filler at correct height.

Now do you see a need for this tool?

You clamp a block of wood to the bottom, u-scribe users clamp them to the filler and carcass.  Neither method is superior or faster intrinsically.  One might argue that a continuous scribe line is more accurate and better looking than the point to point method you use, but that is really up to the person's eye that's paying for the work.  On quick, dirty and cheap jobs that'll be caulked your compass is even a waste of time.
 
Back
Top