DynaGlide
Member
- Joined
- May 16, 2017
- Messages
- 1,697
I know there's a lot of threads being revived about a Vac Sys station and rather than add on to the others I'll just start my own. I've been thinking about making one ever since I got the unit back in September mainly because I wanted something I could move around with me as my needs during a project change. Having it fixed to one location in my space was problematic because I found if I had stuff on the adjacent bench then I'd have to move it to use the clamping module.
I came across a nifty Shaper Origin cart that [member=167]neilc[/member] designed over on the Origin forum and thought it'd make a good base for what I was after.

I exchanged a few emails and texts with him and he was generous enough to share his SketchUp file with me. I have the base unit completed and going to put it to use for a bit before I decide how I want to attach a top to work with the Vac Sys module beneath. Neil and I have already bounced some ideas on that back and forth but I feel I need to use it for a bit before I settle on a design.
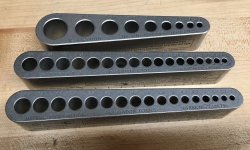
Both sections on the sides are line bored for Sys AZ drawers should I want to house some systainers in the future. The back is line bored for shelving as well. Here's some pictures:


Being relatively new to woodworking this was the most complicated project I've taken on. I made some mistakes but nothing I couldn't recover from. The glue up did not go well mostly due to my inexperience. Too many pieces fitting together with Dominos plus the back panel. I'll make some design changes next time something like this comes up and plan better.
As Sedge would say. . .I hope this helps!
I came across a nifty Shaper Origin cart that [member=167]neilc[/member] designed over on the Origin forum and thought it'd make a good base for what I was after.
I exchanged a few emails and texts with him and he was generous enough to share his SketchUp file with me. I have the base unit completed and going to put it to use for a bit before I decide how I want to attach a top to work with the Vac Sys module beneath. Neil and I have already bounced some ideas on that back and forth but I feel I need to use it for a bit before I settle on a design.
Both sections on the sides are line bored for Sys AZ drawers should I want to house some systainers in the future. The back is line bored for shelving as well. Here's some pictures:
Being relatively new to woodworking this was the most complicated project I've taken on. I made some mistakes but nothing I couldn't recover from. The glue up did not go well mostly due to my inexperience. Too many pieces fitting together with Dominos plus the back panel. I'll make some design changes next time something like this comes up and plan better.
As Sedge would say. . .I hope this helps!