Wall of windows

tiralie

Member
Joined
Jan 26, 2010
Messages
3,617
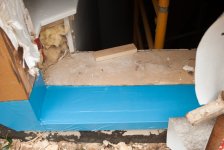
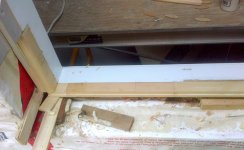
This is a project the home owner (an architect) started but because of age and frankly the scope has asked me to help with. It's a bit of a mess to say the least.

[attachimg=#]

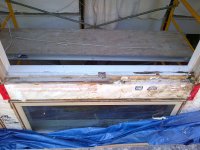
This wall of windows faces north. The windows are Kolbe Heritage consisting of fixed, fixed geometric and crank out casement and crank out fixed and awning.
At this point I am getting quotes for all the windows to be replaced.

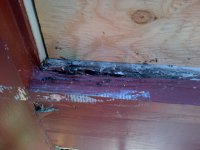
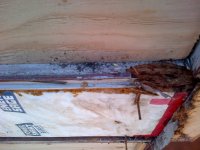
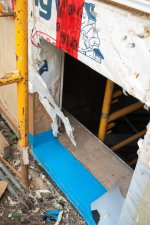
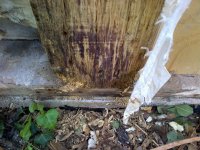
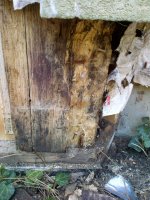
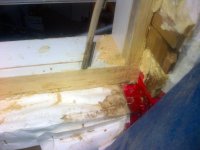
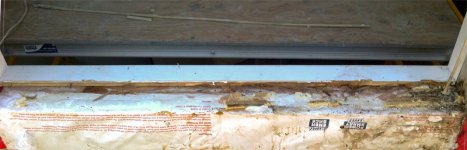
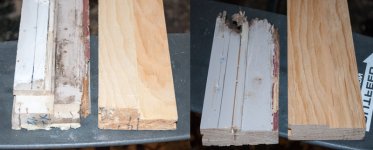
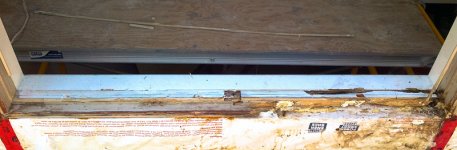
There is a fair amount of rot on the bottom rail of the sash of all the the windows on the bottom row as well as the large middle windows.

[attachimg=#]

[attachimg=#]

[attachimg=#]

You can see the rot sitting underneath the paint in the closeup of the top window here. These sashes need to be replaced at the very least, but by the time I remove the windows, replace the sash, and repaint it may be faster and cheaper to replace the whole works. Too bad, these are nice windows.
Tim

[attachimg=#]
 
I'm guessing the verticals between the windows are load bearing frame members. I'd pull the windows, pull the wrap off the framing, rebuild framing as required, rebuild or replace windows.

The exterior sills need to be sloped. How ever did this originally had no clue about water management.

Good luck, your client needs to design a better system for this wall.

Tom

 
Tim I have to agree on the replacement method for sure, I think to much time would have to be spent on the repair and make right method, I agree it sad as they are nice window. If you go with a replacement, I am guessing  a Pella or Anderson Window Wall setup would work

Sal
 
tjbnwi said:
I'm guessing the verticals between the windows are load bearing frame members.

Yep.
tjbnwi said:
I'd pull the windows, pull the wrap off the framing, rebuild framing as required, rebuild or replace windows.

Yes, that's where this is going. Like I said in your thread, it won't be cheap and the client knows it. The owner doesn't want to go there but I am fairly certain that he knows this is the best solution.

tjbnwi said:
The exterior sills need to be sloped. How ever did this originally had no clue about water management.

Agreed. When I first looked at this that was my first thought. Why were the exterior sills not sloped. The original supplier told me that these windows were shipped with only a primer coating. These windows are usually shipped with a sill and casing that is primed. On closer inspection it appears water has wicked up between the frame and the sash because of water and snow sitting on top of the  casing (1 1/2") cut at 90 degrees, that basically acted as a trough to hold water and ice.

tjbnwi said:
Good luck, your client needs to design a better system for this wall.
Tom

Thanks, for the affect he was looking for, I would have thought a commercial window system would have been more suitable than these.

Sal LiVecchi said:
Tim I have to agree on the replacement method for sure, I think to much time would have to be spent on the repair and make right method, I agree it sad as they are nice window. If you go with a replacement, I am guessing  a Pella or Anderson Window Wall setup would work

Thanks Sal.
The client would like to stay with the same "style" and Kolbe make the same type of window that is aluminum clad. The sill plate also needs to be flashed and completely sealed as it's basically 3-4 inches from grade.
 
Tim,

With the client being an architect let them do the design and leg work. After they get their ideas on paper ( or zeros and ones ) help them get it right. It will give you insight as to their ability.

Tom
 
I know it's been some time since I updated this thread. After almost 4 weeks of dithering back and forth with the client I started to work on this wall.

As the I stated earlier the client wanted to save these windows, however the bottom three were in such bad shape that they really weren't worth the effort so it was agreed that at least those should be replaced with aluminum clad windows. I ordered the same style from Kolbe and they were delivered about 6 weeks later.

Meanwhile we got to work dismantling the wall. After setting up a scaffolding to reach the second story window on the outside and three stories inside we removed the large middle window in the top row, (the two on the left and the right of the large window were in ok) and the six windows under it.

We used the Festool Geko to handle these windows, the large ones were about 170lbs., and they worked flawlessly. We now got a better look at the damage to the sash and casing and the window frame.

[attachthumb=#]

More on the sash later but when we took out the large middle window the bottom sash fell off it was so rotted. Luckily the silicone glazing holding the double paned glass to the remaining sash stayed in place.

[attachthumb=#]

The photo above is of the bottom corner of the large window in the middle of the middle row after the casing was removed. The rot extends all the way into the frame and up the side.

[attachthumb=#]


Attachments

  • Oakville-20130726-00104.jpg
    Oakville-20130726-00104.jpg
    1 MB · Views: 187
  • Oakville-20130726-00105.jpg
    Oakville-20130726-00105.jpg
    1 MB · Views: 198
  • IMG-20130802-00128.jpg
    IMG-20130802-00128.jpg
    1.3 MB · Views: 198
  • Oakville-20130802-00125.jpg
    Oakville-20130802-00125.jpg
    1.1 MB · Views: 242
Alittle bondo & primer and she's good as new.... [big grin]
I'm not a waterproofing expert and we don't see a lot of rain her in s. Calif. ... How do you plan on flashing the new windows? Not sure how Kolbe & Kolbe  send out there clad windows as far as flashing. I have had metal pans fabricated that door or windows sit in (along with traditional flashing )to insure any water doesn't creep in. Generally it's patio doors on second story that lead to deck, but in your situation it might work. It was fairly inexpensive to have a metal guy fab up a pan with drip edge.
 
Guilliaume woodworks said:
How do you plan on flashing the new windows?

To answer your question, I gotta back up a bit.
When I started this project, we were quite concerned as to how much rot had penetrated the sill, and pillars. Because the foundation ends only inches from grade which essentially puts sill and the columns in a lot of moisture. Because of the awful state the bottom drip edge and bottom row of windows, we felt the sill might be badly damaged and it may have to be replaced. Luckily that was not the case but there was definitely some rot.
To give you a better idea, here is a photo of the corner pillar and a bit of the sill. While there is some rot it really only goes about an inch into the sill and the pillars.

[attachimg=#]

Here is a photo of one of the middle pillars after I cut the house wrap off and removed the half inch sheeting.

[attachimg=#]

I cut the rot out of the areas and filled them with new pieces of cedar and then wrapped the sill and part way up each pillar in each window opening with some ice and water shield underlayment.

[attachimg=#]

I reinforced the corners with another layer of ice and water shield underlayment.

[attachimg=#]

I then rewrapped in house wrap and installed a custom made drip plate. I attached the metal drip plate with two beads of silicone and tacked the edges in place. I sealed all the open edges with silicone sealant.

[attachimg=#]

Guilliaume woodworks said:
Not sure how Kolbe & Kolbe  send out there clad windows as far as flashing.

There are a lot of technical issues with this wall and having those windows that close to grade is only one of them. Kolbe Traditional windows are usually sent out primed with casing attached. They really are not designed to sit six inches from grade.
 

Attachments

  • DripPlate.jpg
    DripPlate.jpg
    446.3 KB · Views: 1,073
  • BlueSkinwindow2.jpg
    BlueSkinwindow2.jpg
    235.5 KB · Views: 1,096
  • BlueSkinwindow1.jpg
    BlueSkinwindow1.jpg
    321.5 KB · Views: 1,079
  • MiddlePillarRot.jpg
    MiddlePillarRot.jpg
    427.1 KB · Views: 1,220
  • CornerPillarRot.jpg
    CornerPillarRot.jpg
    464.7 KB · Views: 1,114
Ok, back to this. Sorry for the delay.
After we removed the windows, I started to work on the frames.
Here is what the large middle window frame looked like after I took the window out.

[attachimg=#]

And after I removed the rotten frame…

[attachimg=#]

While the rot wasn’t as bad on the large upper middle window, I did have to cut out all of the lower rail and about 6” of the side stiles.  In the large lower window the rot extended in the frame extension so I cut that back as well.

[attachimg=#]

This allowed me to take a look at the beam supporting the middle upper window. After cutting back the house wrap and removing the rotten ½” sheeting here is what I was greeted with. While it looked like the top part of the beam was ok, the front was obviously rotten.

[attachimg=#]

After pulling on this 2” x 10” with the claw of my hammer, the whole 54”, 2 x 10 came out along with the sistered 2x 10 mate. There was third 2x10 behind these two and it was undamaged because there was space between the first pair of 2x’s and the last 2x. This meant that the large top widow was only held up with one 2 x 10 and not much was touching that as there was not much frame left to support the sash.
After I removed and replaced the 2x10’s to complete the beam, I got to work on fixing the frames.
The large window in the middle had the most rot so I first cut all the rot from the frame extension, jointed it with a chisel plane, milled a new piece from some finger jointed pine and glued and fit it into place. I milled the new piece with a tongue to mate with the groove in the frame pieces.

Here is a close up of the left hand side of the window with the new pieces in glued in place.

[attachimg=#]

Here is a picture of the opposite side.

[attachimg=#]

Once the glue was dried I sanded and primed the frame extension.

[attachimg=#]

I now needed to mill some new pieces for the frame stile and rails. Because of how the window sits in the frame, the rail and stile are different from each other. The rail is thicker to support the weight of the window. 
I purchased some clear pine and milled the two profiles based on the samples from the window. These still needed to have the groove cut into them to hold the weather seal.

[attachimg=#]
 

Attachments

  • Mdl.Win.L.HPaintedJamExt.jpg
    Mdl.Win.L.HPaintedJamExt.jpg
    392.5 KB · Views: 728
  • Mdl.Win.JamExt.R.H.jpg
    Mdl.Win.JamExt.R.H.jpg
    506.5 KB · Views: 714
  • MdlWinJamExtL.H.jpg
    MdlWinJamExtL.H.jpg
    461.2 KB · Views: 711
  • RottenBeam.jpg
    RottenBeam.jpg
    573.9 KB · Views: 733
  • TpMdleWinFrameRH.jpg
    TpMdleWinFrameRH.jpg
    515.1 KB · Views: 744
  • Mdl.Win.FrameExten.jpg
    Mdl.Win.FrameExten.jpg
    256.8 KB · Views: 710
  • Mdl.WinFrame.jpg
    Mdl.WinFrame.jpg
    243 KB · Views: 722
  • OldAndNewFrameRailStile.jpg
    OldAndNewFrameRailStile.jpg
    235.9 KB · Views: 722
Back
Top