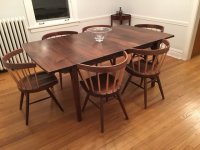
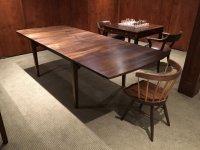
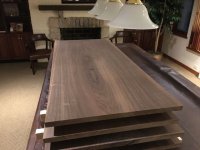
Just completed this table for my son and his wife.
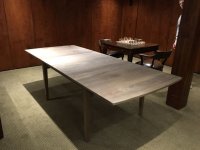
Overall dimensions are 42" wide x 72" closed with two optional 16" leaves opening up to a full 104" with both leaves.
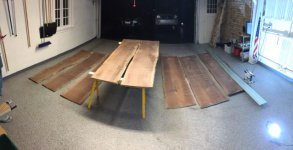
Ordered the walnut from Horizon Hardwoods out of Pennsylvania. They do an excellent job and shipped 9 sequential flitch cut pieces from the same log as well as rift sawn stock for the legs. I highly recommend them as I've ordered from them several times in the past.
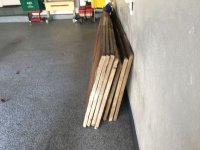
Wood arrived and was as wide as 25" with all pieces 9' plus in length. We used about half of the supply and will use the balance for a sideboard in the future.
Pieces were edge-jointed with a TS-55 on a long rail and then crosscut to rough length.
I was fortunate to find a local shop that had a wide belt and 24" planer for thicknessing the large panels. Bernhard Woodwork in Northbrook, IL (Chicago suburb) was excellent and they have an amazing shop - about the size of a football field it seems with wood storage and all their machine and assembly areas. I was surprised they would take a small planing job but they turned it around in under a day's time.
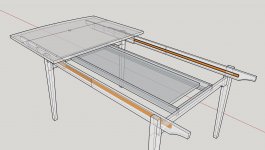
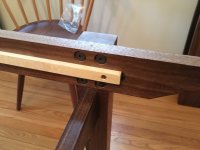
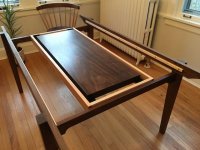
Legs are fixed and the top separates to reveal leaf storage below. A sliding dado facilitates opening of the table.
Dominos attach the legs to the cross brace and knock-down hardware into epoxy-secured inserts allow the table to be disassembled for movement. Top was sanded to about 15/16" and finish sanded with a ETS 150/3 sanding to 320 grit. Legs were tapered on the tablesaw and then planed to final size. The two top pieces and end rail details were pattern routed. The top was a bit of a challenge as it has a 147.75" radius detail on each end, which was interesting to set up with a router on a long arm to create a pattern out of hardboard, but it worked great. That hardboard template was finish sanded with a ETS 150/3 on the edge and then stuck to the top for pattern routing on the Festool router table.
Finish was two coats Maloof oil / poly followed by four coats of General Finishes satin wipe-on poly. Light hand sanding with 600 grit between coats.
Photos follow. I also have a sketchup model if anyone is interested.
Thanks for looking -
Neil
Overall dimensions are 42" wide x 72" closed with two optional 16" leaves opening up to a full 104" with both leaves.
Ordered the walnut from Horizon Hardwoods out of Pennsylvania. They do an excellent job and shipped 9 sequential flitch cut pieces from the same log as well as rift sawn stock for the legs. I highly recommend them as I've ordered from them several times in the past.
Wood arrived and was as wide as 25" with all pieces 9' plus in length. We used about half of the supply and will use the balance for a sideboard in the future.
Pieces were edge-jointed with a TS-55 on a long rail and then crosscut to rough length.
I was fortunate to find a local shop that had a wide belt and 24" planer for thicknessing the large panels. Bernhard Woodwork in Northbrook, IL (Chicago suburb) was excellent and they have an amazing shop - about the size of a football field it seems with wood storage and all their machine and assembly areas. I was surprised they would take a small planing job but they turned it around in under a day's time.
Legs are fixed and the top separates to reveal leaf storage below. A sliding dado facilitates opening of the table.
Dominos attach the legs to the cross brace and knock-down hardware into epoxy-secured inserts allow the table to be disassembled for movement. Top was sanded to about 15/16" and finish sanded with a ETS 150/3 sanding to 320 grit. Legs were tapered on the tablesaw and then planed to final size. The two top pieces and end rail details were pattern routed. The top was a bit of a challenge as it has a 147.75" radius detail on each end, which was interesting to set up with a router on a long arm to create a pattern out of hardboard, but it worked great. That hardboard template was finish sanded with a ETS 150/3 on the edge and then stuck to the top for pattern routing on the Festool router table.
Finish was two coats Maloof oil / poly followed by four coats of General Finishes satin wipe-on poly. Light hand sanding with 600 grit between coats.
Photos follow. I also have a sketchup model if anyone is interested.
Thanks for looking -
Neil
Attachments
-
 IMG_0092.jpg45.8 KB · Views: 935
 -
 IMG_0114.jpg46.6 KB · Views: 1,561
 -
 IMG_0109.jpg51.2 KB · Views: 1,327
 -
 IMG_0106.jpg36.5 KB · Views: 937
 -
 IMG_0105.jpg49.8 KB · Views: 1,264
 -
 IMG_0098.jpg40 KB · Views: 1,017
 -
 IMG_0097.jpg54.5 KB · Views: 1,053
 -
 IMG_0095.jpg41.4 KB · Views: 1,134
 -
 IMG_0093.jpg35.2 KB · Views: 904