Walnut side table

ear3

Member
Joined
Jul 24, 2014
Messages
4,341
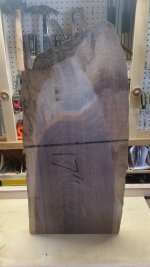
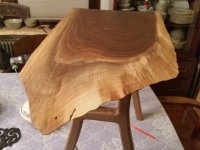
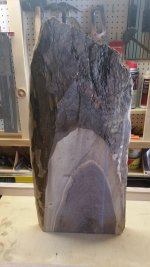
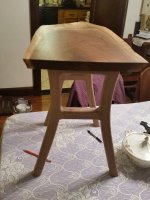
So a number of months ago my lumber guys threw me the offcut of a large walnut slab for $30.  I thought it would be perfect for a couch side table I wanted to make as a wedding gift for my friends who were recently married.  I planed down the slab on a router sled, and textured the live edges with a wire brush attached to the angle grinder.  I had some extra hard maple lying around, and thought the purple/white contrasts would produce an interesting effect, so I made a first attempt at a base with this material.  I'll spare you the ugliness, but it came out looking like a flying ironing board.

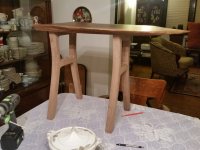
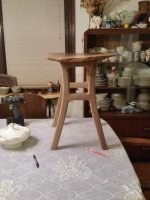
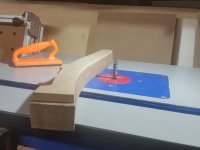
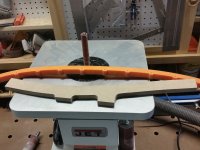
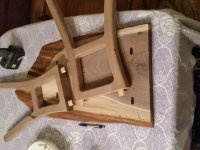
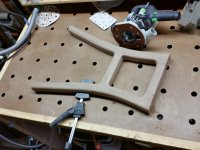
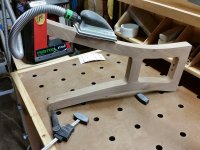
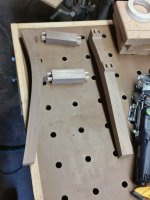
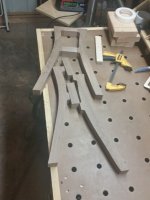
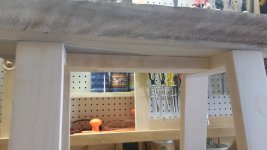
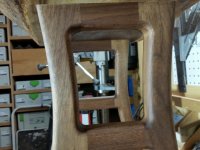
So this past weekend, I picked up some 8/4 walnut to do things right.  I made a template from MDF and routed all the leg parts on the router table.

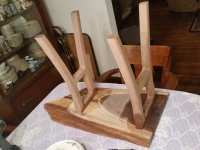
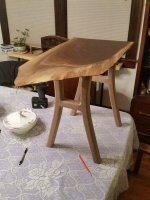
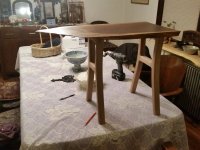
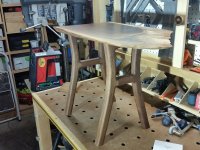
Here's the result fresh from glue up, just waiting for a finish to be applied to the legs.

The Forum is giving me some problems uploading photos, so maybe I'll try to post some process pics in a subsequent post.


Attachments

  • 20160131_123110.jpg
    20160131_123110.jpg
    1.9 MB · Views: 355
  • 20160503_002739.jpg
    20160503_002739.jpg
    2.4 MB · Views: 409
  • 20160503_002853.jpg
    20160503_002853.jpg
    2.5 MB · Views: 345
  • 20160503_002730.jpg
    20160503_002730.jpg
    1.3 MB · Views: 348
  • 20160131_123123.jpg
    20160131_123123.jpg
    357.8 KB · Views: 279
Process photos of template, which I made using the CMT flexible template guide and refined with my JET oscillating spindle sander.  Used a 2" double bearing spiral bit to flush the wood to the template.  I made sure to get a board that was wide enough to accommodate two legs along its width (The wood for the legs was three times as expensive as the top!).  Even then I ended up using a substantial portion of the board.  I only had one screw-up, where I didn't trim the piece to be routed close enough to size, and so the router bit ended up producing substantial chip-out on one of the faces trying to hog off too much wood.  I still ahve a few scraps of the walnut left, but not really enough to make a whole separate piece.
 

Attachments

  • 20160430_165908.jpg
    20160430_165908.jpg
    736.8 KB · Views: 278
  • 20160430_150706.jpg
    20160430_150706.jpg
    1.3 MB · Views: 246
  • 20160429_173308.jpg
    20160429_173308.jpg
    840.7 KB · Views: 267
Joints made from doubled up 6mm dominoes.  Since I made the template using one of the long sides as a reference, I could make each pair of cross pieces the same size.  I did, however, make the leg assembly at the back larger than the one in the front to reflect the weird geometry of the underside of the slab.

After sanding the leg, I decided that it might look better if the edges were substantially rounded, so I took the 1010 to it with a large roundover bit.  The resulting form is a bit more "oriental" than what I was aiming for, but in the end I still think it works.

Attached the legs to the bottom using 10mm glued-in dominoes, and for extra strength put a couple of screws into each leg assembly, which I will fill in with some walnut plugs I will turn tomorrow on the drill press.

I've already finished the top with Osmo as part of my previous aborted attempt, and so will do the same to the legs.
 

Attachments

  • 20160502_222820.jpg
    20160502_222820.jpg
    933.9 KB · Views: 238
  • 20160502_221352.jpg
    20160502_221352.jpg
    1.1 MB · Views: 226
  • 20160501_182122.jpg
    20160501_182122.jpg
    874.3 KB · Views: 210
  • 20160501_163324.jpg
    20160501_163324.jpg
    980.2 KB · Views: 210
  • 20160501_125119.jpg
    20160501_125119.jpg
    832.5 KB · Views: 203
  • 20160430_200025.jpg
    20160430_200025.jpg
    774.7 KB · Views: 208
A few more shots of the table
 

Attachments

  • 20160503_002747.jpg
    20160503_002747.jpg
    526.5 KB · Views: 228
  • 20160503_002759.jpg
    20160503_002759.jpg
    440.6 KB · Views: 188
  • 20160503_002814.jpg
    20160503_002814.jpg
    530.5 KB · Views: 236
Hey Edward, nice job on the table overall and great recovery on the legs redo.  I expect your friends will be very happy to get a personal and hand made gift like that. 

Couple questions from your pictures.  Noticed the HSK hand sander and was wondering if you would recommend it as a purchase?  Also noticed what appears to be a custom made MFT top on your bench?

 
[member=59799]nako[/member] Thanks.  I forgot to take good pictures of the original design with the hard maple base anchored to the top, but I do have two pictures attached below of the maple base that gives you a sense of how ugly, overbuilt and blockish it was, and why I decided to redo it.

I really like the HSK sanding block, though I understand it's a bit expensive compared to some of the other ones on the market, like the one made by Mirka.  The hose is really long and durable, and if you get the 80x133 interface pad, the block is perfect for projects like this where there are a lot of curved surfaces in areas hard to reach with an electric sander.  Or if you want to finish off a flat piece with a final hand sanding, or do a light sanding in between coats of finish.  In case you haven't seen it already, here's a review and some user testimonial in a thread started by [member=1619]SRSemenza[/member]http://festoolownersgroup.com/festool-tool-reviews/hsk-80-x-130-hand-sanding-block-and-hoses/

The workbench top I made using the woodrave template manufactured by FOG member [member=34574]anthonyz[/member] available athttp://woodrave.blogspot.com/p/blog-page_15.html  It works really well, utilizing the hole pattern of standard pegboard to produce the pattern.  It doesn't give you CNC level of precision in the spacing, so I don't use it for cross cutting, but all of the clamping and assembly I used to do on the MFT I now can do on the workbench.  Not too long ago another system was introduced by [member=11196]Peter Parfitt[/member] which you can see demonstrated here:http://festoolownersgroup.com/festool-sales-dealer-area/ujk-parf-guide-system-videos/

nako said:
Hey Edward, nice job on the table overall and great recovery on the legs redo.  I expect your friends will be very happy to get a personal and hand made gift like that. 

Couple questions from your pictures.  Noticed the HSK hand sander and was wondering if you would recommend it as a purchase?  Also noticed what appears to be a custom made MFT top on your bench?
 

Attachments

  • 20160201_223101.jpg
    20160201_223101.jpg
    297.7 KB · Views: 222
  • 20160202_085152.jpg
    20160202_085152.jpg
    248 KB · Views: 206
Edward I like the former base  [big grin]

Just doesn't go with the top you had. Perhaps a larger slab would work with it, as in wider.
 
[member=3192]rvieceli[/member] I would have happily mailed it to you, but unfortunately I've already chopped it up to salvage what scraps I could  [big grin]

rvieceli said:
Edward I like the former base  [big grin]

Just doesn't go with the top you had. Perhaps a larger slab would work with it, as in wider.
 
Nice build, Edward!  I like the way you textured the edges with the wire brush.  You can only see it in that last close up picture with the first base, but it gives a nice overall texture.

By the way, is that dining room table your workshop annex?  I think I recognize it from other posts.  LOL  [big grin]

Thanks for sharing!

Mike A.
 
[member=30413]mike_aa[/member] Thanks.  It's still a bit chilly round these parts, so I continue to use the household as place for glue up and finish, as I have throughout the winter.

mike_aa said:
Nice build, Edward!  I like the way you textured the edges with the wire brush.  You can only see it in that last close up picture with the first base, but it gives a nice overall texture.

By the way, is that dining room table your workshop annex?  I think I recognize it from other posts.  LOL  [big grin]

Thanks for sharing!

Mike A.
 
Finished applying the finish to the legs -- two coats Osmo polyx oil, really brings out the chocolate in the Walnut.
 

Attachments

  • 20160503_195439.jpg
    20160503_195439.jpg
    513.2 KB · Views: 229
  • 20160503_195520.jpg
    20160503_195520.jpg
    351.5 KB · Views: 195
Hey Edward, the walnut legs are definitely an improvement in terms of form so congratulations on that, but don't be too hard on yourself about the maple legs.  Thanks for sharing your build pictures, the details on your experience with the HSK sanding block, the Semenza, woodrave and Parfit Ujk links, very informative.
 
A really nice job.  I liked the first set of legs but agree with the poster who said they would have fit a wider top. The legs you ended up with were terrific.  Overall great design.

I do my glueups in my basement shop, but bring up to kitchen or bedroom for the curing.  It's great to have the extra space  ::)
Tinker
 
Edward this is superb work. Your friends are truly lucky to  have a friend such as you.
 
Back
Top