Warped table top

cliffp

Member
Joined
Jun 22, 2012
Messages
517
I am in the process of making a coffee table and have made the table top but it warped within a day or so.

The top is made from American Oak and is 50cm (20") square and 20mm thick. It is made out of 4 and a half boards joined together using a domino (8mm dominos).

The boards were slightly cupped so I flattened them with a jack plane (LN low angle). I was very careful to flatten the side of the boards that was going to be the table top - the other side I was less fussy about and I didn't try and get the thickness of the boards all identical (it was PAR timber so should have been close anyway) as I knew it would only be the edges that would be seen (the discrepancy was no more than 0.5mm anyway).

I registered the domino fence against the flatter side of each board. I glued it all up, clamping initially two boards, clamping this for the recommended clamping time, then adding a third, again clamping this for the recommended time, and followed this process until all were added. I then laid the top down on a flat surface and left for around 15 hours. At this stage the top was reasonably flat (maybe at worst 1mm out of whack at one end).

I then used a no 4 plane to smooth it but because the wood was highly figured (and I am not very skilled!) I was getting tear out so I decided to finish the flattening/smoothing with my RO150. The top ended up flat and smooth. I then brought it indoors and after a couple of days it warped (at right angles to the length of the boards and grain). The top is now concave with the centre around 3.4mm below the level of the edges.

I am wondering a) what I did wrong and b) whether it is fixable. Its only around £15 worth of wood and I can salvage bits of it but I don't want the same thing to happen again!

I would be grateful for any advice!

 
I'm guessing you have made the top in the garage or a shed which is unheated and has a different atmospheric conditions form in the house. So the timber has properly had a moisture content of around 14-18%. Where in the house the moisture content has properly being around 9-13%. So there has being a difference in moisture content of the timber in the two situation. Ideally when you make furniture for the house you want to make it in close as possible conditions that replicate the conditions the item will be used in. As you bought the piece in the moisture content of the wood lowered causing it to warp. The only way to sort is to redo the top, you might be able to cut the top up and if you have the place you make the top at the same temperature as the house which should hopefully have the moisture content at the right level and hopefully it should be equilibrium
 
Thanks for the reply. Yes I made the top in the garage. Does this mean that making things out of solid wood in a garage is not feasible? Or should the timber be brought indoors to stabilise and taken out only when working on it?
 
You should have also assembled the top by alternatively arranging the rings, ie when looking at the end grain the first board will be have the rings curved up, the next curved down etc etc helps keep the overall table top flat.

But the main reason for it warping will probably be the humidity. Try putting the table back in the garage and see if it flattens out...
 
Hi Cliff

At this time of year you should be pretty close with humidity and moisture levels (I hope).

With joined boards you really do need to make sure that your edges are nicely square as even a slight error will look bad. Also, you need to try to alternate the grain so that any cupping will tend to even out.

If you need to recover the situation just rip the top through the glued joints and check the points above. You may also benefit from ripping the bits through to make more narrower pieces, flip the grain and then domino up again. The narrower flipped pieces will cup less.

Peter
 
Thanks Mark and Peter. I did fail to alternate some of the boards though the warp curvature is continuous even across boards that were alternated. With one board its very difficult to tell which direction the grain is running in as the rings (on this one board) don't seem curved when looking at the end of the board. On the subject of having a square edge, its possible I didn't make enough effort with this as I relied on a track giving me a right angle (which probably wasn't a safe assumption given that the boards were neither very long, nor very wide). Next time I will check with a square.

 
If you're seeing that much movement in just a couple of days, it is probably not finished moving yet! That's the bad news!

Is it possible that your clamping pressure was uneven on the top and bottom of the table top? You need to have a more or less equal number of clamps above and below the top.

You could cut the top in half and rotate one half 180 degrees. This will halve the concavity and give you less thickness to flatten.

Also, you may want to consider breadboard ends to help maintain a flat top.
 
I take the top does not have finish on it yet?

Has it been sitting flat on another surface with top or bottom facing up or down?  Or have both sides been open to the air?

  The way you describe the warping, either the bottom took in more moisture than the top. Or the top dried out more than the bottom.  I have seen this happen with pieces I left sitting flat on my workbench. One side being more exposed to the air than the other. I have even flipped them over, and come back the next day to find the opposite warp occur overnight.

    Certainly not the only factor but it could be a contributor.

Seth
 
Thanks for the latest replies.

RL, I only clamped in the plane of the wood. I used 3 or 4 (cant remember) Bessey K clamps, with the boards sitting on the plastic supports that clip over the clamp bar. All clamps were the same way up (so if the clamping pressure was not 100% parallel there may have been some bias). I did not use any clamps at 90 degrees to these to force the boards to remain flat (I assumed that if my glued edges were square and with the use of dominoes, everything would be ok).

I'll look into the idea of cutting in half and reglueing but suspect I would need to go the whole hog as Peter suggested.

I have heard of breadboard ends but never known what their purpose was (apart from making a breadboard!). I'll research this as well.

Seth, the top does not have finish on it yet. The top initially sat on top of my MFT while it was drying out. After I had smoothed the top I brought it indoors and sat it on top of a pine bedside table. The top of the bedside table is a lot smaller than the warped top and the warping is so extreme that there is no longer much contact area!
 
Cliff,
    When I built my coffee table last year, I had a similar problem.  The top came from a single 16' plank of 5/4 cherry that I had run through my surface planer and let stay in the shop for several weeks to acclimate.  When I finally cut the plank into three pieces and dominoed the pieces to form the top, I let it sit in the clamps overnight to set up.  The next morning I noticed that the center board had developed a very distinct arch (side-to-side).  Nonetheless, I went ahead with the domino mortises in the top to meet the dominoes in the base assembly.  They were all glued up using some pretty massive cauls and clamps as you can see in the post.  By the next morning after gluing the top to the base, the arch had gone out of the top and has not returned to this day.  My guess is that the act of cutting the plank let out some of the tension in the plank that had kept it flat after planing, and that it warped as a result. 
 
Thanks Untidy Shop and Sparktrician. Lots of great information in your posts. I'll digest the info and work out my next step - I'll report back...
 
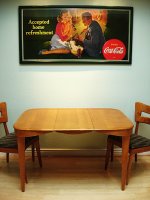
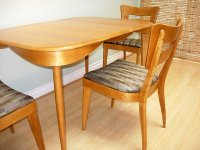
About 7 years ago, I worked on the restoration of a 1950's mid-century Heywood-Wakefield dining set. It had a table leaf that was so warped and twisted, it was unusable. I was able to correct the problem by covering the concaved side with damp towels. I placed it outside in the sun to help speed up the process. After several hours (4 to 5, I think), it had straightened out enough to be able to clamp to battens to dry. I then made aprons for it in the style of the original and it has been fine ever since. Here's the finished restoration.

[attachimg=#]

[attachimg=#]
 

Attachments

  • Coke1.jpg
    Coke1.jpg
    58.9 KB · Views: 735
  • DSCN4868.JPG
    DSCN4868.JPG
    93.2 KB · Views: 778
Tony, I was going to try your idea out and when I went to inspect the top again, it had straightened out on its own! I had left it for several days with the concave side up (resting on a bedside table) and then turned it over yesterday. When I checked it again after 12 hours like this it was still warped. Then maybe 8 or 9 hours later (in reasonably high temperatures for the UK (maybe 27 deg C) it had straightened out.
 
Tony, I was going to try your idea out and when I went to inspect the top again, it had straightened out on its own! I had left it for several days with the concave side up (resting on a bedside table) and then turned it over yesterday. When I checked it again after 12 hours like this it was still warped. Then maybe 8 or 9 hours later (in reasonably high temperatures for the UK (maybe 27 deg C) it had straightened out.

Wood can be so frustrating at times, but so beautiful. Glad it's stabilized for you.
 
It isn't completely flat but its better and I think I can live with it.
 
cliffp said:
It isn't completely flat but its better and I think I can live with it.

Cliff,

Find yourself a copy of the book "Understanding Wood" by R. Bruce Hoadley it will give you a better appreciation of what goes on with solid wood construction.

For my solid wood table and case construction,  I always bring the wood into the shop and cut it to rough dimensions and then sticker it and let it sit for several days before I cut it to final dimensions.  For solid tops and case sides select straight grained wood if possible or alternate the flat sawn wood as suggested above.

Once you achieve a flat and level top or case side you need to consider how it will be incorporated into the table of carcase to keep it straight and finish that part of construction before moving it into another environment.

Jack
 
Thanks Jack. This recent experience has made me initially frustrated and then very interested in the characteristics of wood and I will have a look at the book you recommend. Thanks for the tips on solid wood construction. I will incorporate your suggestions into my work flow.

Cliff
 
cliffp said:
Thanks Jack. This recent experience has made me initially frustrated and then very interested in the characteristics of wood and I will have a look at the book you recommend. Thanks for the tips on solid wood construction. I will incorporate your suggestions into my work flow.

Cliff

Your welcome Cliff.  Even when you take all precautions sometimes the wood seems like it has a mind of it's own and moves on you.  I have on more than one occasion brought the warped top over to the saw and started over.  I have also incorporated wet rags and my wives steam iron which not only moves a board quite a lot but is also great for steaming out accidental dents.

Jack
 
jacko9 said:
cliffp said:
It isn't completely flat but its better and I think I can live with it.

Cliff,

Find yourself a copy of the book "Understanding Wood" by R. Bruce Hoadley it will give you a better appreciation of what goes on with solid wood construction.

For my solid wood table and case construction,  I always bring the wood into the shop and cut it to rough dimensions and then sticker it and let it sit for several days before I cut it to final dimensions.  For solid tops and case sides select straight grained wood if possible or alternate the flat sawn wood as suggested above.

Once you achieve a flat and level top or case side you need to consider how it will be incorporated into the table of carcase to keep it straight and finish that part of construction before moving it into another environment.

Jack

Yeah, that's a good book.

Seth
 
Back
Top