Why I chose my screen handle

Woodhack

Member
Joined
Feb 2, 2014
Messages
33
the video?

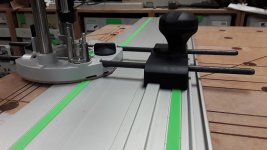
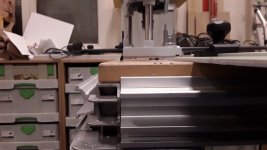
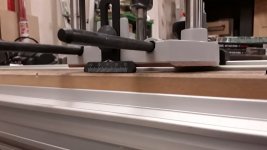
Tried (made) making some fluted trim pieces today with the of1400 and guiderail. I ran some video. The description box tells the tale of issues I had. Btw. I have a potty mouth in parts of the video. In case you're sensitive.

My excuse? They hired the painter to do the carpentry.
Anyway enjoy my mistakes if you like.
Woodhack


I dont see my link...ugh! Hence why I never post stuff online. Alway a problem

 
Woodhack said:
I dont see my link...ugh! Hence why I never post stuff online. Alway a problem

You can't use the short YouTube link.  Use the entire URL:

 
My god this thread  is screwed up. How does this happen? Anyway theres another video after that one where I fixed it.
Im about to put a hammer through my computer.
 
If you throw the hose over your shoulder it will be out of the way. I would never let go of a running router while in wood. Instead do not lock the height adjustment, but push down on the router and let up when you stop. Hold the router solid, and if you are going to use the rail keep one hand where you currently do. You would find a different way to clamp the board you are working with down or just clamp the rail and not worry about the board. Hard to tell depth of cut, but there is nothing wrong with making multiple passes.

This clamp is handy for doing just what you are doing.https://www.festoolusa.com/accessory/489790---fs-rapidr
 
Woodhack,

Firstly,....Find a way of clamping your workpiece to your rail. Routing whilst using an unclamped rail was always going to be a recipe for disaster...

Secondly,..You are using that Guide Rail Adaptor the wrong way around!!!!....Turn it around 180degrees.
It should run on the rail between the 2 splines. If you look back at your video, you will see that the guide rail adaptor & rods are not running parallel with the surface of the rail, which leads me to...

Thirdly,...Set the router up with the guide rods so that about half of the router base is actually sitting on the guide rail itself and is running on the green low friction strip. Then, adjust the support foot on the RHS so that it runs on your workpiece. The Router will then slide along the rail a lot easier, be far more stable and you wont find the support foot moving when you apply your downward pressure in plunge mode.

I hope this helps.

Tim.

[attachimg=1]

[attachimg=2]

[attachimg=3]

[attachimg=4]


Attachments

  • Of 1400 on Guide Rail 4.jpg
    Of 1400 on Guide Rail 4.jpg
    780.9 KB · Views: 173
  • Of 1400 on Guide Rail 3.jpg
    Of 1400 on Guide Rail 3.jpg
    749.3 KB · Views: 177
  • Of 1400 on Guide Rail 2.jpg
    Of 1400 on Guide Rail 2.jpg
    816.5 KB · Views: 164
  • Of 1400 on Guide Rail 1.jpg
    Of 1400 on Guide Rail 1.jpg
    773.4 KB · Views: 173
I had to do this once but I think it's better if you do it without the track. I used an edge guide but I had the Festool edge guide on one side of the router and a home made one on the other side. It creates a sandwich so that the router doesn't move.

One good thing about doing it this way is that once you lay out your marks on your work piece, you don't have to change the setup often. If your flutes are evenly spaced, the setup for the first flute is the same for the last flute. Just put the router on the other side in the opposite direction.

So, if you are doing 5 flutes. Setup 1 & 5 are the same. 2 & 4 after the same. Then number 3, the middle one is on its own.

Sent from my SM-G965U using Tapatalk

 
Also, you can take your ruler and put it on an angle to make the lines evenly spaced. If you don't know that trick, I will have to find a video or write a better explanation.

However, once you have the lines played out, use the center mark on the router to move the router to the marks you laid out.

It worked perfectly for me when I did this once.

Sent from my SM-G965U using Tapatalk

 
Back
Top