Woodpecker Thin Rip Guide

Birdhunter

Member
Joined
Jun 16, 2012
Messages
4,144
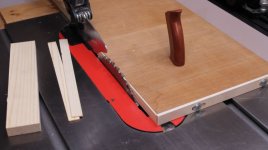
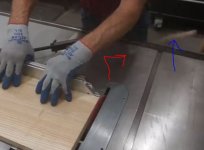
Received my Thin Rip Guide today. Carefully packaged. The only hard part of assembling it was peeling off the protective tape off the two sighting glasses. It works as advertised to cut repetitive thin strips with excellent accuracy.

I’ve been able to do his in the past, but this tool is a lot faster and can be taken off the saw (SawStop) and put back on without losing accuracy.

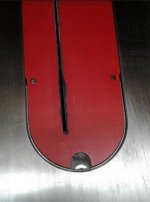
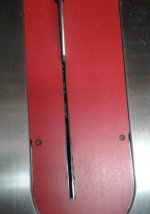
It has two 5 sided washers that slide into the miter bar slot. Very secure, but I wish a short (8”) miter bar was an option. Getting the washers lined is fussy.

Overall, this is a tool I will use often.
 
I hadn't realized you could dial in the width setting. Now I want one, but a new anchor, ground tackle, and VHF are first. I just use one of the plastic feather boards turned at an angle. It tends to cause more friction than desired, but I have never found it didn't work.
 
Birdhunter said:
Getting the washers lined is fussy.

I also wish the nut was a bit larger such that it engaged with the walls of the slot. When loosening, it was spinning freely within the slot and not unscrewing. I had to pull up on the handle to add some resistance.

Otherwise, it works very well.

 
My 5 sided (might be 6 sides as I didn’t really look) washers fit snugly in my SawStop miter slot. I did some test cuts today and they were perfect.
 
Birdhunter said:
My 5 sided (might be 6 sides as I didn’t really look) washers fit snugly in my SawStop miter slot. I did some test cuts today and they were perfect.

I have a SawStop PCS. If yours don't spin in the track, maybe you received larger bolts on your jig or I have larger T-slots in my miter track.
 
The is so much safer for small strips than ripping them against the fence.  I also received mine and was using it today.  Works great!

Using on the Sawstop Jobsite Saw and it works well with it.
 
On my unit, the nut doesn’t go into the slot. The washer with flat sides goes into the slot.
 
Birdhunter said:
On my unit, the nut doesn’t go into the slot. The washer with flat sides goes into the slot.

We're either calling the same thing different names or your kit is missing the miter slot nut. Methinks it's the former.

Anyway, it's a nice piece of kit.

[cool]

Woodpeckers_ThinRip-Guide_Instructions_REV061722_2022-07-21_19-52-23.png
 
The nut (which I have been calling a washer) on my unit measures 22.4mm flat to flat and 25.1mm corner to corner. My miter slots on my SawStop Industrial measure 24.7mm for both. So, there is very little interference.
 
My shop made thin strip rip guide do no require resetting the fence for each cut, though I admit that pieces longer than 36” get difficult to handle.

This article shows three methods.  I use the second method.  The third method is a shop built version of the Woodpecker design.

I still prefer the second method because the fence never has to be reset and you don’t have that repeatability issue to deal with.
https://www.woodmagazine.com/video/how-to-make-a-thin-strip-ripping-jig-for-your-tablesaw

 
Packard said:
Snip.
I still prefer the second method because the fence never has to be reset and you don’t have that repeatability issue to deal with.

Snip.

It's true that once the fence needs to be reset in the process, no matter what jig you use, the same thickness of the strips cannot be guaranteed. One can argue that the difference can be minor, but the difference is there, depending on how many strips/resetting you go through.

I have a sled with an adjustable shoe for cutting strips without resetting the fence, but as you said, it can't handle long strips:

[attachimg=1]

The most accurate and consistent method is to rip strips by setting the fence to the required thickness, and keep it until all the strips are cut (method #1 in the Wood video). To overcome the control issues, I use a featherboard AND a push block that straddles both the strip and the blade as the stock is fed near the end. The WS block is shown below:

[attachimg=2]

No burn marks whatsoever even for long strips -- provided the table saw is properly tuned.

The Micro jig Grr-ripper has a 1/8" leg to rip thin strips without moving the fence. But I don't consider 1/8" thin.

What about thin strips that don't require a 0.01mm tolerance? I use my featherboard (round cornered) in conjunction with the JessEm stock guides, which does require resetting the fence:


Attachments

  • thin strips on the table saw.JPG
    thin strips on the table saw.JPG
    49.7 KB · Views: 1,426
  • thin strip push block.JPG
    thin strip push block.JPG
    36.8 KB · Views: 1,429
  • thin strip reg.JPG
    thin strip reg.JPG
    57.4 KB · Views: 188
On the repeatability/accuracy issue, I just want to chime in that putting a Wixey DRO on my tablesaw fence has really simplified my woodworking.

I've thought about making a thin rip guide using Incra's sawtooth racks. I'm metric, so that would limit me to 1mm increments. For imperial, that'd be 1/32" increments.
 
Reminder: Always use a zci when ripping thin strips. Kickbacks and bad injuries can happen if ripping is done on a non-zci.
 
Also, short pieces are especially prone to a variation on kick-backs where the stock kicks up. 

I ended up in the emergency room after a “kick up” tore off my fingernail.

Also, while the resin push sticks are convenient, they can catch on the blade and store energy by bending and then “explode” and can be very dangerous.

I only use consumable push sticks made from scrap. My favorite is a parallelogram shaped piece of 3/4” stock which rides atop the piece to be ripped and has a small tab at the rear end to drive the stock forward. 

For narrow pieces, these are consumable as the blade will cut lengthwise slots in the push block.  But it does not store energy from the blade and it does not explode into small pieces. No drama at all.
 
Packard said:
Also, short pieces are especially prone to a variation on kick-backs where the stock kicks up. 

I ended up in the emergency room after a “kick up” tore off my fingernail. Snip.
Ouch!

This YouTuber learned his lesson about the non ZCI after suffering from a kickback hurting his arm:

[attachimg=1]

[attachimg=2]

By the way, I have a countless supply of ZCIs for my SawStop...by "bondoing" the throat plate periodically:

[attachimg=3]

[attachimg=4]


Attachments

  • kickback non ZCI.JPG
    kickback non ZCI.JPG
    32.7 KB · Views: 1,296
  • angled cut kickback3.JPG
    angled cut kickback3.JPG
    19.7 KB · Views: 1,257
  • ZCI bondo1.JPG
    ZCI bondo1.JPG
    20.6 KB · Views: 1,256
  • ZCI bondo3.JPG
    ZCI bondo3.JPG
    33.9 KB · Views: 1,251
ChuckS said:
By the way, I have a countless supply of ZCIs for my SawStop...by "bondoing" the throat plate periodically:

That sounds like a great tip. How well does it hold up?
 
Anthony,

I recharge the ZCI about twice a year, depending on the condition, but never more than 3 times according to my memory.

This one was refreshed about 4 months ago (Edit: March 2 to be exact; the SS is my most used machine in the shop, followed by the DF500, the drill press, and then the Kapex):

[attachimg=1]

I also have a spare ZCI which is used once in a blue moon if the regular one is waiting for the Bondo to cure (I allow 24 hours). The spare has never been "Bondoed":

[attachimg=2]

I haven't tried this on the dado ZCI, which is now hardly used as the DF500 has almost eliminated the need for dadoes.
 

Attachments

  • ZCI refreshed about 4 months ago.JPG
    ZCI refreshed about 4 months ago.JPG
    19.6 KB · Views: 1,233
  • ZCI spare.JPG
    ZCI spare.JPG
    31.3 KB · Views: 1,232
Back
Top