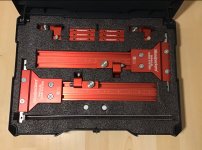
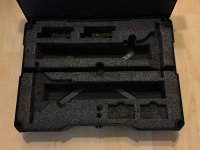
I just wanted to share something I came up with for my Woodpeckers PGS. One of the common complaints many have had about the Woodpeckers system is that it needs to be disassembled and reassembled each time it is used. The new TSO product can be used straight out of the systainer but I like the ability to add tracks and store it all in one systainer.
So here’s what I came up with. It’s a custom kaizen foam insert I made that allows the parallel guide system to be stored already assembled. If you need additional track length you can add it on but if not you can use it as is (most cuts I will be making will not require multiple tracks connected).
[attachimg=1]
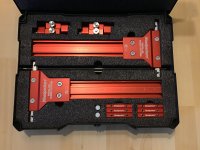
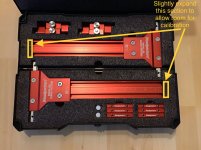
In order to allow room for calibration of the PGS to your track saw guide rail leave a small amount of extra space in your foam cutout where the track ends (see photo below)
[attachimg=2]
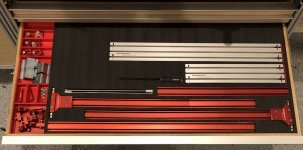
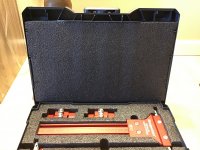
The remaining tracks store directly below the top track to conserve space. I made a finger hole which allows easy access for removing the tracks as well as for removing the narrow stock guide bars. The track connectors are easily accessible and I drilled a small hole in between the two sets of track connectors to hold the allen key. I also drilled holes for the nylon pins that go on the narrow stock guide bars. So that the insert sits nice and flush I installed the Tanos flush mount base insert under the kaizen foam.
[attachimg=3][attachimg=4]
The kaizen foam in the lid is a precut insert from kaizeninserts.com
[attachimg=5]
I pitched this idea to Woodpeckers. They seemed to like it but said they don’t know when they would get around to it with all the projects they are currently working on. I told them it might help them out since many people are purchasing TSO’s parallel guides because they are ready to go out of the systainer. We shall see what happens [tongue].
Anyways, sorry for the long post. I hope this helps for those who want their Woodpeckers PGS to stay assembled in the systainer.
So here’s what I came up with. It’s a custom kaizen foam insert I made that allows the parallel guide system to be stored already assembled. If you need additional track length you can add it on but if not you can use it as is (most cuts I will be making will not require multiple tracks connected).
[attachimg=1]
In order to allow room for calibration of the PGS to your track saw guide rail leave a small amount of extra space in your foam cutout where the track ends (see photo below)
[attachimg=2]
The remaining tracks store directly below the top track to conserve space. I made a finger hole which allows easy access for removing the tracks as well as for removing the narrow stock guide bars. The track connectors are easily accessible and I drilled a small hole in between the two sets of track connectors to hold the allen key. I also drilled holes for the nylon pins that go on the narrow stock guide bars. So that the insert sits nice and flush I installed the Tanos flush mount base insert under the kaizen foam.
[attachimg=3][attachimg=4]
The kaizen foam in the lid is a precut insert from kaizeninserts.com
[attachimg=5]
I pitched this idea to Woodpeckers. They seemed to like it but said they don’t know when they would get around to it with all the projects they are currently working on. I told them it might help them out since many people are purchasing TSO’s parallel guides because they are ready to go out of the systainer. We shall see what happens [tongue].
Anyways, sorry for the long post. I hope this helps for those who want their Woodpeckers PGS to stay assembled in the systainer.
Attachments
-
 BC1460DB-027D-40ED-AA4A-28E093737E7E.jpeg2.1 MB · Views: 4,523
 -
 98A9B47A-CBBC-4FA5-A30A-68A9C1274E18.jpeg870.8 KB · Views: 2,275
 -
 003797F3-7AEB-4401-B678-1484CAF8CA5D.jpeg475.1 KB · Views: 2,114
 -
 298681C4-0D22-42CD-AAA8-5575AC9A2527.jpeg1.9 MB · Views: 2,188
 -
 D36693B6-8A57-4DEF-92A3-4462FBF68729.jpeg2.3 MB · Views: 2,440