Woven Walnut Hamper

drummaniac

Member
Joined
Sep 17, 2012
Messages
14
After watching the two Wood Whisperer videos on this project I had to build one.  The major components are solid walnut.  The back and bottom panels, as well as the two lid panels are 1/2" sanded plywood tinted to match the walnut.  Per the videos, I used General Finishes medium brown dye with excellent results.

The components were sized using the MFT3 and TS55.  Tenons were cut on the tablesaw with a dado stack.  The mortises were done with the OF1400 with a 3/8" spiral upcut bit.

Everything was sanded to 300 grit with the RO150 prior to assembly.  Although pricey, I used Rockler 15 inch pound torsion hinges for the lid.  The hamper is finished with one coat of brushed teak oil that I let cure for 2 weeks and resulted in a very smooth surface without being glossy. 

Let me know what you think, thanks!
 

Attachments

  • 20151009_161835.jpg
    20151009_161835.jpg
    1.7 MB · Views: 296
  • 20151012_121629.jpg
    20151012_121629.jpg
    2.1 MB · Views: 292
  • 20151025_121635.jpg
    20151025_121635.jpg
    1.7 MB · Views: 295
  • 20151104_223609.jpg
    20151104_223609.jpg
    897.8 KB · Views: 409
More pictures.
 

Attachments

  • 20151111_180159.jpg
    20151111_180159.jpg
    1.6 MB · Views: 318
  • 20151117_211424.jpg
    20151117_211424.jpg
    1.4 MB · Views: 437
I've been thinking of making one of these. I watched the videos and it's one of a few projects that actually appealed to me.  I recently built a toy check for my daughter (3y.o) and used the Rockler hinges. I trusted their calculator for weight and suggested hinge size. They suggested 3 of the 60lb hinges. I decided on just a pair and it is still waaaay too tight/tough to move. Are you satisfied with the sizing of yours? They are pricey.

Marc

And fiery nice job btw. I tend to ramble.
 
Very satisfied with the hinges.  The pair suports the lid just enough to hold it open without being difficult to open or close.  I just finished a second hamper, with a woven top instead of the panels, and used the same hinges and still love them.  The overall construction wasn't too difficult, but I learned a few things on the woven portion that I incorporated on the second one that made assembly easier, faster, and cut down on waste.
 
great take on a hamper. I have never seen one like that, and would have never thought to use thin pieces of walnut to weave.
 
It was a fun project.  Here are a few pictures of the second one I built.  I added a woven top to this one and I really like how it turned out.  I'd change the dimensions on the top weave just slightly, but keep the appearance.
 

Attachments

  • 20160404_171348.jpg
    20160404_171348.jpg
    1.8 MB · Views: 171
  • 20160404_171418.jpg
    20160404_171418.jpg
    1.4 MB · Views: 166
  • 20160508_122524.jpg
    20160508_122524.jpg
    1.3 MB · Views: 190
This is beautiful ! I am a huge fan of black walnut and love your execution. Your choice of finish suprised me but I am intrigued. Is there any risk of the oil bleeding onto the contents inside? Would you describe the sheen as satin or otherwise?
 
Krkww - I had the same concern.  I let the teak oil dry for two weeks out of an abundance of caution.  The original design called for two canvas drawstring bags to be used, but I elected not to do that on this version.  We have a pair of plastic laundry baskets that fit pretty well inside and have been using those.  However, I am pleased to note that there hasn't been any danger (so far) of the finish bleeding onto the clothes at all.  I wouldn't recommend throwing wet clothes against the wood, regardless of the finish, but I have used it without the basket in place with no issues.

I did put the canvas bags in the second version and I believe those will work quite well too.  Cheers!
 
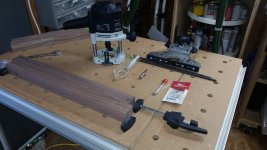
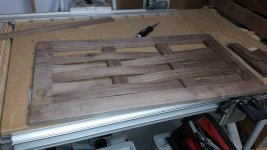
Edward - the strips are 1/8" thick.  I used a 3/16" bit to cut the receiving grooves in the corner posts where the woven slats are captured.  Getting the slats to 1/8" took some trial and error.  I initially tried cutting everything to about 3/16" thick and then passing them through the planer.  I had mixed results with this.  Some of the slats came through with no issue, others got sucked up into the cutterhead and destroyed.  I then tried cutting them at the bandsaw (with a cleanup pass on the jointer in between each one) and this works well.  There is a bit of sanding to do to remove the blade marks on one face of the slats, but since that side will be on the inside of the hamper you could elect to skip that step.  If you choose to do a woven top like I did on the second version, I'd definitely sand both sides of the slats.  I also tried cutting the slats on the tablesaw (again with a cleanup pass on the jointer in between each one) and although there is less yield due to the wider kerf this results in a smoother cut side and reduces sanding effort.  I had just picked up a Forrest Woodworker II blade right before I did this and the results were quite impressive.  I had to remove and clean the blade a few times to remove some buildup but that wasn't a huge issue. 

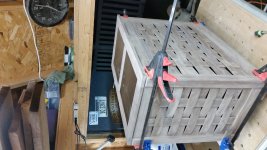
I would cut all of the slats (whether for the front or sides) to the length of the front slats.  Count on damaging a few of them (or more than a few in my case) when sanding/cutting/installing.  I found that I could cut down some of the damaged ones and use them for the side slats.  Additionally I was able to use the scrap slat cut off as clamping cauls to prevent damage on to the frame which was a convenient turn of events.

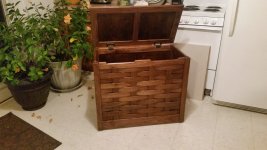
I put a very slight chamfer on the top and bottom edges on both faces of the slats prior to sanding and install.  I felt like this would reduce damage to the slats over time, and hopefully prevent any injury to small fingers that decide to explore the hamper.  This has proven to be true in both cases so far.

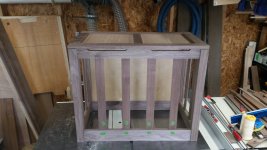
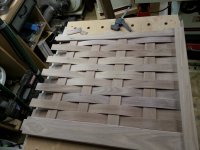
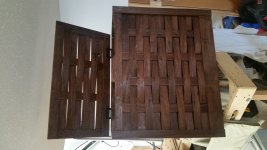
As far as the glue up goes, I followed Marc's plans and steps pretty much exactly on the first version.  Putting on the second leg of the panels while trying to clamp the free ends of the slats was a huge pain in the ass no matter how I tried to do it.  This actually contributed to some of the damaged slats and a good deal of harsh language on my part.  On the second hamper, I happily discovered that I could completely assemble the carcass and do all of the weaving after.  The slats are flexible enough at 1/8" to bend the end of them enough to slip them into the receiving grooves on the legs.  This made the whole process much faster and far less frustrating.  The better your sanding job is on the slats, the easier they will be to weave.

Have fun if you decide to build one.  Hit me up with any questions - I must have watched the videos a couple hundred times each and while Marc's instruction is great, I found a couple procedural differences that worked a bit better for me.

 
What brand teak oil did you use? That looks like satin sheen from one angle, would you agree?
 
The first hamper has a really nice satin sheen to it.  Very smooth.  I used Watco Teak oil, brushed on, and allowed to sit and cure indoors for a couple weeks.
 
Back
Top