Your method for multiple flutes on a column.

Joined
Jan 23, 2007
Messages
307
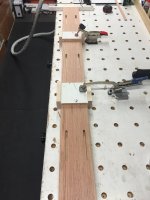
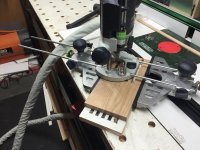
How do you make stopped flutes on a pilaster?

I am looking at using either a router edge guide on the work or sliding a router down a guide rail.  I have an OF 1400 and accessories to do either or is there a better way? 
 
Scott

The way I do it is as follows, it may not be everybody's way but it is accurate and you dont have the worry of one slip and the jobs knackered.

Build a box out of scrap ply and put a temporary dowel into either end of the column.

Cut out holes in either end of the box to accept the dowel.

Knock up a "sliding carriage" that will take your router and will sit on top of the box.

Make a circular index plate and on that mark out how many flute cuts you want.

Screw that index plate into the end of the dowel and also screw some stops on the top of the box that will stop your sliding carriage at the beginning and end of your cut.

With the first mark on your indexing plate at 12 oclock on a clock face screw it to the outside of your box and run your router for the first cut.

Next rotate your indexing plate so that the next mark for your flute cut is at 12 oclock and run your cut again and repeat until you have done.

I hope that makes sense to you.

Guy
 
Scott, you may want to fire off a message to honeydokreg. He uses a technique to puts flutes on his built-ins.

Gary Katz used to, and I assume still does, cover a technique in his free clinics. Check it out at http://www.katzroadshow.com - he only has one more event left this year, but it happens to be in California.

December 13 - Anaheim, CA @ Ganahl Lumber

Also, check out Gary's blog website, This is Carpentry. There's an article on there where he demonstrates it.

http://www.thisiscarpentry.com/2010/10/22/tapered-fluted-newel-posts/

He uses a 1400 to does this, here's the video.

Tapered Newel
 
Scott

[doh] Ignore my previous post, that was for fluting circular column's, having re read it and others response's your project is rectangular in which case the above advice is pertinent!

Its been a long day! [embarassed]
 
Thanks, Tim. Thought I had seen a video from Kreg demonstrating his method. But I couldn't remember where. I think Kreg routs his own beadboard in his spare time.  [blink]
 
Shane Holland said:
Thanks, Tim. Thought I had seen a video from Kreg demonstrating his method. But I couldn't remember where. I think Kreg routs his own beadboard in his spare time.  [blink]

No problem. Kreg does it in his sleep...
 
yep !  lol  thanks for posting my video to help this fellow out...
 
Thank you guys for the video links.  As always there are many ways to skin the cat.  I've read somewhere that a pair of opposing edge guides can be used to capture the work.  That would be similar in principle to Gary Katz's shopmade jig.  I think the original intent was for mortising, but it seems to me it would also work for fluting.  Has anyone done this?
 
Scott,

I purchased a fluting jig from Rockler about two years ago.  I have used it on one project and it worked very well.  I think it ran about $70 retail but I took advantage of one of their discount coupons which they usually have available.

It does have its limits on width but it may work for you.  They have information on their website.

Good luck.

Neill
 
Neill said:
Scott,

I purchased a fluting jig from Rockler about two years ago.  I have used it on one project and it worked very well.  I think it ran about $70 retail but I took advantage of one of their discount coupons which they usually have available.

It does have its limits on width but it may work for you.  They have information on their website.

Good luck.

Neill

Thanks, Neill,  The Rockler fluting jig looks pretty nice for the money.  I'll check it out during my next visit there.
 
I use a guide rail and the router referencing off the centerlines of the flutes.  Using the outrigger shoe on the router and either stops or lines on work pieces you are guaranteed straight flutes and the ends are as accurate as your eye.

Peter
 
Peter Halle said:
I use a guide rail and the router referencing off the centerlines of the flutes.  Using the outrigger shoe on the router and either stops or lines on work pieces you are guaranteed straight flutes and the ends are as accurate as your eye.

Peter
I use the guide rail for flutting too.I also use it to make HVAC register on cabinet kick plate.
 
Mastercabman

The register is a great detail. Nicely done.
 
I have used that same register method when doing kitchen cabinets with a kick splash heater installed behind it

Sal
 
I like that alot. I have been slowly, one by painful one trying to replace all of the old cast baseboard radiators with new wrapped in beautiful little cabinet grade clothing. It makes things so much nicer.
 
Mastercabman,

I am resurrecting this very old thread as I am getting ready to build some window seats and I'll need to be making some HVAC registers on the kick plates.  I also will be doing some wainscoting on a wall that has a large return air register (the duct is in the cavity of the wall), so I want to flute the hvac slats there as well.

I tried to enlarge the pictures of your kick plates, but as this is an old post, they won't enlarge.  They look amazing and I was hoping you had a larger picture you could post.

I was also trying to figure out how you made these as this is exactly the look I am going for.

mastercabman said:
I use the guide rail for flutting too.I also use it to make HVAC register on cabinet kick plate.
 
Grasshopper this is how I do my hvac vents. I bought another edge guide and some longer rods from Home Cheapo. I use Whiteside down spiral router bits and make multiple passes to limit tear out.
 

Attachments

  • image.jpeg
    image.jpeg
    644.6 KB · Views: 852
  • image.jpeg
    image.jpeg
    727.7 KB · Views: 846
  • image.jpeg
    image.jpeg
    646.2 KB · Views: 824
Back
Top