Cheese
Member
- Joined
- Jan 16, 2015
- Messages
- 12,505
A sister thread:https://www.festoolownersgroup.com/...ed-lights-using-the-mfs/msg576988/#msg576988I
I need to install some false drawer fronts on 20 drawers. There will be 4 holes/screws in each drawer so I figured a jig was mandatory. There will be a pair of holes on the LH & RH of each drawer.
However, because each drawer is lined with aromatic cedar, the screw head holes need to be counterbored into the rear of each drawer.
[attachimg=1]
[attachimg=2]
The OD of the screw head is .500" so if I want to have .06" (1/16") adjustment in each direction, I needed to counterbore a .625" (5/8") diameter in the rear of the drawer. A .250" through hole would then also allow .06" movement for the screw body.
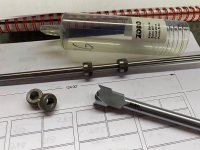
Not being able to readily find a 5/8" x 1/4" counterbore I decided to use a Series 3 Zobo bit. Unfortunately, a 5/8" diameter bit is not available however a 16 mm (.629") bit is available.
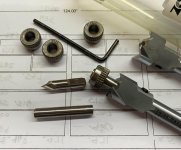
If you're not familiar with the Series 3 Zobo bits, they have the ability to use different size guide pins, centering points and pilot drills.
https://www.timbertools.com/System-3-Accessories/
https://www.timbertools.com/Zobo-Central-Drilling-System-3/
Unfortunately again, they do not offer a 1/4" diameter pilot, 6 mm is the closest they come which is not up to the task.
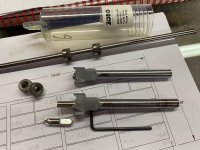
So, the plan is to purchase 4 each 1/4" drill bushings, a section of 12L14 tight-tolerance 1/4" rod and a 16 mm Zobo bit. One end of the rod will be turned down to 6 mm so it fits into the Zobo bit while the other end fits into the drill bushings.
[attachimg=3]
I need to install some false drawer fronts on 20 drawers. There will be 4 holes/screws in each drawer so I figured a jig was mandatory. There will be a pair of holes on the LH & RH of each drawer.
However, because each drawer is lined with aromatic cedar, the screw head holes need to be counterbored into the rear of each drawer.
[attachimg=1]
[attachimg=2]
The OD of the screw head is .500" so if I want to have .06" (1/16") adjustment in each direction, I needed to counterbore a .625" (5/8") diameter in the rear of the drawer. A .250" through hole would then also allow .06" movement for the screw body.
Not being able to readily find a 5/8" x 1/4" counterbore I decided to use a Series 3 Zobo bit. Unfortunately, a 5/8" diameter bit is not available however a 16 mm (.629") bit is available.
If you're not familiar with the Series 3 Zobo bits, they have the ability to use different size guide pins, centering points and pilot drills.
https://www.timbertools.com/System-3-Accessories/
https://www.timbertools.com/Zobo-Central-Drilling-System-3/
Unfortunately again, they do not offer a 1/4" diameter pilot, 6 mm is the closest they come which is not up to the task.
So, the plan is to purchase 4 each 1/4" drill bushings, a section of 12L14 tight-tolerance 1/4" rod and a 16 mm Zobo bit. One end of the rod will be turned down to 6 mm so it fits into the Zobo bit while the other end fits into the drill bushings.
[attachimg=3]


 I’m very curious why you would not drill the counter bore with a short Forstner bit first and then drill the through holes? I am assuming the ceder linings will slip into the rabbets and cover the hardware?