10" deep floating shelves

mrFinpgh

Member
Joined
Oct 30, 2015
Messages
568
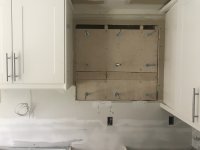
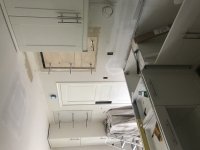
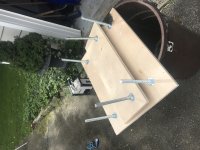
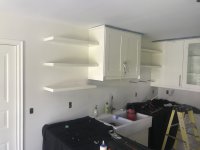
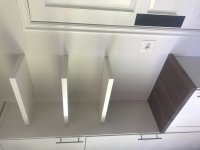
If I wanted to do 10" deep, 2" thick, ~24" wide floating shelves, where the shelf consisted of a box that had a dado for LED strip lighting, what would be the best approach?

The shelves would be holding dishes, glassware, possibly small appliances, possibly 750ml bottles of liquid. 

I have access to the studs in the wall behind (I'll be framing it), so my first thought was a buried bracket of some kind. 

French cleats seem like there would be too much leverage at the front of the shelf unless I made them substantially thicker.

The rebar in the stud idea has appeal, but the shelf won't be solid, so I'm not sure exactly how i would do that.  Maybe some inner structure designed to slip over the rebar?

Thanks,
Adam
 
Sounds like your shelves are going to be carrying more weight, but I built my wife a couple of shelves that are maple 3/4" thick by 9 1/2" wide. Used 1/2" Spax lag screws driven into the studs, then cut the ends off with a portable band saw. I was going to figure out a way to affix the now studs into the shelf, but they required a rubber mallet to gently seat them (I don't hit things with my hands anymore). They are solid and going nowhere. Would I start putting really heavy stuff on them? Nope! But as book shelves they are working great.

Take a look at the Ikea floating shelves for how they mount. That is where I got the idea for the ones I made, but simplified it, using just lags.

________________________________________
So if I wanted some ultra heavy duty shelves and had access to the back of studs, I would start welding up some brackets. Possibly using scrap 1/2"-3/4" pipe (Not rebar) welded to a 1/4" plate 3"x6" pre-drilled with holes. Put a hole in the drywall, then insert the mount and put one bolt into the bracket. Level on the other side and continue bolting it into place. The second mount will take a little more setup time, as it must be leveled on two planes.

As to the shelf I would make the mounting area solid, and either use a router to cut half circles in each part and glue them together, or attempt to drill them straight. I would think the router would be more accurate, just gotta have the right bit. 

Another option for less than what the poster above showed is to buy Ikea shelves, and use just the brackets. I believe Home Depot sells them too. They are around $10 per shelf.
 
Dane said:
Blind shelf supports.http://www.kitchensource.com/supports-brackets/fb-32136.htm?p=FB-32136 

I'd do a torsion box with an applied bottom to house the lights.  If they are puck lights you can probably recess them into the torsion box web and forgo the false bottom.

That's kind of my plan in terms of the shelf.  A 3/4" top wrapped in 2" hardwood  with some internal bracing.  If I play my cards right, I can probably form the dado for a strip light housing with the applied bottom.

I also saw these brackets:http://www.aandmhardware.com/ and they look interesting.

Thanks,
Adam
 
Peter_C said:
Sounds like your shelves are going to be carrying more weight, but I built my wife a couple of shelves that are maple 3/4" thick by 9 1/2" wide. Used 1/2" Spax lag screws driven into the studs, then cut the ends off with a portable band saw. I was going to figure out a way to affix the now studs into the shelf, but they required a rubber mallet to gently seat them (I don't hit things with my hands anymore). They are solid and going nowhere. Would I start putting really heavy stuff on them? Nope! But as book shelves they are working great.
________________________________________
So if I wanted some ultra heavy duty shelves and had access to the back of studs, I would start welding up some brackets. Possibly using scrap 1/2"-3/4" pipe (Not rebar) welded to a 1/4" plate 3"x6" pre-drilled with holes. Put a hole in the drywall, then insert the mount and put one bolt into the bracket. Level on the other side and continue bolting it into place. The second mount will take a little more setup time, as it must be leveled on two planes.

As to the shelf I would make the mounting area solid, and either use a router to cut half circles in each part and glue them together, or attempt to drill them straight. I would think the router would be more accurate, just gotta have the right bit. 

Another option for less than what the poster above showed is to buy Ikea shelves, and use just the brackets. I believe Home Depot sells them too. They are around $10 per shelf.

Sounds like 1/2" lag bolts might be sufficient

What do you think about 12" lengths of 1/2" iron or galvanized pipe, sunk into the stud 3.5" and then attached to the inside of a built up shelf via some pipe straps and lateral blocks? 

Or would I just be better off with something like these:http://www.aandmhardware.com/?

Thanks,

Adam

 
Resurrecting this thread, as I'm actually ready to make these things stay up on the wall.

I ended up putting 1/2" diameter lag screws through the studs, which left about 8 inches sticking out for the shelf to sit on.  The wall is tiled, with the tile notched around the bolts.

The shelves themselves are walnut ply framed with 2" wide solid walnut to create a thicker appearance.  The bottom of the shelf is 1/4" walnut, which leaves the inside of the shelf free for low voltage wiring.  There is space for LED channel at the front of the bottom of the shelf.

Right now, the shelves just sit on top of the lag bolts, but they need to become more permanently attached.  I was looking at cable straps as a way to clamp the shelf to the lag bolt, but a 1/2" diameter bolt seems to be too small to really get a grip.  There are 3/8"  I could line them with rubber, I suppose?   

Folks on here tend to know more than I do about these things.  Anyone have a good way to lock these shelves down?

Thanks,
Adam
 
mrFinpgh said:
Resurrecting this thread, as I'm actually ready to make these things stay up on the wall.

I ended up putting 1/2" diameter lag screws through the studs, which left about 8 inches sticking out for the shelf to sit on.  The wall is tiled, with the tile notched around the bolts.

The shelves themselves are walnut ply framed with 2" wide solid walnut to create a thicker appearance.  The bottom of the shelf is 1/4" walnut, which leaves the inside of the shelf free for low voltage wiring.  There is space for LED channel at the front of the bottom of the shelf.

Right now, the shelves just sit on top of the lag bolts, but they need to become more permanently attached.  I was looking at cable straps as a way to clamp the shelf to the lag bolt, but a 1/2" diameter bolt seems to be too small to really get a grip.  There are 3/8"  I could line them with rubber, I suppose?   

Folks on here tend to know more than I do about these things.  Anyone have a good way to lock these shelves down?

Thanks,
Adam
I think the clamps for Armored Cable/BX electrical cable could work since you can get them in a smaller diameter than rigid conduit clamp sizes.
 
The bottom is put on after the shelf is installed?

Route channels in some ply, place over bolt, screw into bottom of the top of the shelf. You’ll probably only need the “clamps” in a few locations. Be careful of the screw length.

Tom
 
As I stated above I drilled into the 3/4" maple and slide my shelf over the cut off bolts. Although I drilled near perfectly there is enough tension between the two bolts to keep the shelf in place. If loose, a little construction adhesive would do the job. The Ikea type shelves use a 5mm machine screw or so, which is threaded into the bolt/stud mounted onto the wall.

You could work with Tom's suggestion. The goal should be for the shelf to appear free floating. The low voltage wiring should run inside the wall.

Right now we have no idea what the air gap between the top and bottom of the shelf is. Do you have photos showing multiple angles?
 
This is how we did some recently. Probably overkill but homeowners planned on putting plates and glassware on them and they’re 11” deep X 1.5” thick poplar, with 5/8” threaded rod-super beefy. FYI-The 3/4 thick import birch ply was notched into the studs with a multi master, and screwed directly to the studs. We liked the plan because we had really good control of hole alignment and the shelves are dead level and are level to each other too. Another nice feature with the plywood is the wall is very straight and flat now so scribing was minimal if at all. With all this said, the hardest part was accurately drilling the corresponding holes. Since we lack a drill press, we opted to rent some block time at my local woodcraft, which worked well enough. When installing the shelves we filled the holes with Gorilla glue since it expands and will stick to wood, metal and drywall. All in all a fun project. Cheers
 

Attachments

  • 3B034B01-47E7-42B7-B1FA-505B4F4591B1.jpeg
    3B034B01-47E7-42B7-B1FA-505B4F4591B1.jpeg
    1.5 MB · Views: 453
  • E43BF91A-8FF2-43E5-B854-B92915FB4ED9.jpeg
    E43BF91A-8FF2-43E5-B854-B92915FB4ED9.jpeg
    1.9 MB · Views: 392
  • 67280A90-0C48-46EF-A4AF-B0D1E08B7B8E.jpeg
    67280A90-0C48-46EF-A4AF-B0D1E08B7B8E.jpeg
    3.1 MB · Views: 406
  • B25091F5-9DEB-41F1-A4F9-14A0CA8B52EE.jpeg
    B25091F5-9DEB-41F1-A4F9-14A0CA8B52EE.jpeg
    1.5 MB · Views: 456
  • 85A14DB3-F7E0-475A-9C53-E95CB71C4FC5.jpeg
    85A14DB3-F7E0-475A-9C53-E95CB71C4FC5.jpeg
    1.3 MB · Views: 435
I came across this thread and just wanted to suggest these brackets for future projects as an alternative. I used them to put floating vanities in our master bath with 3cm granite tops and they worked very good with the weight. Nice and conceited if you have access to the studs as the OP indicated.

Countertop Brackets
 
This worked perfectly.

I routed out channels using a 1/2" core box bit and cut them into 2" pieces.  A couple GRK screws through each and the shelves are solid and stable.

There is still some deflection, but I think that just comes with using 1/2" lag screws to create the cantilever.  I think any other solution would have been about 20x more expensive.  For 2' wide shelves, this seems good.

Thanks,
Adam

tjbnwi said:
The bottom is put on after the shelf is installed?

Route channels in some ply, place over bolt, screw into bottom of the top of the shelf. You’ll probably only need the “clamps” in a few locations. Be careful of the screw length.

Tom
 
Back
Top