Hi all.
As mentioned in other threads, I've been doing some more building using salvaged wine barrel staves. This time was mucho
easier as I figured out to use the foam interface pad, which allows the paper to conform to the curves and sands much faster.
One problem I was dealing though was aligning the suction holes and even getting the pad and discs nicely centered on the base pad.
Because I start sanding in the aggressive mode, even a little off center can really throw off the balance. It's also difficult to see through the interface pad holes to line them up with the base.
I decided to build a small alignment jig using dowels, but then I realized that the base suctions holes (6 mm) are actually smaller than those in the sandpaper and interface pad (8 mm).
So I decided to see if I could make one using 3D printing. Sure enough, it wasn't that difficult (other than my rusty Sketchup skills getting in the way).
here is the prototype:
[attachthumb=#]
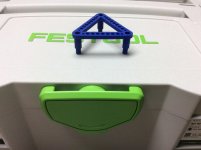
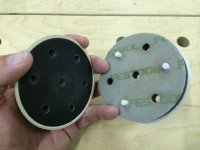
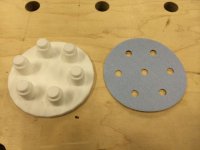
And now side by side with the sandpaper, you can see what I realized as soon as I unwrapped it.... apparently I still can't tell the difference between a radius and a diameter [embarassed](ironically my 2nd guitar had double curvature on the top and back form the same reason). This was especially unfortunate since I got so excited to print it that I forgot about hollowing it out to remove bulk (Shapeways charger per cubic centimeter of material), and it cost over $50 to print this first one. [scared]
[attachthumb=#]
lessons learned.
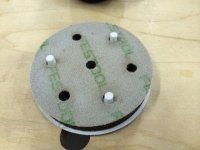
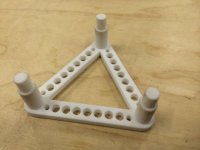
Now here is iteration 2. I reduced it to just 3 prongs, and made the support structure just a triangle, the bare minimum to support the prongs. I also "drilled" holes wherever possible. Even the prongs are mostly hollow. Note that this is NOT FDM (Fused Deposition Modeling) like the home printers. This is laser sintering on a powder.
[attachthumb=#]
[attachthumb=#]
[attachthumb=#]
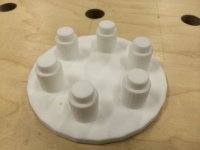
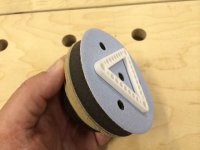
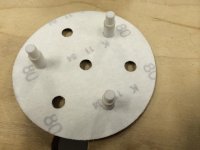
Below are pictures showing how it works:
1) place paper on the jig (upside down!)
2) then place the interface pad onto the paper, on the jig
3) then insert the smaller parts of the prongs into the base suction holes and press.
4) then just remove the jig.
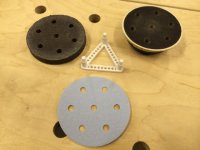
[attachthumb=#]
[attachthumb=#]
[attachthumb=#]
[attachthumb=#]
[attachthumb=#]
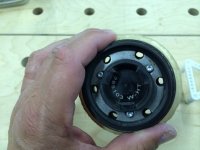
As you can see from the final picture, the holes line up perfectly.
I've made this jig available for sale at Shapeways.com:
You can see it here
Note that there is also a "linear" version of the jig which costs a bit less, but doesn't look quite as cool!
Also, you can choose from many different materials. The ones shown are simply "Strong, White, and flexible", but it might be
worth getting it printed in one of the "polished" options, since it will reduce friction when removing the jig (the prongs are .5 mm undersized to facilitate that as well).
If you do order one, please give me any feedback you may have.
I think I will glue mine to a larger 100mm sized wood circle to make it easier to remove the jig.
As mentioned in other threads, I've been doing some more building using salvaged wine barrel staves. This time was mucho
easier as I figured out to use the foam interface pad, which allows the paper to conform to the curves and sands much faster.
One problem I was dealing though was aligning the suction holes and even getting the pad and discs nicely centered on the base pad.
Because I start sanding in the aggressive mode, even a little off center can really throw off the balance. It's also difficult to see through the interface pad holes to line them up with the base.
I decided to build a small alignment jig using dowels, but then I realized that the base suctions holes (6 mm) are actually smaller than those in the sandpaper and interface pad (8 mm).
So I decided to see if I could make one using 3D printing. Sure enough, it wasn't that difficult (other than my rusty Sketchup skills getting in the way).
here is the prototype:
[attachthumb=#]
And now side by side with the sandpaper, you can see what I realized as soon as I unwrapped it.... apparently I still can't tell the difference between a radius and a diameter [embarassed](ironically my 2nd guitar had double curvature on the top and back form the same reason). This was especially unfortunate since I got so excited to print it that I forgot about hollowing it out to remove bulk (Shapeways charger per cubic centimeter of material), and it cost over $50 to print this first one. [scared]
[attachthumb=#]
lessons learned.
Now here is iteration 2. I reduced it to just 3 prongs, and made the support structure just a triangle, the bare minimum to support the prongs. I also "drilled" holes wherever possible. Even the prongs are mostly hollow. Note that this is NOT FDM (Fused Deposition Modeling) like the home printers. This is laser sintering on a powder.
[attachthumb=#]
[attachthumb=#]
[attachthumb=#]
Below are pictures showing how it works:
1) place paper on the jig (upside down!)
2) then place the interface pad onto the paper, on the jig
3) then insert the smaller parts of the prongs into the base suction holes and press.
4) then just remove the jig.
[attachthumb=#]
[attachthumb=#]
[attachthumb=#]
[attachthumb=#]
[attachthumb=#]
As you can see from the final picture, the holes line up perfectly.
I've made this jig available for sale at Shapeways.com:
You can see it here
Note that there is also a "linear" version of the jig which costs a bit less, but doesn't look quite as cool!
Also, you can choose from many different materials. The ones shown are simply "Strong, White, and flexible", but it might be
worth getting it printed in one of the "polished" options, since it will reduce friction when removing the jig (the prongs are .5 mm undersized to facilitate that as well).
If you do order one, please give me any feedback you may have.
I think I will glue mine to a larger 100mm sized wood circle to make it easier to remove the jig.
Attachments
-
 IMG_6671.jpg30.2 KB · Views: 757
 -
 IMG_6679.jpg43.3 KB · Views: 654
 -
 IMG_6678.jpg37.6 KB · Views: 741
 -
 IMG_6677.jpg44.8 KB · Views: 548
 -
 IMG_6676.jpg45.4 KB · Views: 588
 -
 IMG_6675.jpg37.5 KB · Views: 560
 -
 IMG_6674.jpg39.2 KB · Views: 600
 -
 IMG_6672.jpg44.1 KB · Views: 566
 -
 IMG_6673.jpg39.3 KB · Views: 744
 -
 IMG_6670.jpg36.5 KB · Views: 640
")