Crazyraceguy
Member
- Joined
- Oct 16, 2015
- Messages
- 4,897
I'm sure that many of you have seen the one made by Marc (TWW) or the even more elaborate version from Woodpeckers, but sometimes in a "one off" situation, a job-specific jig will do just fine.
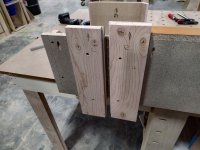
Yesterday I needed to make a dado to fit a metal U-channel, as a decorative item, in the outside of a column. The outside was pre-laminated so the dado was just formed by spacing the parts away from each other. Where the edge meets the other side needed a matching groove.
Those bigger jigs are intended for larger projects and not easily adapted to a vertical surface.
5 minutes with some short strips of plywood and 1/4" mdf, custom made for this application. Since the face they were going onto was raw, a couple of 23ga pins told hold them while adding some screws, worked fine. They could also be double-side taped, but there is some risk there.
The first time I made this trim feature, for a different location, it didn't have this detail. There are more of these to come, so I kept these pieces after the cut was made.
I make lots of jigs/fixtures/forms that only ever get that one-time use, so I usually just throw them away. Since this may come back, I'll hold onto it for a while. I have learned over the years to write what you need to know to use it though. Copy-ring size, bit size, reference edge, brand/model # of the thing it fits, etc. It is very easy to forget.
I made this for my OF1010 with a 15mm copy-ring and a 1/4" bit, marking the left and right "just in case". It shouldn't really matter because I always use the Festool centering cone, but why not. I marked them after successful use. Jigs don't have to be fancy, adjustable, or permanent, just useful.