Richard/RMW
Member
- Joined
- Jul 11, 2010
- Messages
- 2,947
[member=12380]greymann[/member] - I had pretty much the same experience sans the handy neighbor w/ milling machine, my 20mm end mill is still unused as I figgered out belatedly that it was too large for my drill press chuck. As [member=36908]BadRobot[/member] pointed out, where 80/20 gets really expensive is in the cost of specialty fasteners/boring/tapping/etc. If you can buy used/overstock you can save a ton but sometimes this limits what you can do.
I also settled on end taps in the 1515 ULS and drilling access holes, which works great and is cheap but does limit your ability to adjust something after the fact. All that is needed is a chop saw w/ AL blade, the drill guide and a 5/16" tap and you can do most anything.
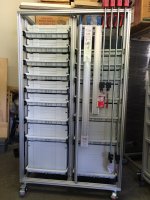
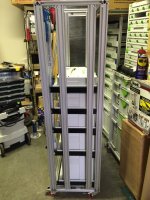
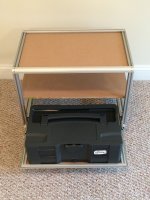
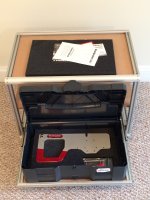
To avoid the need for extrusions lined up with every drawer glide I opted to add side panels thick enough so the inside face is just proud of the extrusion, then mount the glides to the panel. Using 15 series this meant I needed a panel 25mm thick. The end product, mocked up, looks like this:
[attachimg=1]
Here's a recent post with some more details, if you scroll down there is more trial & error info on using 80/20 with Systainers.
The panels are doubled up 1/2" ply, with an 8mm thick tab routed along each edge. I cut one piece of 1/2" ply to the exact size to fit the 80/20 side frame and then the second one 20mm larger in each direction, glue them together creating a 10mm long tab & then using a top-bearing router trim bit reduce the thickness of the tab to fit the extrusion. If you are using the 10 Series extrusion you can probably just use 3/4 ply and rabbet the edges to fit the slots.
The 15 Series extrusion slot is 8mm wide, and each face of the extrusion is 15mm. The nominal 1/2" ply doubled is just under 25mm thick so the face is ~2mm proud of the extrusions when installed this way, and the only fasteners needed are 4 screws at the extrusion corners. With the panels pre-bored for 32mm hardware you have decent adjustability for the drawer glides.
Hope this makes sense.
RMW
I also settled on end taps in the 1515 ULS and drilling access holes, which works great and is cheap but does limit your ability to adjust something after the fact. All that is needed is a chop saw w/ AL blade, the drill guide and a 5/16" tap and you can do most anything.
To avoid the need for extrusions lined up with every drawer glide I opted to add side panels thick enough so the inside face is just proud of the extrusion, then mount the glides to the panel. Using 15 series this meant I needed a panel 25mm thick. The end product, mocked up, looks like this:
[attachimg=1]
Here's a recent post with some more details, if you scroll down there is more trial & error info on using 80/20 with Systainers.
The panels are doubled up 1/2" ply, with an 8mm thick tab routed along each edge. I cut one piece of 1/2" ply to the exact size to fit the 80/20 side frame and then the second one 20mm larger in each direction, glue them together creating a 10mm long tab & then using a top-bearing router trim bit reduce the thickness of the tab to fit the extrusion. If you are using the 10 Series extrusion you can probably just use 3/4 ply and rabbet the edges to fit the slots.
The 15 Series extrusion slot is 8mm wide, and each face of the extrusion is 15mm. The nominal 1/2" ply doubled is just under 25mm thick so the face is ~2mm proud of the extrusions when installed this way, and the only fasteners needed are 4 screws at the extrusion corners. With the panels pre-bored for 32mm hardware you have decent adjustability for the drawer glides.
Hope this makes sense.
RMW
greymann said:I agree with all of BadRobot's points. When I started with my 80/20 building, I settled on one size. In my case 40mm stock. Then kept looking until I found overstock extrusions of 2, 3 and 4 feet. They were much cheaper than the equivalent in exact mm length.
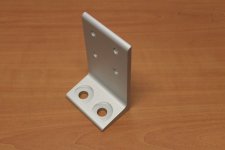
I also bought the counter bore bit thinking I would do it myself only to find that it was a 20 mm bit with a 20 mm shank. Luckily, I have a neighbor with a very expensive metalworking mill and he does the few I really need. The initial setup took some time because the depth and the setback for the counter bore needs to be very precise. Since it has digital controls, he now just has to dial the settings in and go.
I use the tabs and screw where ever possible and do the tapping and access drilling myself using the 80/20 jig and like BadRobot I like the look better.
![ScreenClip [6].png](/data/attachments/31/31309-985bf4669799d7ac2cd28bf230c3d422.jpg?hash=XT6tqGGr2I)