A couple of ash tables

Rutabagared

Member
Joined
Jan 27, 2008
Messages
298
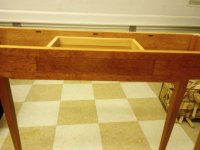
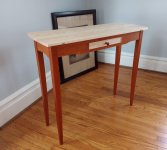
Ash with red oak base.

[attachimg=1][attachimg=2]

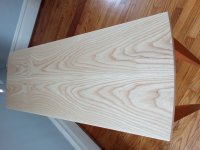
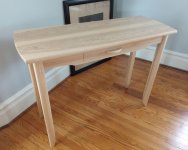
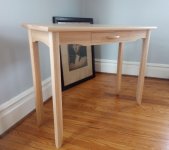
Just ash . . . under the watchful eye of GW.

[attachimg=3][attachimg=4]


Attachments

  • Ashredoakhall table.jpg
    Ashredoakhall table.jpg
    769 KB · Views: 403
  • Ashredoakhall table2.jpg
    Ashredoakhall table2.jpg
    847.9 KB · Views: 408
  • ashhalltable.jpg
    ashhalltable.jpg
    1.1 MB · Views: 405
  • ash hall table 2.jpg
    ash hall table 2.jpg
    776.5 KB · Views: 368
Very nicely done. I especially like the leg curves. The long sweeping curve/taper of the Red Oak one is quite elegant.
It seems very deliberate to be of similar proportions, yet so may differences.
Color contrast on one.
Bullnose edge in one, maybe more radius on the ends too?
The arches in the aprons
The drawers, size, inset, cock-bead, etc

It's like a test  [big grin]
 
Crazyraceguy said:
Very nicely done. I especially like the leg curves. The long sweeping curve/taper of the Red Oak one is quite elegant.
It seems very deliberate to be of similar proportions, yet so may differences.
Color contrast on one.
Bullnose edge in one, maybe more radius on the ends too?
The arches in the aprons
The drawers, size, inset, cock-bead, etc

It's like a test  [big grin]

Thank you for the kind words.  Your exactly right.  I was experimenting.  I built the red oak first and thought I should make the drawer size larger in proportion to the front apron, so did that with the all ash table.  The cock beading and the curly ash veneer drawer front were unplanned (red oak inset drawer was planned) because there was a color mismatch with the drawer front vs. the surrounding apron (below).  Even though the drawer face was a cut out from the front apron, the dye was applied at a different time.  I sanded and reapplied without success.

I also added the dovetailed keys to the top to straighten a bit of cupping that occurred with the top after I glued the bookmathed halves.  I've found this to be partially effective in most cases (removes about 1/2 of the cupping).  Attaching the top removed most of the remainder.

The details (bullnose, pillowed legs, etc.) of the all ash table were just experiments.  When you're giving it away, most don't care unless they have specific requirements. :)

I'll change the widths of the aprons next time so the overall width of the side aprons matches the reduced width of the front aprons where they meet the legs.

[attachimg=1][attachimg=2]
 

Attachments

  • table 1r.jpg
    table 1r.jpg
    376.7 KB · Views: 270
  • table r.jpg
    table r.jpg
    428 KB · Views: 267
Jujigatame said:
It's beautiful!

What color/stain/finish did you use on the oak?

Thank you.  I used two coats of Homestead transtint golden brown dye (dissolved in water) on the base.  I sprayed Emtech EM6000 water based lacquer (satin) (Target Coatings) on the entire table.  This is my favorite Target finish (probably because I have the most experience with it :)).  It ambers significantly over time.  I'll post some pics of current projects versus some ash cabinets I sprayed a couple of years ago to show the contrast.
 
Elegant work with subtle curves makes it easy on the eyes.

Beautiful. 
 
Wow!  How did you get the grain to run across the apron and the draw front of the ash table?  Is is a veneer?

Thanks
Bob
 
bobtskutter said:
Wow!  How did you get the grain to run across the apron and the draw front of the ash table?  Is is a veneer?

Thanks
Bob

Thank you.

Here's an explanation from Wood Magazine.  I also have a photo of it above for the table with the red oak base.
 
Very nice work.  I'm interested in the ash legs--they aren't square in cross-section?  If so, how did you create the profile?
 
cider said:
Very nice work.  I'm interested in the ash legs--they aren't square in cross-section?  If so, how did you create the profile?

Thank you.  They are pillowed.  I used a table edge profile bit similar to the Whiteside 3294.  Mine is a knockoff brand that I purchased about 20 years ago.  It chipped on the first leg of this table, leaving a ridge that required a bit of sanding (interface pad to the rescue). 

Size the stock so the edge of the profile lands as close to the center as possible, with depth just at the surface (no shoulder/ridge in the center).  Mine was nominally 1.75".  It doesn't have to be perfect because subsequent sanding will blend small flat spots/ridges. There are four total passes - two on each outer face in opposite directions (one with and one against the grain - another reason I wish I had the Whiteside at the time).

There is an order to routing so you can always maintain a flat corner to register against both the fence and the table simultaneously (I actually took notes and still messed up one leg  :)).  I don't have access to my shop currently (and have no idea where I placed the notes or even if I saved them) but I think the order is 1) outside corner of one face, 2) outside corner of adjacent face, 3) opposite corner on either face, 4)opposite corner on the remaining face.  I recommend milling up extra leg stock or leave a leg extra long for practice (I prefer the latter because I always seem to end up with worthless offcuts that are 6 - 8 inches long).
 
So are two opposing faces profiled and the other two remain straight and parallel to each other?  In any case, sounds like a cool detail.  It also gives an interesting light/shadow look to the legs in the picture.
 
cider said:
So are two opposing faces profiled and the other two remain straight and parallel to each other?  In any case, sounds like a cool detail.  It also gives an interesting light/shadow look to the legs in the picture.

The two outside, adjacent faces are pillowed while the remaining two are straight and paralell.  Thanks.
 
Back
Top