A quick 4-day in & out. A Georgian-period panelled room.

Joined
Apr 25, 2021
Messages
1,216
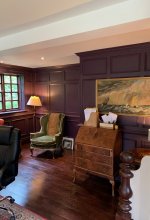
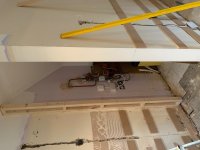
So here's a quick 4-day job for a customer who had recently purchased a rectory (a house occupied by the rector - the local head-honcho priest) built in 1827. Almost nothing of the original interior remained, having been ripped out long ago in the name of 'progress'. She handed me a faded old photo of a similar room and asked me to replicate it. So ......

[attachimg=1]

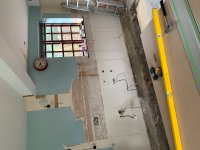
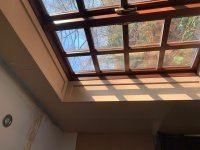
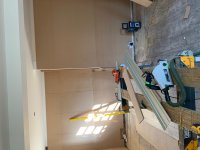
Let's hide all of this. Stage 1 consisted largely of sheeting the walls with 9mm MDF above mid-rail height, and 18mm MDF below it. Panelling in rooms of this period 'stepped out' at waist level, so the deeper sheeting thickness would provide an initial basis for this. The lower sheeting was additionally fixed to 18mm battens to achieve the correct step-out. The sheeting and battens were attached to the walls using cartridge silicone, with a few 16g Paslode gas brads popped in to stop the sheets from slumping whilst the adhesive set.

[attachimg=2]

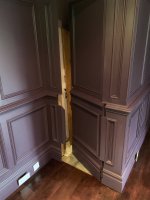
Many rooms of this type incorporated a 'secret door'. These were sometimes used as an escape passage during times of religious persecution, or to hide important stuff away from prying eyes (jewellery/money/beer/hot mistresses/German power tools etc). In this case - the door would do none of the above. She just wanted one because she thought they were cool  :) So a small stud frame was constructed to build out the side which this secret device would close against;

[attachimg=3]

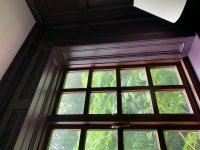
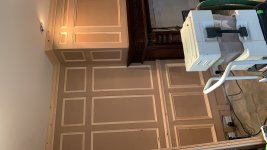
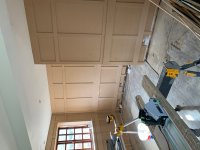
Next job was to cut and install the rails which would form the basis of the panels - 9mm for the uppers and 12mm for the lowers. These were batch-cut with the TS55, and fixed on using Titebond II and 23g headless pins. Minor gaps between rail joints were filled with 2-pack and sanded to 240-grit. Although most of this kind of work gets done using measurements as normal, there's also a substantial proportion of it which has to be designed and built on-the-fly to accommodate obstacles such as windows - all whilst maintaining correct panel spacing and appropriate symmetry. You'll see a lot of this further down the post. The customer had specified heavily-profiled 9" high skirtings (= baseboards), so the bottom rail was positioned so that the amount of rail visible below the midrail would be the same as the amount of rail visible above the skirting once it had been installed. (Forward planning, attention to detail etc. etc). If the above sentence confuses you, you'll see what I'm talking about on the pictures later in the post). The odd vertical pieces at floor level are there to give me something to attach the skirtings to, plus she wanted her fancy new electrical sockets to be fixed and recessed into these;

[attachimg=4]

[attachimg=5]

[attachimg=7]

The pic above [unsure] ........ FOG members with reasonable medium-term memories will maybe remember that I recently ditched my DeWalt DWS780 in favour of a Kapex, with the 780's monumentally hopeless dust collection being the prime mover for the change. What a beautiful machine the Kapex is. But I'm sorry to report that it's also been the single most diva-like, delicate, walking-on-eggshells, unreliable power tool I ever owned (4 x job-halting mechanical/electrical failures inside 6 months along with £££ in lost revenue/delays/rescheduling/hacked-off customers as a result). So the commercial head ruled the hopeful heart and it had to go, along with its enormously clever (but also enormously fragile) saw stand. It's unquestionably the perfect shop rig. But for in-and-out-of the-van-every-day site work? No. It's nowhere near robust enough (and in fairness to Festool, it's maybe not even designed for this kind of work). So I'm back with the old yellow faithful, complete with its hopeless DC - but also complete with its tank-like build and bombproof dependability.

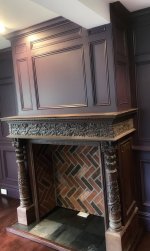
Back on topic - the next stage of the game was to cut and install the mouldings sitting inside the rails.The top ones were fairly standard inside-the-rail jobs, but the lower ones were built using so-called 'bolection mouldings' which are substantially bigger, and which have their top edges rabbeted so that most of the moulding sits recessed in the panel, but the top edge hangs over the face of the rail. The walls were then topped out with large crown mouldings, and various traditional details were added such as double-bead roundovers on all external vertical corners. This pic also shows the magnificent 18th-century carved fireplace surround the customer had acquired from a garage sale for just £100 - with the seller reportedly being 'delighted to see the back of this monstrous carbuncle'. Some folks have all the luck. I built her a fake chimney breast which sat on top of this;

[attachimg=6]

Sorry for the leap forward. Quotations to do, invoices to send etc. You'll now see what I meant earlier about the positioning of the bottom rail. The resulting appearance provides the same visible rail dimension between the top of the skirting and the bottom of the waist rail. Clever, huh? Also - the weird piece of timber scribed to the shape of the stair newel post in one of the pics below forms the basis of the next job I'm doing for her.

Here's the finished result;

[attachimg=8]

[attachimg=9]

[attachimg=10]

And the secret door, still needing a few tiny positioning adjustments and an additional coat of eggshell from the painters. The deep plum colour is very traditional and historically accurate - but admittedly not for me. Almost all of the countless other panelled rooms I've built have all been finished in other paler, traditional colours (French grey or pea green being favourite).

[attachimg=11]

[attachimg=12]

Postscript - it was only on the third build day that the customer finally decided on her flooring. She acquired a pile of reclaimed mahogany floorboards from a salvage yard which were in remarkably good condition. So another two days was spent installing and polishing them.

Kevin
 

Attachments

  • 1.jpg
    1.jpg
    520.7 KB · Views: 576
  • 11.JPG
    11.JPG
    255.9 KB · Views: 510
  • 10.JPG
    10.JPG
    197 KB · Views: 509
  • 8.jpg
    8.jpg
    788.3 KB · Views: 511
  • 7.jpg
    7.jpg
    464.3 KB · Views: 511
  • 9.jpg
    9.jpg
    642.4 KB · Views: 524
  • IMG_1464.jpg
    IMG_1464.jpg
    659.7 KB · Views: 510
  • 6.JPG
    6.JPG
    693.4 KB · Views: 524
  • 4.JPG
    4.JPG
    519.7 KB · Views: 508
  • 5.jpg
    5.jpg
    532.5 KB · Views: 534
  • 2.jpg
    2.jpg
    370.6 KB · Views: 526
  • 3.jpg
    3.jpg
    535.8 KB · Views: 571
A wonderful "work diary" with a very nice result.

I have only one question.
Have noticed in many, many of the UK carpentry videos a major preference to MDF, even some folks "boasting" how the moisture-resistant types are so great etc.

I cannot understand it still - especially given how humid a place the UK seems to be any time I visited.

Context:
Over here MDF is considered the most "garbage" material, possibly worse than laminated chipboard and I do not know anyone who would ever consider using it in carpentry-style jobs like I can see here. It is used for some *super-cheap* industrial cabinetry, some speakers, and that is about it. And this is not because we are rich .. average income is like 1/3 the UK one and material prices are generally comparable.

May it be that while in UK the air is generally pretty humid, there are no big temperature differences (i.e. no -20C over the winter) so moisture condensation is not such a problem over the heating season ?

Just interested, why is it so - is mold really a non-issue in UK climate /assuming the roof is good/ ?
Or is it something else I am missing ?

ADD:
The only thing really bothering me is the ceiling, the built-in 1990s style lights just do not fit in. Shame it could not be re-done in styling corresponding to the walls and the floor.
 
Yep, I fully agree with mino: very nice result indeed! But I also do agree with him regarding the ceiling and lighting. To my tastes it lacks the contemporary feeling you'd expect in such a lovely room.
 
Beautiful work [member=75780]woodbutcherbower[/member] ! My wife would be thrilled if I could complete a project of that size in 4 days.
I read with interest your comments about the DeWalt vs. the Kapex. I have a Kapex and I too have been pleased with the dust collection. I however have mine mounted on a shop mitre station and it doesn't travel. I was curious if you may have seen this video (and product) for DeWalt dust collection at=3s. This fellow used to post often but since coming up with this solution he's gone silent. I wonder if business is too good(?). It's not your specific model but he implies it's adaptable to other DeWalt models. He may have come up with one for your model by now. Anyway you may want to check it out.
Thanks for sharing the project details and the photos.
----
Rich
 
Great job, looks fantastic. Really nice work. Not sure I could see that job with MDF over here. Great finish work by the Painter. Nobody will know just looking at it.
I like the basic ceiling. Ceilings should not draw ones eye. I'm also a big fan of properly sized and placed recessed cans regardless of the room style. When done well they provide lighting and you don't really notice them. Since I'm not an architect I'm not putting 12 6" cans in one room.
Your comment on the Kapex worries me a bit. Budgeting to get a new one soon. My old one was a work horse on job sites. Never a problem or break down. That thing handled being lugged around great. Makes me worry if the bean counters haven't down engineered the new ones. A new Kapex would have to be able to handle job site work.
 
Outstanding work as always!

Very interesting to see the details of the secret door.

The thing that boggles my mind is how did you know where to stop the paneling above the non-existing floor? And what did you do make the late arriving floor boards meet the paneling?
 
Holzhacker said:
Your comment on the Kapex worries me a bit. Budgeting to get a new one soon. My old one was a work horse on job sites. Never a problem or break down. That thing handled being lugged around great. Makes me worry if the bean counters haven't down engineered the new ones. A new Kapex would have to be able to handle job site work.

This may also be a matter of the habits one creates over time of owning and using a tool, and definitely people's differences in what "rough use" entails.  If you had a Kapex in the past and are just looking for a new one, I don't know of any decontenting that has been done over the years; that's actually one thing that Festool is pretty good at, and at least part of the reason why their prices continually rise instead of stay the same.
 
woodbutcherbower said:
The pic above [unsure] ........ FOG members with reasonable medium-term memories will maybe remember that I recently ditched my DeWalt DWS780 in favour of a Kapex, with the 780's monumentally hopeless dust collection being the prime mover for the change. What a beautiful machine the Kapex is. But I'm sorry to report that it's also been the single most diva-like, delicate, walking-on-eggshells, unreliable power tool I ever owned (4 x job-halting mechanical/electrical failures inside 6 months along with £££ in lost revenue/delays/rescheduling/hacked-off customers as a result). So the commercial head ruled the hopeful heart and it had to go, along with its enormously clever (but also enormously fragile) saw stand. It's unquestionably the perfect shop rig. But for in-and-out-of the-van-every-day site work? No. It's nowhere near robust enough (and in fairness to Festool, it's maybe not even designed for this kind of work). So I'm back with the old yellow faithful, complete with its hopeless DC - but also complete with its tank-like build and bombproof dependability.

Kevin

First off, fantastic job, (as expected) but I have to say I wasn't expecting that color. Of course, I have no idea what traditional UK interior finishings would be.
The amount of electrical outlets surprises me too. That is certainly not period correct. Is it mandated by modern regulations?
My house is far newer, but still nearly 100 years old, and when I did the major remodel (2006) it had to be updated. All of the rooms have a centrally located ceiling light and had minimal outlets. Now there are far more of them and legally located/spaced.

As far as MDF, it is used quite a bit here too, because it takes paint so well.
That big job that I have been working on intermittently, since early winter has an entire room (lounge) that is covered in MDF panels that I made, in the shop. It was all primed, then painted in the field. The moulding is less detailed though, just square. I don't have any pics, but I have seen a couple. It is also a color I wouldn't expect, medium blue. Again, historical building, being restored. (1850s) This job is way behind (on site) and should have already been done.

Kapex. I have been wondering how it was working out for you Kevin. I was cautioned/advised against it, by the dealer I would have been buying from. He said that it may not stand up to the kind of use that it would see from me. I was surprised, but listened, and went back to the DeWalt 10" slider I had before.
He said that commercial shops usually do way more repetitive cutting than the Kapex would stand for.
That and my personal preference for a horizontal handle, made me stay with what was proven to me.
(the devil you know, I guess) The DeWalt had always worked fine, but the dust extraction was basically non-existent, and it takes a ton of space. That's why I switched to Makita. I did that mostly for a smaller footprint and was happily surprised at is extraction capability.

Four days is absolutely impressive, especially adding the detail of the secret room.
 
Thankyou as always, guys. Such kind words really mean a lot coming from fellow woodworkers - and I'm glad my project posts always seem to hit the spot. A few answers to some questions;

1 - MDF. I don't know if it's only applicable to the UK and maybe Europe - but over here it comes in six different grades, ranging from carcassing grade (a smooth & flat surface, but nasty, furry cut edges) through to hugely dense furniture grade (Medite). This is a different beast altogether, and it cuts/machines superbly well, with no priming needed on cut edges. There's also Tricoya - an acetylated product which is 100% waterproof and can be used outdoors. As CRG has said - for a job like this it's the ideal material because it takes paint so well - the photos don't really do the flawless paintjob justice. Above all though - MDF doesn't expand, contract, warp, twist, cup, bow, shake or split. It doesn't have knots, there are no unexpected stresses to relieve when you cut it, there's zero prep required ...... the list is a long one.

2 - Ceiling & lights. It wouldn't have been my choice, either. But they were already there, and I never pass judgement on a customer's taste or decision-making. But I very often get asked for my opinion - and I'll give it honestly with some words of explanation as to why I've said what I've said. I'll usually also pull up a bunch of photos on my phone to show a customer just how great something would look if they followed my advice [big grin] In this case - no opinion was sought, so my mouth remained professionally shut.

3 - Lower rail height positioning when future floor thickness is unknown. She had already talked about using salvaged floorboards, but she wasn't exactly sure of what she wanted. So in this case - the usual thickness of an old floorboard is around an inch, so that's how the rail was set. But if her flooring had been thinner? Two solutions - a) overboard the existing surface with the appropriate thickness of plywood to raise it before the final flooring goes down, or b) conceal any gap at the bottom of the skirtings by using quadrant mouldings or similar which are then painted and look just like part of the skirtings. You'll notice that I pull the same dimensional trick on the top rail - cutting it wider so that the visible part under the crown moulding is the same as everywhere else. See the photo below. You'll already have figured that I've built these panelled rooms countless times before  [cool] 

4 - Electrical outlets. Yeah, there were a lot. This was originally two rooms, however (see the boxed-in steel girder running across the ceiling) so there was double the usual quantity, running on two seperate circuits from the breaker board. She chose dark nickel-plated sockets though, and these were way less obtrusive that the white plastic ones still present when the job was being done. Plus - she likes lamps. Lots of lamps. They all have to be powered from somewhere, so she was happy.

5 - Kapex. This was most definitely not a case of rough handing or tool abuse - I just don't do stuff like that. When your livelihood depends on your tools, they're always treated with the appropriate care and respect. So I'd mention that the first failure (a jammed bevel adjuster) happened only three days in, and the second (a failed trigger switch) happened after two weeks. I was gutted to be honest - I paid an awful lot of money for the saw & stand, and I had very high hopes for it. Maybe I just got unlucky. But in my position, unreliable tools simply aren't an option - and after the 4th breakdown, it just had to go. The upside, however, was that I got back 85% of what I'd paid for it thanks to Festool's outstanding ability to hold value. 

6 - The 'show me the fireplace' request. I quickly glossed over this because I had a pile of paperwork to do last night. She already had this, so my first actual task was to build a rectangular frame and pour a sand/cement mix into it to create a hearth for the fire surround to stand on. Once set, the frame was removed leaving a cement hearth. She also had some rough slate tiles which she wanted to use as a base, so I laid these for her as well. Discussions about ceilings, lighting, paint colours etc? One of the slates was a totally different colour to the others, but she specifically asked me to use it  [eek] The final thing to mention was that she wanted the inner faces to be brick, in a herringbone pattern - so I made these as well (although not in the 4-day slot - it was done on a Sunday (my day off supposedly) and installed one evening. Brick slips glued to plywood using CT1 grab adhesive, and pointed using sand & cement. So here it is - once again ready for its final paint coat. I hate that steel girder ....

[attachimg=1]

I think the above just about answers everything. Thanks again to all who have taken time out of your day to reply.

Kevin


Attachments

  • IMG_2018-compressed.JPG
    IMG_2018-compressed.JPG
    219.5 KB · Views: 405
Fantastic work, thanks for documenting. This is exactly the type of job that MDF is perfect for, I find it a bit puzzling that it still has a 'bad reputation'. A side note, I'm old enough to remember when there was an advertising blitz on TV for MDF down here in Australia, in the 80's, with Edward Woodward featuring. ('Craftwood' is a brand name)
=UODTiYvetII24Gyj
 
My local lumber supplier stopped carrying MDF.  He said he could not make money on it since he would have to compete with Lowes and Home Depot.

Lowes and Home Depot used to sell MDF with a smooth calendared surface front and back.  You could paint over either surface without raising the grain.

Since Covid, they are selling MDF with a rougher surface that needs to be sanded and sealed with shellac before painting.  A problem because I mainly spray Advance (Benjamin Moore) and Advance has not sprayed well over shellac.  So, I would have to spray shellac, then spray primer, the spray Advance twice. 

Which is a pity, because I liked MDF for center panels on Shaker doors.
 
Stunning Kevin... I love the finished work but I'm more interested with the time-line, was all of that carpentry work the result of a single carpenter?
I'm just curious, did you have any assistance in producing this result? For me to produce those same results single handedly, it would be at least a 2 week project.

I also love the secret door...I'd love to see more details.  [smile]

I'm also very impressed with the paint work...those folks know their craft.
 
[member=44099]Cheese[/member] Thanks buddy. Apart from the yard delivery guy helping me to unload all of the materials into the customer’s house the day before the job started - it was just me on my lonesome. It’s that way for maybe 90% of the time, and I’ll only draft in some help when there’s heavy lifting involved (huge oak doors, kitchen countertops etc).

I’m pretty sure that any three-decades-plus pro will tell you all about the methods they’ve learned over the years to complete projects in short timescales and to a level of quality. And you’re right - the first 5-6 of these rooms I built maybe 25-30 years ago did take 2 weeks - more so for bigger ones. But looking back - probably more than half of that time was spent figuring out how to do it - and constantly having to re-do things because I’d screwed up. But once you develop your own ‘system’ and you have the experience, you can look at a job at quotation stage - and you immediately know exactly how you’re going to build it. And how long it will take.

Some of it comes with the experience of early mistakes I made (not cutting a wider top rail to accommodate the crown, incorrect positioning of the bottom rail etc. both as described above) - but the absolute key to speed (specific to a panelling job) is batch cutting. What I’m referring to is critically accurate positioning of the rails on the wall (including dead-square corners) and ensuring that each group of adjacent panels is exactly the same size - meaning that all of the mitred mouldings can then be batch-cut using a stop on the saw, rather than having to goof around measuring every piece individually. I can stand at the saw and knock out 50-60 pieces an hour. It’s probably many more than this actually, once Im set up and in the zone - I’ve never counted. For sections having a different dimension, the first two are measured (vertical + horizontal) and test-fitted to ensure a snug fit, the stop gets moved, and the next few dozen get done.

The second key to speed is pre-assembly. Once a set of mouldings is cut for a particular group of panels, they’re pre-glued using a 2-pack instant-set cyano (exactly like making a bunch of picture frames). This means super-tight mitre joints, but it also means only one walk over to a wall section to fix on the little pile of assembled and glued-up rectangles, rather than many trips backwards-and-forwards. It’s quite incredible just how much time this saves.

The final thing to add is that I get to a job at maybe 7am and I don’t stop. No coffee breaks, no lunch breaks, just concentrated application of effort. I’ve always worked this way, sipping coffee from a Thermos, eating a sandwich on the hoof, and I usually work a 10-hour day. The only time I’ll ever stop early is when tiredness kicks in and I realise I’m starting to get sloppy.

As for the secret door - it’s all about where you split it to make it as invisible as possible. If you zoom in, you’ll see panels tucking in behind mouldings, all sorts. The first few I ever did took me about three days each. This one was around 5 hours. It’s built as one solid lump just like a regular door, and hung from the rear on three adjustable strap hinges so nothing’s visible from the front. Folks inevitably also placed a piece of furniture in front of these doors to completely hide them.

There’s much more - but you get the picture. One other point (the commercial one) is that if I’m quoting £x for a job and I get it done in half the time = I’m doubling my daily earnings. I hope this small glimpse into WBB-world helps. Postscript - the painter (Joe) is 76 and I’ve known him since forever. He’s pretty much retired but he’ll still come out and do jobs like this for me - It gets me out of the house and away from the Mrs …” He never delivers anything other than a perfect job, and he’s the only guy I’ve ever met who can paint a laser-straight line without using masking tape. A true old-school master of his craft.

Kevin
 
I honestly don't know why MDF has such a bad reputation, among some people anyway. It just requires some special considerations, such a screw holding. It can bend, if stored improperly, but that's not the material's fault. Besides, the same thing can happen to real wood.
We don't have as many variations as Kevin said they do in the UK. Apart from the "normal" stuff, there is a moisture resistant and an "ultra-light". There are some color-core versions too, but I am certainly not well versed enough to know if those variations can be combined? (like MR plus color, or UL plus color?)

All of the doors in the kitchen I built for my daughter are MDF. The rails/styles are 3/4" and the flat panels 1/4". I did that for a couple of reasons, not the least of which is they stay flat. I have had Poplar framed doors bow or twist on me, after initially looking fine. It's a risk that I wasn't willing to take.
The other big advantage is that you have no concern about chip out or splintering.

As Kevin said, a lot of the speed that can be developed in doing commercial work is in repetition. It's not necessarily exactly the same, but a technique/mind-set thing.
 
Why does MDF have a bad reputation or stigma?
Here's my take.

In the upper bracket world, as in the posted job site, there is less of a stigma because MDF gets used in appropriate locations. Think, how much water exposure is that room going to get.

In the normal world, i.e. non upper bracket and blue collar, MDF gets used all over the place in room and wall locations it really shouldn't get used. It gets hit with water, blows up, crumbles apart, swells, etc. and homeowners are pissed.
And of course the average homeowner isn't differentiating whether its MDF, particle board or other type of sawdust panel.
 
Holzhacker said:
Why does MDF have a bad reputation or stigma?
Here's my take.

In the upper bracket world, as in the posted job site, there is less of a stigma because MDF gets used in appropriate locations. Think, how much water exposure is that room going to get.

In the normal world, i.e. non upper bracket and blue collar, MDF gets used all over the place in room and wall locations it really shouldn't get used. It gets hit with water, blows up, crumbles apart, swells, etc. and homeowners are ticked.
And of course the average homeowner isn't differentiating whether its MDF, particle board or other type of sawdust panel.

You're obviously quite right and I don't disagree with a single word you said. To me - this represents the same old 'Joe Public vs. The-Guy-Who-Understands-Material-Limitations' scenario. It's the same deal as when homeowners buy power tools. How many of them will ever even have heard of Festool? or Hilti? Or Lamello? Or Mafell? My guess would be 1% or less. And they'll baulk when the see the prices we pay for quality tools, because to them - £49 represents a fortune for a tool which will come out of the garage once every two years when a shelf needs putting up. As I said earlier - six grades in the UK, plus several additional specialist grades such as Tricoya. Largely meaningless to homeowners though. To them - MDF is MDF, just as you say.

Just as wood is wood. Right? I wonder if they'd pay extra for MDF which carries a 50-year warranty above ground when used outside, and even a 25-year warranty when used below ground? Probably not.
https://tricoya.com/


Back
Top