A simple jig for cutting tapered legs with a TS55

Roseland

Member
Joined
Aug 16, 2009
Messages
684
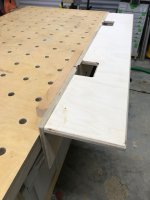
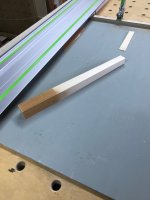
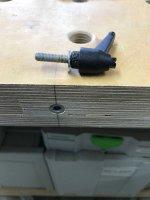
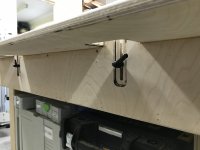
Whilst my MFT is very useful, I haven't found a way to cut tapered table legs easily on it.  So for my other workbench I made a simple jig.  It is essentially just an L-shaped bracket, 7 inches x 7 inches by 4 feet long, that attaches to the vertical side of the bench with screw-in inserts and clamping handles:
View attachment 1

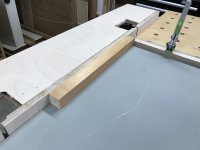
I put a sacrificial board under the leg, clamp a batten as a stop, and then adjust the height of the jig to match the top of the leg to be cut::
View attachment 2

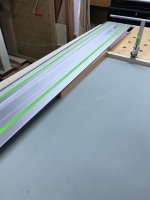
I then clamp the rail, and make the first cut:
View attachment 3

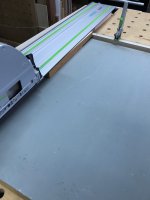
Finally I use the offcut to wedge the leg for the second cut:
View attachment 4

And then the leg is finished!
View attachment 5

It's also useful for cutting thin stock, like hardwood lipping.

Andrew
 

Attachments

  • IMG_1298.jpg
    IMG_1298.jpg
    736.1 KB · Views: 1,121
  • IMG_1299.jpg
    IMG_1299.jpg
    713.4 KB · Views: 1,203
  • IMG_1300.jpg
    IMG_1300.jpg
    654.5 KB · Views: 937
  • IMG_1302.jpg
    IMG_1302.jpg
    627.8 KB · Views: 887
  • IMG_1303.jpg
    IMG_1303.jpg
    657.1 KB · Views: 908
I was just pondering how to make some short tapered legs without a tablesaw... and here you are with an answer. Spooky!

So have a big thanks, and, as I have no shame, I'll be pinching your idea forthwith.
 
Wow Andrew! I’ve been reading FOG since it was a Yahoo user group and this is the first time I’ve seen a height adjustable guide rail support.

Great idea! Can you post a photo of how the L platform is clamped to the table frame?
 
I just screwed two 6mm (1/4 inch) threaded inserts into the side of my bench, which is 2 inches thick:

View attachment 1

The threaded section on the handles was only 1 inch long, and the ply was 3/4 inch.  I wanted more than 1/4 inch engagement, so I made a groove for the handle to run in.  I'm going to get some penny washers, but for now I just had standard washers:

View attachment 2

I hope this explains it adequately.

The L section is just Dominoed and Titebonded together.

Andrew
 

Attachments

  • IMG_1306.jpg
    IMG_1306.jpg
    1.1 MB · Views: 551
  • IMG_1308.jpg
    IMG_1308.jpg
    718.7 KB · Views: 740
This is brilliant, Andrew.  I love the simplicity of it. Thanks so much for posting.
 
Thanks for sharing your idea!
I have some furniture builds coming up and that post is inspiration for me to try tapered instead of square legs.

With the profile on the side of the MFT we could use that same type of rail support you made and clamp it to the side of the table.
Looks like a great solution for narrow and/or thick stock.
 
My original plan was to make it fit my MFT, but I also wanted to be able to cut longer strips for lipping ply, so I made it 4 feet long (and so too wide for the MFT).

Andrew
 
Why can't you do the same operation with the standard MFT rail setup? It can be tilted front to back. There are 4 legs to make, so you can use identical piece as a spacer under t-track edge of the rail.
 
That works if you have another piece of wood, exactly the same thickness, to support the side of the rail away from the cut, to stop the rail twisting.

But otherwise if you are cutting slender legs, or cutting thin strips for lipping, you rely on the torsional stiffness of the rail between the front and rear brackets.

This method supports the full width of the rail, either on the jig or on the wood being cut, so you get a truly square cut. 

It also enable one to cut longer lengths than will go front to back on an MFT.  I originally designed it for cutting hardwood strips for lipping ply, and those are typically three feet long or more.  This jig is four feet long, but it could be any length.

Andrew
 
I'm with ya, Roseland. 
The MFT rail setup works fine for sheet goods, but has a lot of limitations for lumber(and length).
 
This is brilliant!

I just started working on a small table and was thinking about edge jointing a few relatively narrow pieces without firing up my jointer. I'm definitely building a copy of this, thank you for sharing!
 
Back
Top