Adding color to Epoxy filler

ear3

Member
Joined
Jul 24, 2014
Messages
4,341
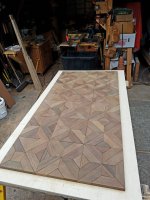
I'm doing a desk for my new office, and am utilizing a tile pattern made from Ipe off cuts like I did for a series of tables for a Japanese restaurant over the winter. With those, I found that wood movement ended up cracking the wood filler I initially used, so I switched over to a more flexible sealer type filler. This eventually did the trick, but it took a bunch of applications to achieve.

This time around I chamfered all the tiles to get an even "grout" line.  I'm also not going to screw around with filler, and am using the west system epoxy. I haven't decided whether I will add color or just keep it clear, but I'm wondering what are some good products to dye the filler with.

I experimented with a couple of powders I got off amazon, but haven't been happy so far with the results. I even tried mixing in some fine ipe sawdust, but found that clogged the syringe I have to use in a couple of spots to get the filler all the way in the crack.

Any advice would be appreciated.
 

Attachments

  • IMG_20180622_165321.jpg
    IMG_20180622_165321.jpg
    543.4 KB · Views: 574
  • IMG_20180622_165344.jpg
    IMG_20180622_165344.jpg
    370.4 KB · Views: 580
Trans Tint and Mixol make liquid dyes that may work. Woodcraft sells both both of them. 
 
West Marine sells  tubes of resin colouring agents in 6 primary colours. If you can mix or understand colour theory you should be able to get the colour you want.
I have used them and they work well. Mixol works too.
Tim
 
System 3 makes good colors - a small drop is all you need for a decent batch of epoxy. You can customize the color mixing different ones. Amazon carries them all.
 
That looks gorgeous already! Can't wait to see if after you done the joints.
Years ago I was on site and a builder said you can always tell a good tiler cause it'll look good even before its grouted. The tiler was doing a very complex layout and it looked amazing with tile spacers sticking out (he use to remove them before grout) This reminds me of that [emoji41]

Sent from my SM-G900F using Tapatalk

 
Thanks for the comments. I'm trying Transtint first -- bottle already arrived via 1 day shipping, and now I'm riding to figure out ratios, as there is nothing on their data sheet about how much to add for epoxy fillers.

Any tips?
 
I used the West System epoxy with the dark walnut Transtint to fill knot holes and splits in a white oak wood floor I put down.  It worked very very well.

I used the West System 300 mini pumps, 2 pumps of resin with 2 pumps of hardener which is 1.6 fl oz, with just a drop of Transtint.  With just that drop the expoxy / tint mixture was still very dark which is what I wanted.  But it does not take much dye at all to tint the epoxy.  You’ll have to experiment some to get what you want, but go with a drop at a time of Transtint to get the color you are after.

This is what it looks like before and after sanding followed by Osmo.


Attachments

  • D2E8B5CB-396F-4386-9388-9B361EC5117C.jpeg
    D2E8B5CB-396F-4386-9388-9B361EC5117C.jpeg
    763.9 KB · Views: 589
Not sure how you’re applying epoxy, taking it all apart and gluing or just applying with syringe already assembled.  West Systems makes G/flex which has a bit of give to it which might work better than their 105.  Also you can heat it up whatever epoxy you use a bit with a heat gun so it flows easier if you’re just using a syringe.  Heating the wood right before applying also helps flow and absorption. I’ve used the black West Marine tint in a tube and as others have said, it doesn’t take much, just a drop or two.
 
That floor looks great [member=8008]tjskinny[/member] .  From what I'm gathering a little tint goes a long way, and because it will be nestled in the cracks, there's no need for it to be completely opaque to get the desired effect.  I just found this short video demonstration that makes it look pretty straightforward:


[member=66704]Koamolly[/member] The ipe tiles are already set in place, so I'm filling it already assembled.  I guess I can try keeping a hairdryer running on the pot as I work.  I plan on mixing up a series of small batches as I go, rather than one or two big batches.  The West System pre-portioned pumps makes it all pretty simple.
 
Warm the epoxy on the material.. heating the pot will make it go off quicker and you’ll have to mix another batch
 
Hey [member=8008]tjskinny[/member] , curious what grade of white oak you used for the floor. The floor looks great by the way. [big grin]

Hey Edward, I'm assuming the tiles are 3/4" thick so that's a pretty deep trench to fill. I'd do it in 3-4 batches. Keep the syringe close to the level of the fill to prevent additional air bubbles from forming.

The air bubbles will rise to the surface on each pour which is fine. On the final pour however, the air bubbles will need to be popped either with an object or with heat. I've tried both and find that using a needle is a more messy proposition but good for the first series of air bubbles when the epoxy is still very runny. As the epoxy starts to thicken, then the needle will not break the surface tension of the epoxy and some heat is needed. I use a Mapp/propane torch.

Those air bubbles will keep coming for 15-20 minutes so you need to keep checking the progress. It's likely that when you're finished and you're sanding the epoxy, there may be a couple of air bubbles that you missed, which will leave little craters. Just mix some more epoxy and overfill the craters. After sanding, everything will blend in and appear to be a contiguous surface.

Have fun... [big grin]

 
Thanks [member=37411]ear3[/member] and [member=44099]Cheese[/member], 

Now that video would have been handy..

Good point on the bubbles.  Depending on the size of the knot, I did have to make up to 3 pours so the bubbles didn’t form and get “ trapped”.  Not saying it didn’t happen a couple of times..  ::)

The flooring was #2 character grade.

Look forward to seeing your finished desk.
 
Can’t add links from iPad...

So, google search Robb White’s epoxy trick and the top result among the Wooden boat forum results will take you to a thread discussing how Mr. White applied epoxy to get exceptional filling and minimize bubbles on large complex forms.

Reply #13 is the best.
 
Thanks Cheese but that’s not the thread I was aiming for so here’s the reply that has the concise info.

“Rob totally encapsulated his popular with epoxy by heating the shop and wood quite a bit then cooling it off after the epoxy was on, which he claimed helped the epoxy be drawn into the wood. It worked for him, but I've not seen others use this technique.
Actually his method is the preferred method by Gougeon Bros. and has been the only acceptable method for aircraft composites including with wood since the 50s.

The main reason is bubbles greatly detract from the structural strength and are unpredictable. From my growing up with dad and the others at Kaman and Dad's original research at NACA (the NASA precursor) in rotor tips going supersonic in a helicopter dive (circa 1950-51) such uncontrolable variance was totally unacceptable. Don't forget that Robb had a PHD level education and never stopped learning. He often hid his level of education under his homespun sense of humor. I miss him too gang. He got into epoxies and read up all about them and the best ways to use them. Smart man. Any rise in temperature after putting on the epoxy will, WILL, cause outgassing. Outgassing will cause bubbles which are not controlable and will weaken your composite.

When I repair (3 times now) and old plywood ChrisCraft or cold molded Wolverine that has delaminated I always heat the section with a heat gun just before putting the epoxy in to the delam section with a glue hypodermic and then turn on the vacuum. Then you let it cool as it cures. Never add heat to a two part epoxy to make it cure faster..or you will get half the strength or less.

I'll try and post some pictures I have of the ChrisCraft Cavalier I saved the topsides on when it was delam inside and out.

Chase
Last edited by ChaseKenyon; 04-05-2009 at 11:21 PM.”
 
Back
Top