Going to be building my first workbench. I love the functionality of the MFT as far as compatibility with my TS60, but it just isn’t sturdy or large enough for some of the things I’d like to do. Before I settled on a workbench design, I wanted to ask if anyone has successfully added MFT functions to an otherwise standard bench? I had been thinking something along the lines of drilling 20mm holes in the top using a 3D printed jig and attaching a compatible extruded aluminum rail along front and back edges to use sourced Festool / third party hardware for crosscuts with. No idea how feasible, expensive, or accurate this would wind up being though. Any feedback or tips would be immensely helpful.
You are using an out of date browser. It may not display this or other websites correctly.
You should upgrade or use an alternative browser.
You should upgrade or use an alternative browser.
Adding MFT capabilities to non-MFT bench?
- Thread starter camhabib
- Start date
We are many, who have made our own MFT-style table tops. If that top happens to be the top of a traditional workbench, you can of course also do that.
However, you should be aware that your clamping options will be affected by the thickness of the table top:
However, you should be aware that your clamping options will be affected by the thickness of the table top:
- Bench dogs will work equally well in a thicker top.
- A holdfast'ish clamp like the Festool MFT-HZ 80 will probably work even better in a thicker top.
- A normal Festool rail clamp used upside-down, for example the FSZ 120 or its FS-HZ 160 ratchet cousin, will start giving problems around a thickness of 25 mm.
- Attachment, which rely on bolting from the underside, can also give problems. Those are pretty rare anyway, so I would not be too concerned about that.
Vondawg
Member
You’ll get plenty advice but don’t forget to take advantage of the great search tab here. many have posted about their bench w/pics. Lots have gone the”hybrid” bench way…for a good solid bench yet being able to use dogs,(and where not to place them) and other offerings…to aline, clamp in the middle, and more. To use Festool like clamps you have to be aware of the thickness to get the clamp thru but the holes can be rounded over from the bottom to make it work Edit: as Allano stated) or a clamp that comes apart…again many examples in past posts
Jim_in_PA
Member
- Joined
- Nov 23, 2017
- Messages
- 600
All my benches are set up for the 96mm array of 20mm dog holes including my main bench. That one is hybrid so I can used my beloved Gramercy hold-fasts which require .75" dog holes through much thicker material. So the "field" of the 20mm holes in the cherry area is about 22mm thick and the .75" holes are in purpleheart strips that are about 100mm thick. This was all done on my CNC, although the deeper holes for the holdfasts were competed manually with a spade drill bit.


- Joined
- Oct 16, 2015
- Messages
- 5,820
I have used a full 4' x 8' table of grid holes for more than 10 years, can highly recommend. However, I don't bother with the extrusion aspect of the system. I use bench dogs in the grid for squaring cuts and all of the other accessories that work with the holes. As Jim mentioned, thickness can matter, but really only with the rail clamps. I made that mistake on my first big table, using a piece of 1.125" thick MDF. I had to use a chamfer bit, on the bottom, to get them in. It did work though, I used it for years, until a fire took it out. The thicker top always felt more solid/stable.
Now, I have a much more normal 3/4" MDF.
Now, I have a much more normal 3/4" MDF.
luvmytoolz
Member
@Jim_in_PA That's one beautiful work bench! The Purpleheart looks sensational!
Hipplewm
Member
So much this - I went to a grid/torsion box setup, just so my top could be 3/4 MDF with black formica covering - 20mm dog holes spaced 96mm in a horseshoe shapeWe are many, who have made our own MFT-style table tops. If that top happens to be the top of a traditional workbench, you can of course also do that.
However, you should be aware that your clamping options will be affected by the thickness of the table top:
The problem with the rail clamps is because you can't insert them from above through a long hole and get them twisted around. For a slightly thicker top (perhaps up to 35-40 mm?) you can solve that by beveling the holes on the underside. But if you are thinking about a traditional woodworking workbench with a 75-100 mm thick top, that will not work.
- Bench dogs will work equally well in a thicker top.
- A holdfast'ish clamp like the Festool MFT-HZ 80 will probably work even better in a thicker top.
- A normal Festool rail clamp used upside-down, for example the FSZ 120 or its FS-HZ 160 ratchet cousin, will start giving problems around a thickness of 25 mm.
- Attachment, which rely on bolting from the underside, can also give problems. Those are pretty rare anyway, so I would not be too concerned about that.
The ability to use those speed clamps is next level stupid easy. You can use the cheapies from powertec as well (haven't tried the straight chinesium ones, but they are only marginally cheaper than the chinese powertec ones)
The torsion box won't interfere with you clamps as long as you put the material between the holes and you can twist them 90deg in a few spots, but in reality 88.98% of the time it is a non issues
Steve1
Member
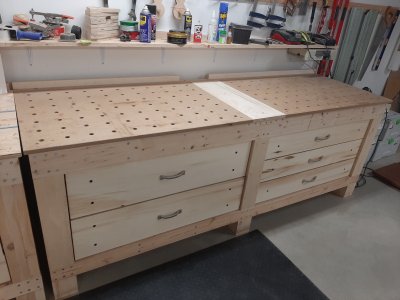
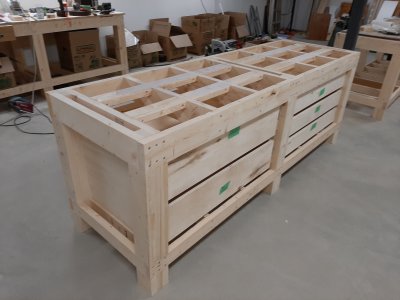
This is my workbench with MFT top.
Two standard Festool tops fit just about perfect for an 8' long benchtop. The center flat pad is replaceable and is intended to allow putting a flip down track rail. (But I never did add the rail)
I was extra careful to keep the support structure flat, so this is also my "assembly table"
If you are putting drawers underneath like me, don't forget to put a removable "dust pan" sheet under the top to catch stuff that falls through the holes.
Attachments
Cheese
Member
Hey @Jim_in_PA and @Steve1 those are 2 great looking benches. ") Completely different from each other but both are done well and are super functional.
Completely different from each other but both are done well and are super functional. ") They make me embarrassed to show the photos of mine.
They make me embarrassed to show the photos of mine.
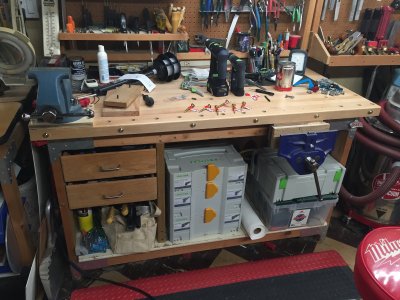
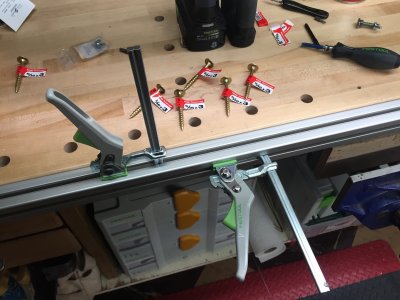
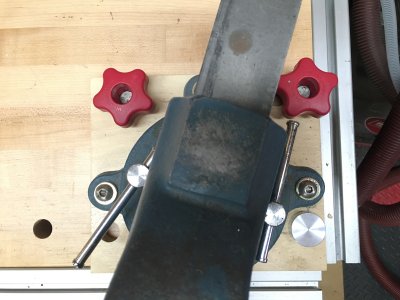
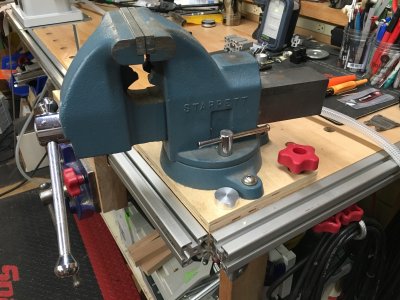
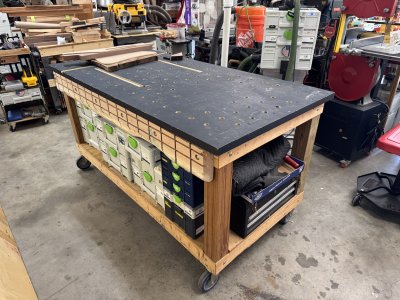
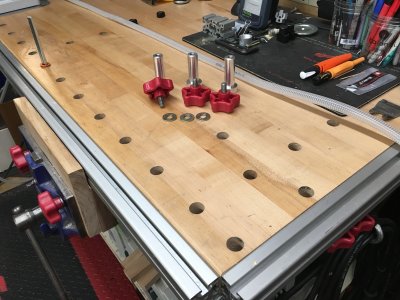
This bench was just cobbled together using 2x materials and Simpson metal connectors. At somewhere in the journey, I added a 1-3/4" thick maple top, some 8020 to the front & sides for clamping purposes and a 40# Starrett vise that can be mounted on either end of the bench. Moving the vise is easy as it's attached with only 3 each 20mm aluminum pins. The vise had to be secured to the top extremely well as it's used to hold the occasional automotive transmission or motorcycle engine/transmission.
Completely different from each other but both are done well and are super functional. They make me embarrassed to show the photos of mine.This bench was just cobbled together using 2x materials and Simpson metal connectors. At somewhere in the journey, I added a 1-3/4" thick maple top, some 8020 to the front & sides for clamping purposes and a 40# Starrett vise that can be mounted on either end of the bench. Moving the vise is easy as it's attached with only 3 each 20mm aluminum pins. The vise had to be secured to the top extremely well as it's used to hold the occasional automotive transmission or motorcycle engine/transmission.
Attachments


Jim_in_PA
Member
- Joined
- Nov 23, 2017
- Messages
- 600
Benches are very personal things, Cheese, but they are also wonderfully adaptable to meet personal expectations. As I noted relative to mine, I needed to satisfy two essentials: continued use of my Gramercy holdfasts which I use a lot more than I ever expected and also "the grid" which I enjoy the endless possibilities of other kinds of work holding. The "solid" end also works well when "banging" on things. I should also note that that specific bench is on a Noden Adjust-A-Bench base which means it's also height adjustable. That can also be a blessing.
onocoffee
Member
Mine is a bench I built way back in the late 90s with two sheets of 3/4" ply, long before I knew anything about all this. Last year, I decided to refresh the bench and used the hybrid bench Denis from Hooked On Wood as inspiration.
Since it was old and well used, I cleaned it up, bondo-ed parts of it and gave it a couple coats of primer before laying out the 96x20mm grid by hand. It's a painstaking job prone to errors (I restarted twice) - especially when laying out 96 holes. Then I drilled each one using a 20mm Fisch Forstner bit with the CXS12 and the Milescraft drill guide. If you decide to go this route, take your time. I had moments of impatience and some of the holes ended up not at a true 90 degree bore. Perhaps not a big deal if you're drilling 3/4" tops, but on the 1.5" top I had to go back later and bore some of the holes more to get the different clamps to fit properly.
The thicker top gives me more stability and rigidity but it also means I cannot use some of the bench dogs and clamps that you can with a 3/4" top. Mostly, I use UJK bench dogs, UJK locking bench dogs (just got a pair of the new Wood River Locking Mutt dogs and they're pretty good), Festool MFT SP clamp, MFT HZ 80 (I use these a lot), and the Bessey KLI20-MFT clamps.
Attachments
Nice vice setup. The purpose of the 8020 is only for clamp support? How is the 8020 attached to the table top? And looks like you can remove it if you want? I happen to have some 8020.Hey @Jim_in_PA and @Steve1 those are 2 great looking benches.
This bench was just cobbled together using 2x materials and Simpson metal connectors. At somewhere in the journey, I added a 1-3/4" thick maple top, some 8020 to the front & sides for clamping purposes and a 40# Starrett vise that can be mounted on either end of the bench. Moving the vise is easy as it's attached with only 3 each 20mm aluminum pins. The vise had to be secured to the top extremely well as it's used to hold the occasional automotive transmission or motorcycle engine/transmission.
manwithtools
Member
- Joined
- Jun 9, 2019
- Messages
- 2
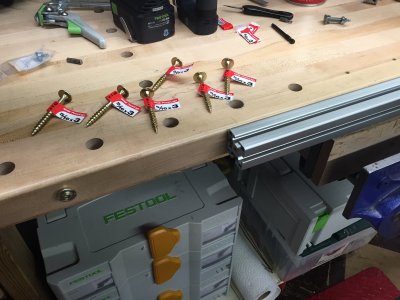
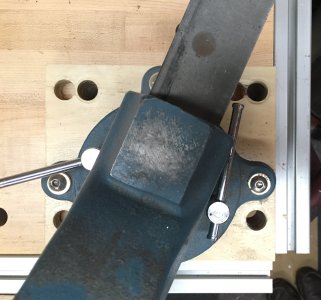
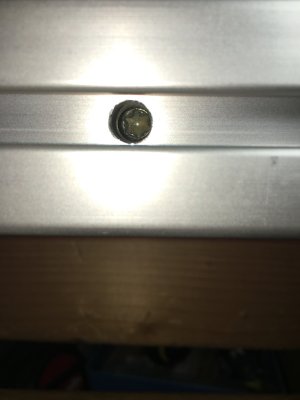
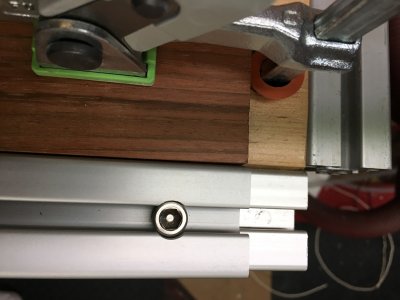
It looks like the 80/20 is secured to the table top with the Spax 5/16 x 3 Structural screws shown in this pictureHow is the 8020 attached to the table top?

The 80/20 slides over the screw heads and then the screws are tightened via holes drilled thru the center of the extrusion allowing a Torx bit to access the screw heads.
Cheese
Member
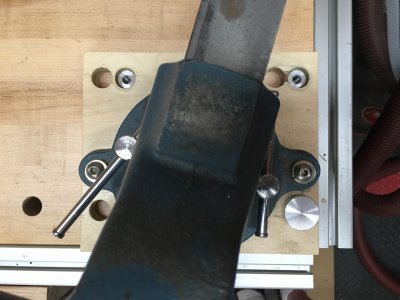
Correct, here's a shot of the thru-holes used to tighten the Spax fasteners.It looks like the 80/20 is secured to the table top with the Spax 5/16 x 3 Structural screws shown in this picture
View attachment 378994
The 80/20 slides over the screw heads and then the screws are tightened via holes drilled thru the center of the extrusion allowing a Torx bit to access the screw heads.
Attachments
Last edited:
Cheese
Member
Thanks...it's pretty handy to be able to move a large vise easily from end to end or to remove it completely from the bench when needed using just 3 knobs.Nice vice setup. The purpose of the 8020 is only for clamp support? How is the 8020 attached to the table top? And looks like you can remove it if you want? I happen to have some 8020.
The original purpose of the 8020 perimeter was for clamping purposes but over time it's also come in handy for holding material stops using various 8020 pieces.
In one case I needed a full length stop across the front of the bench so an additional length of 8020 was simply bolted to the 8020 front perimeter.
In other cases a simple piece of 8020 angle can be positioned on the perimeter and used as a stop or as a guide.
Attachments
Similar threads
- Replies
- 58
- Views
- 3K
- Replies
- 24
- Views
- 27K
- Replies
- 2
- Views
- 1K
- Replies
- 11
- Views
- 21K